This feature is available exclusively for Advanced plan subscribers.
The Green Screen feature allows you and your clients to change the background color or background image applied to photos in your Zenfolio account.
With this feature, you can upload an image with the background of the subject cutout and change what is displayed in the background. When the background is changed, the image will be displayed in the site with the new background.
When clients order prints and downloads of the images, the image that the client will receive will have the custom background applied to the image.
Transparent Cutout Images
To use the green screen feature, you'll need to upload cutout photos that are saved in the PNG format.
The background will appear in the transparent parts of the image behind the cutout of the subject.
Most photographers that use this feature create the images by taking photos of the subject in front of a green backdrop. They then use chroma keying to remove the backdrop from the image, leaving them with an image that only contains the subject with a transparent layer behind the subject that can be replaced with a different background image.
Please note that this feature only works with images saved in the PNG format.
What does your Account look like?
Original Photos Page: How to Upload and Create Your Own Backgrounds
Before the green screen feature can be used, you'll need to create the backgrounds that will appear behind the images.
There are a few built in backgrounds provided but you can also upload your own custom image to use as the background. The recommended size for the custom background image is 2800 x 2600 pixels.
To create the background, follow these steps:
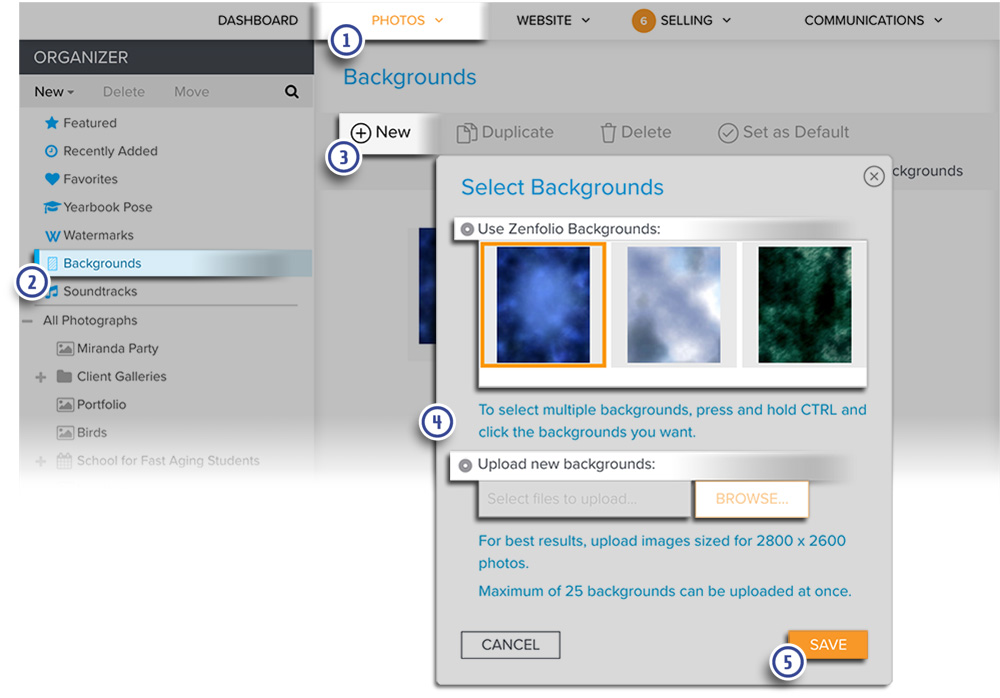
- In your account, click on Photos in the menu across the top.
- Click on Backgrounds under the Organizer column.
- Click on ⊕ New.
- Choose Use Zenfolio Background to use one of the built in backgrounds or choose Upload new backgrounds to upload your own.
- Click Save.
After creating the new background, you can set it as the new default background by selecting the background, and then clicking on Set as Default.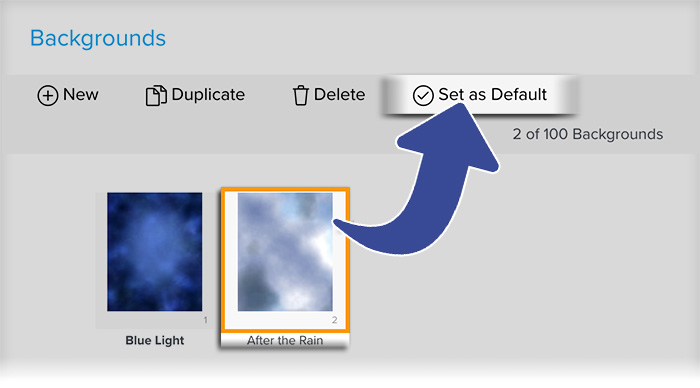
When creating a background for the first time, the new background will automatically be set as the default background. If the background applied to the top most group (All Photographs group) is changed, then all other groups and galleries that are set to follow the top most group will also use that assigned background as their default background.
Set Pricing for Premium Backgrounds
You can charge your clients an additional fee to apply specific backgrounds when purchasing images. Here's how:
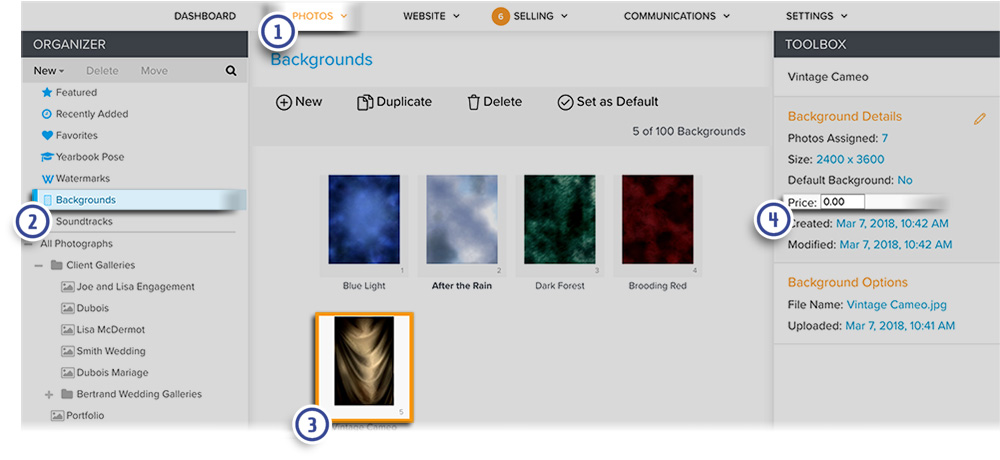
- In your account, click on Photos in the menu across the top.
- Click on Backgrounds under the Organizer column.
- Click on the background that you would like to use as a premium background.
- Click on the Price field in Background details. Enter the desired price into the field then click Enter or Return on your keyboard.
Please note: additional fee to be charged to clients for premium backgrounds will be charged in the currency currently selected in the cart. So for example, if the client is in the UK and is purchasing products in British Pounds, the system will charge them to use the premium background using British Pounds.
Click HERE to learn how to allow clients to purchase products in different currencies.
Create Gallery and Upload Photos
The transparent cutout images will need to be uploaded to a gallery in order for the background to be applied and to display the photos to your clients.
In case it is needed, click HERE to learn how to create a gallery and upload photos to the gallery.
Enable Green Screen in the Gallery
Follow the steps below to enable green screen and to enable background options:
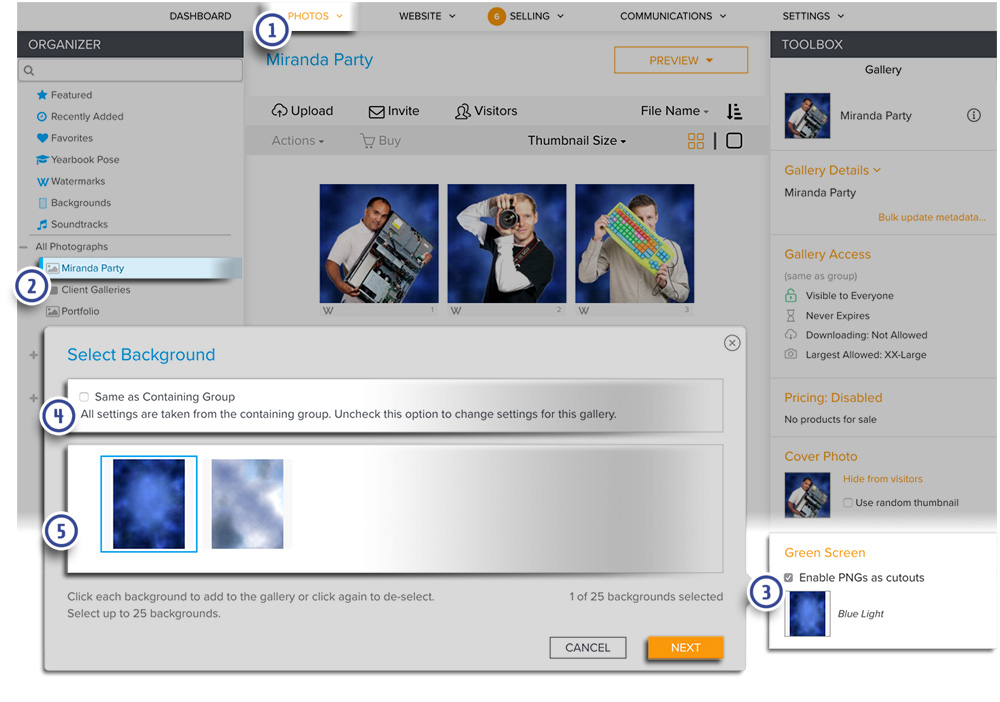
- In your account, click on Photos in the menu across the top.
- Click on the gallery in the Organizer column.
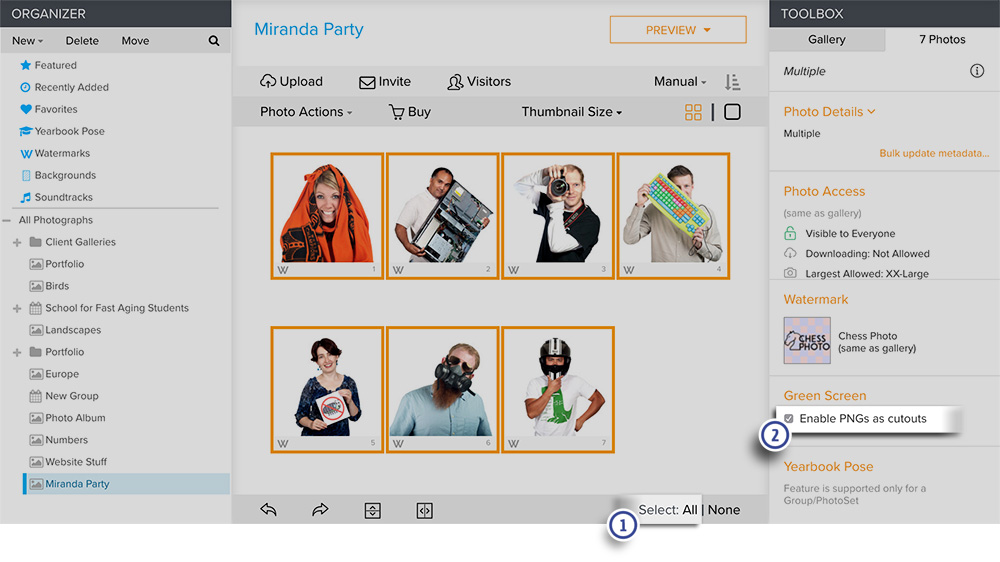
- Check the box for Enable PNGs as cutouts and then click on the background preview.
- Uncheck the box for Same as Containing Group if necessary.
- Select all of the backgrounds that you would like enable in this gallery and then click Next.
The Select Background window will then refresh. Next, select the default background that you would like applied to the gallery. Click Save when you're done.
- After doing the above, scroll down then click on Select: All to select all of the photos in the gallery.
- Check the box next to Enable PNGs as cutouts.
How Clients Select the Background
To allow the clients to select the background, you'll need to these two things:
Once both of the above conditions are met, your clients can go to the gallery and choose their background.
They can select their background by clicking on the image in the gallery thumbnails page, then clicking on Change Background, and then choose the background from the options displayed.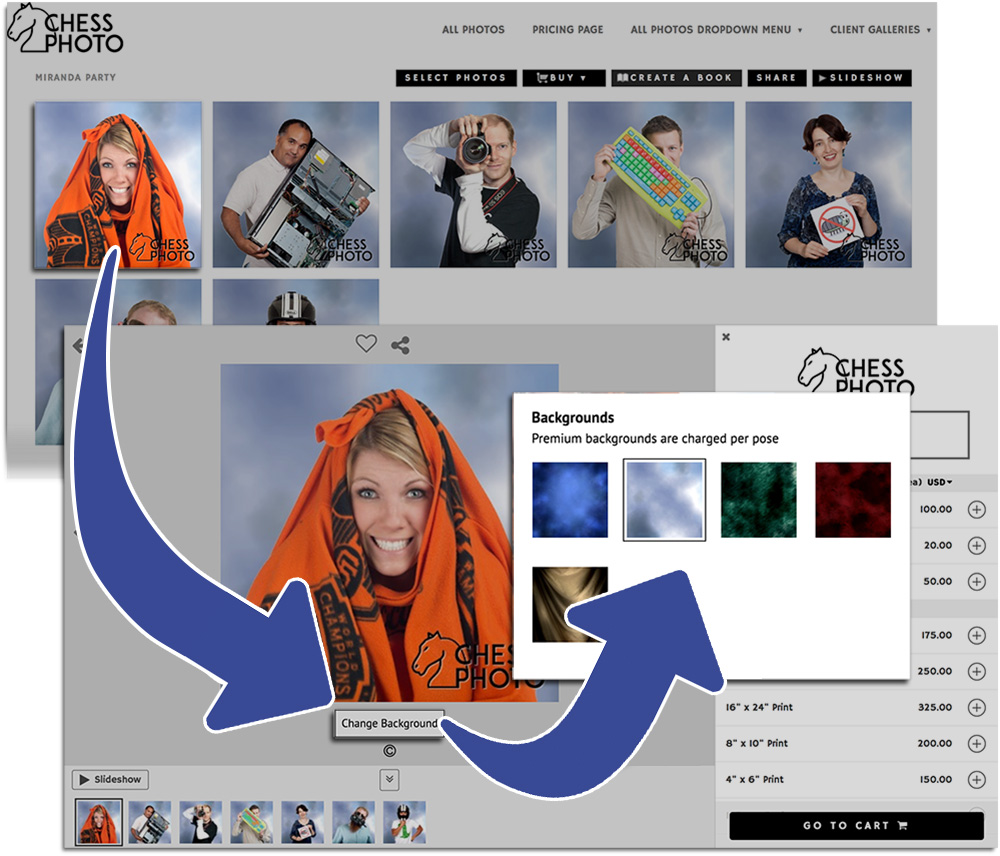
If a price list is not assigned to the gallery, the images will be displayed with the default background. Visitors will not be able to apply different backgrounds, nor will they be able to purchase the images or pay for premium backgrounds.
Additional Resources:
Digital Downloads of the green screen images can be sold just like other images by selling them as Digital Download products.
To allow the downloading of green screen images (with their backgrounds) for free, you'll need to allow the downloading of display images. If the downloading of original images for free is enabled, the visitor will be allowed to download the original cutout image without the background.
New Photos Page: How to Upload and Create Your Own Backgrounds
Before the green screen feature can be used, you'll need to create the backgrounds that will appear behind the images.
There are a few built in backgrounds provided but you can also upload your own custom image to use as the background. The recommended size for the custom background image is 2800 x 2600 pixels.
To create the background, follow these steps:
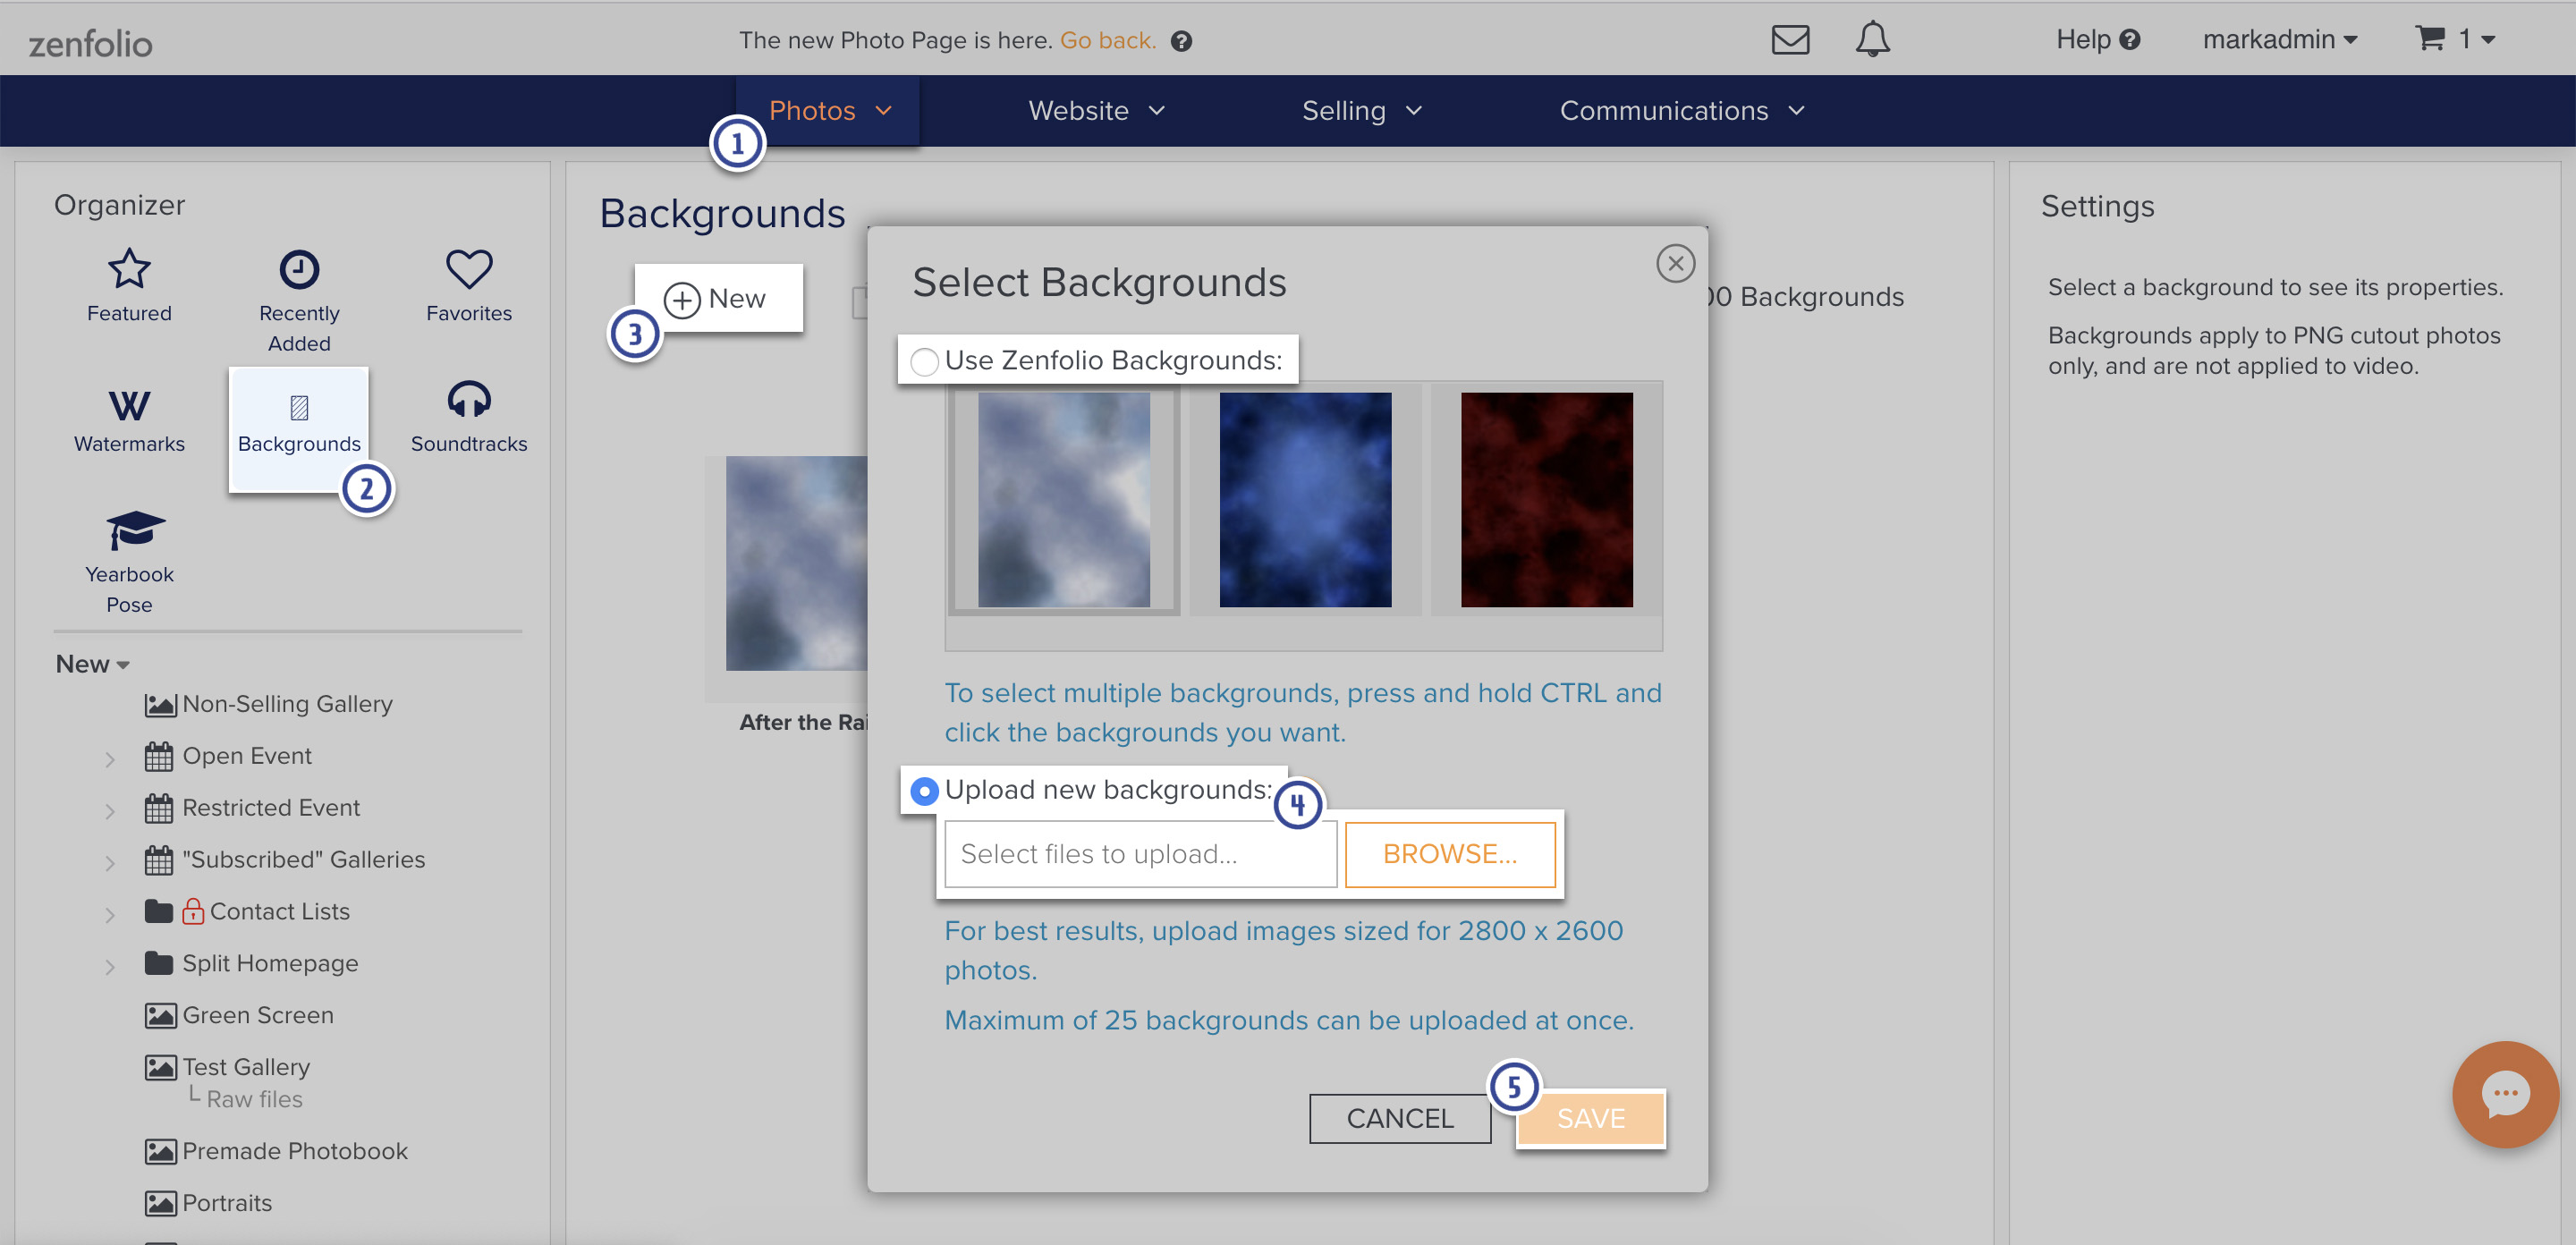
- In your account, click on Photos in the menu across the top.
- Click on Backgrounds under the Organizer column.
- Click on ⊕ New.
- Choose Use Zenfolio Background to use one of the built in backgrounds or choose Upload new backgrounds to upload your own.
- Click Save.
After creating the new background, you can set it as the new default background by selecting the background, and then clicking on Set as Default.
When creating a background for the first time, the new background will automatically be set as the default background. If the background applied to the top most group (All Photographs group) is changed, then all other groups and galleries that are set to follow the top most group will also use that assigned background as their default background.
Set Pricing for Premium Backgrounds
You can charge your clients an additional fee to apply specific backgrounds when purchasing images. Here's how:
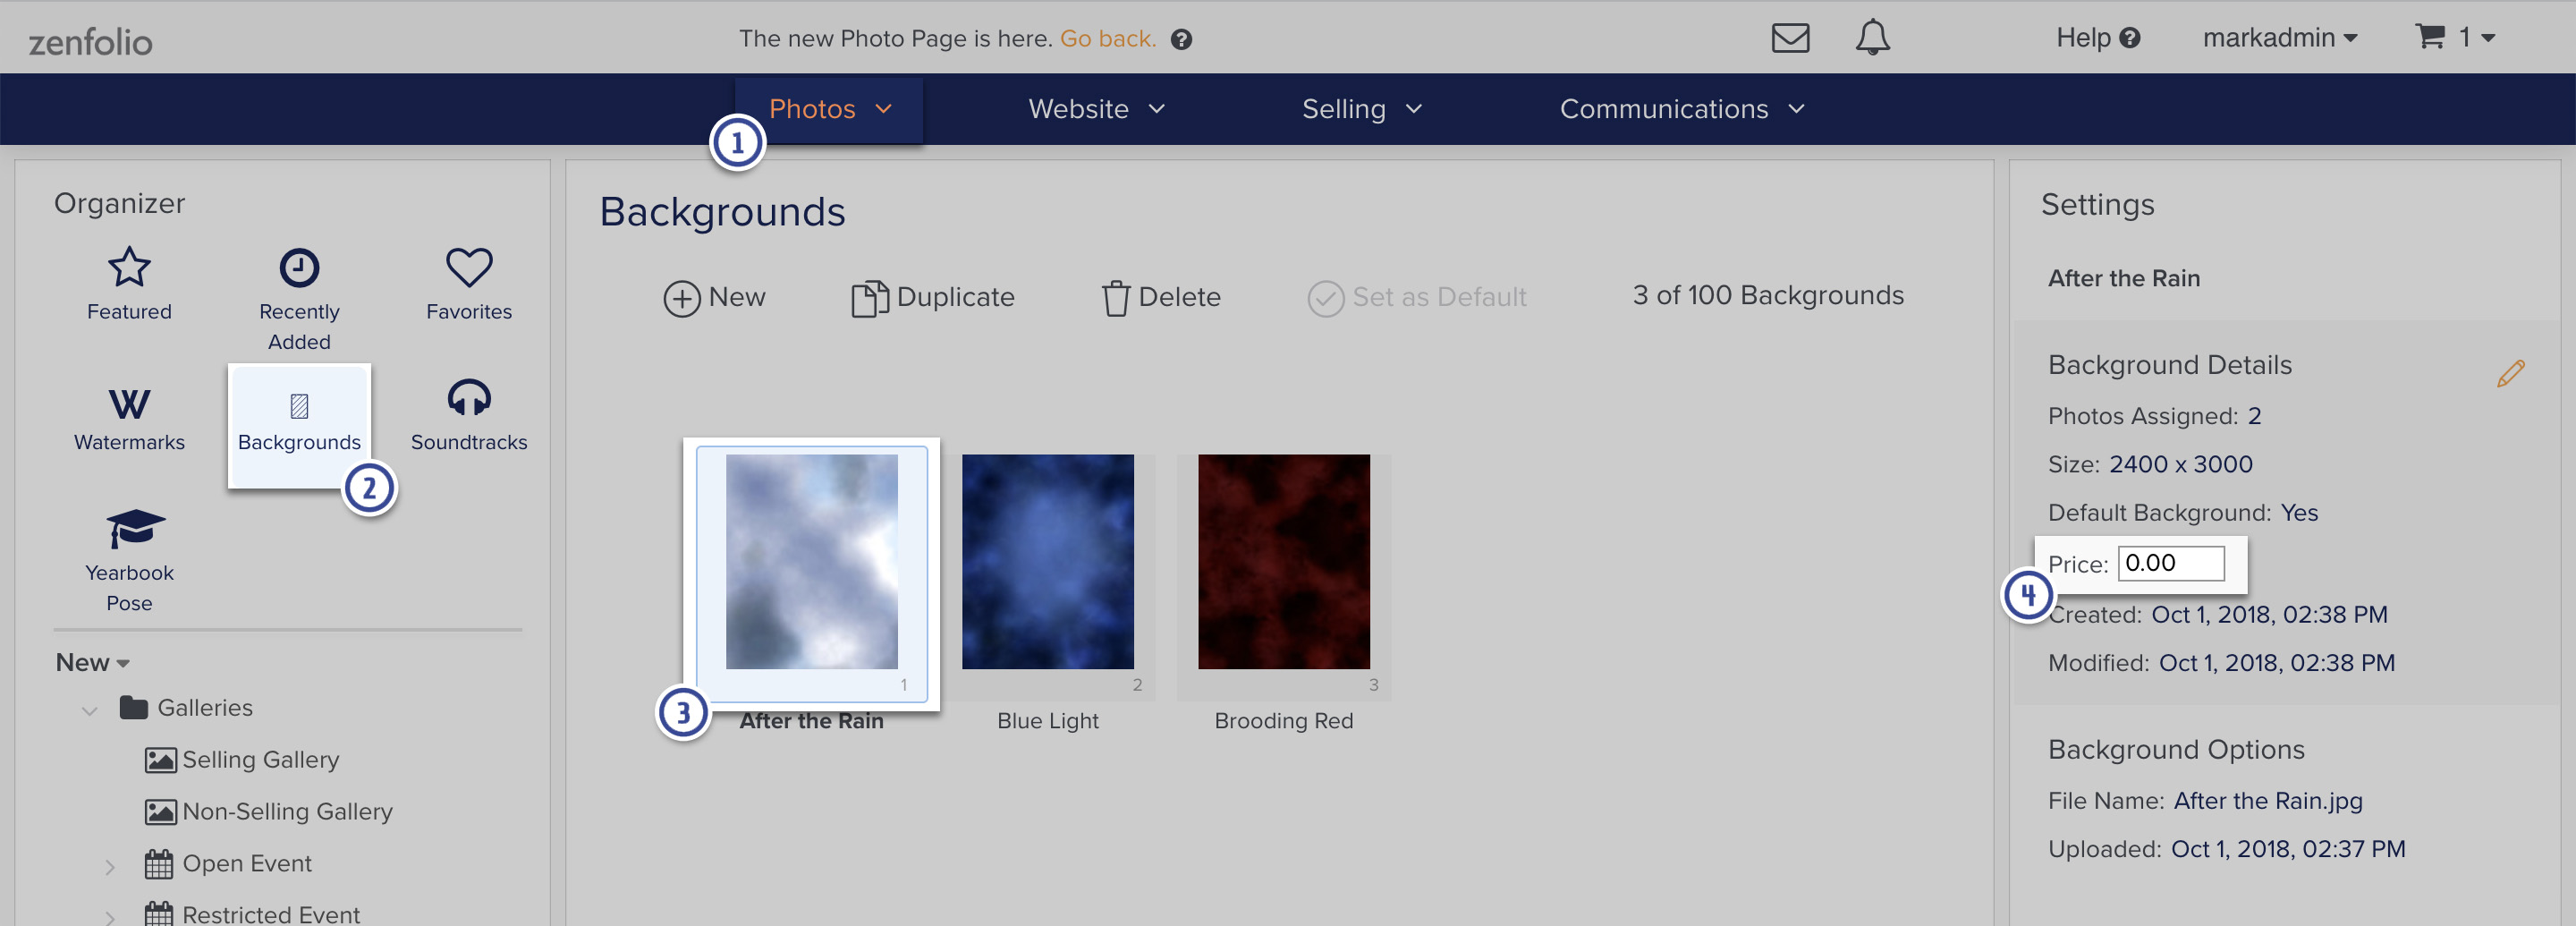
- In your account, click on Photos in the menu across the top.
- Click on Backgrounds under the Organizer column.
- Click on the background that you would like to use as a premium background.
- Click on the Price field in Background details. Enter the desired price into the field then click Enter or Return on your keyboard.
Please note: additional fee to be charged to clients for premium backgrounds will be charged in the currency currently selected in the cart. So for example, if the client is in the UK and is purchasing products in British Pounds, the system will charge them to use the premium background using British Pounds.
Click HERE to learn how to allow clients to purchase products in different currencies.
Create Gallery and Upload Photos
The transparent cutout images will need to be uploaded to a gallery in order for the background to be applied and to display the photos to your clients.
In case it is needed, click HERE to learn how to create a gallery and upload photos to the gallery.
Enable Green Screen in the Gallery
Follow the steps below to enable green screen and to enable background options:
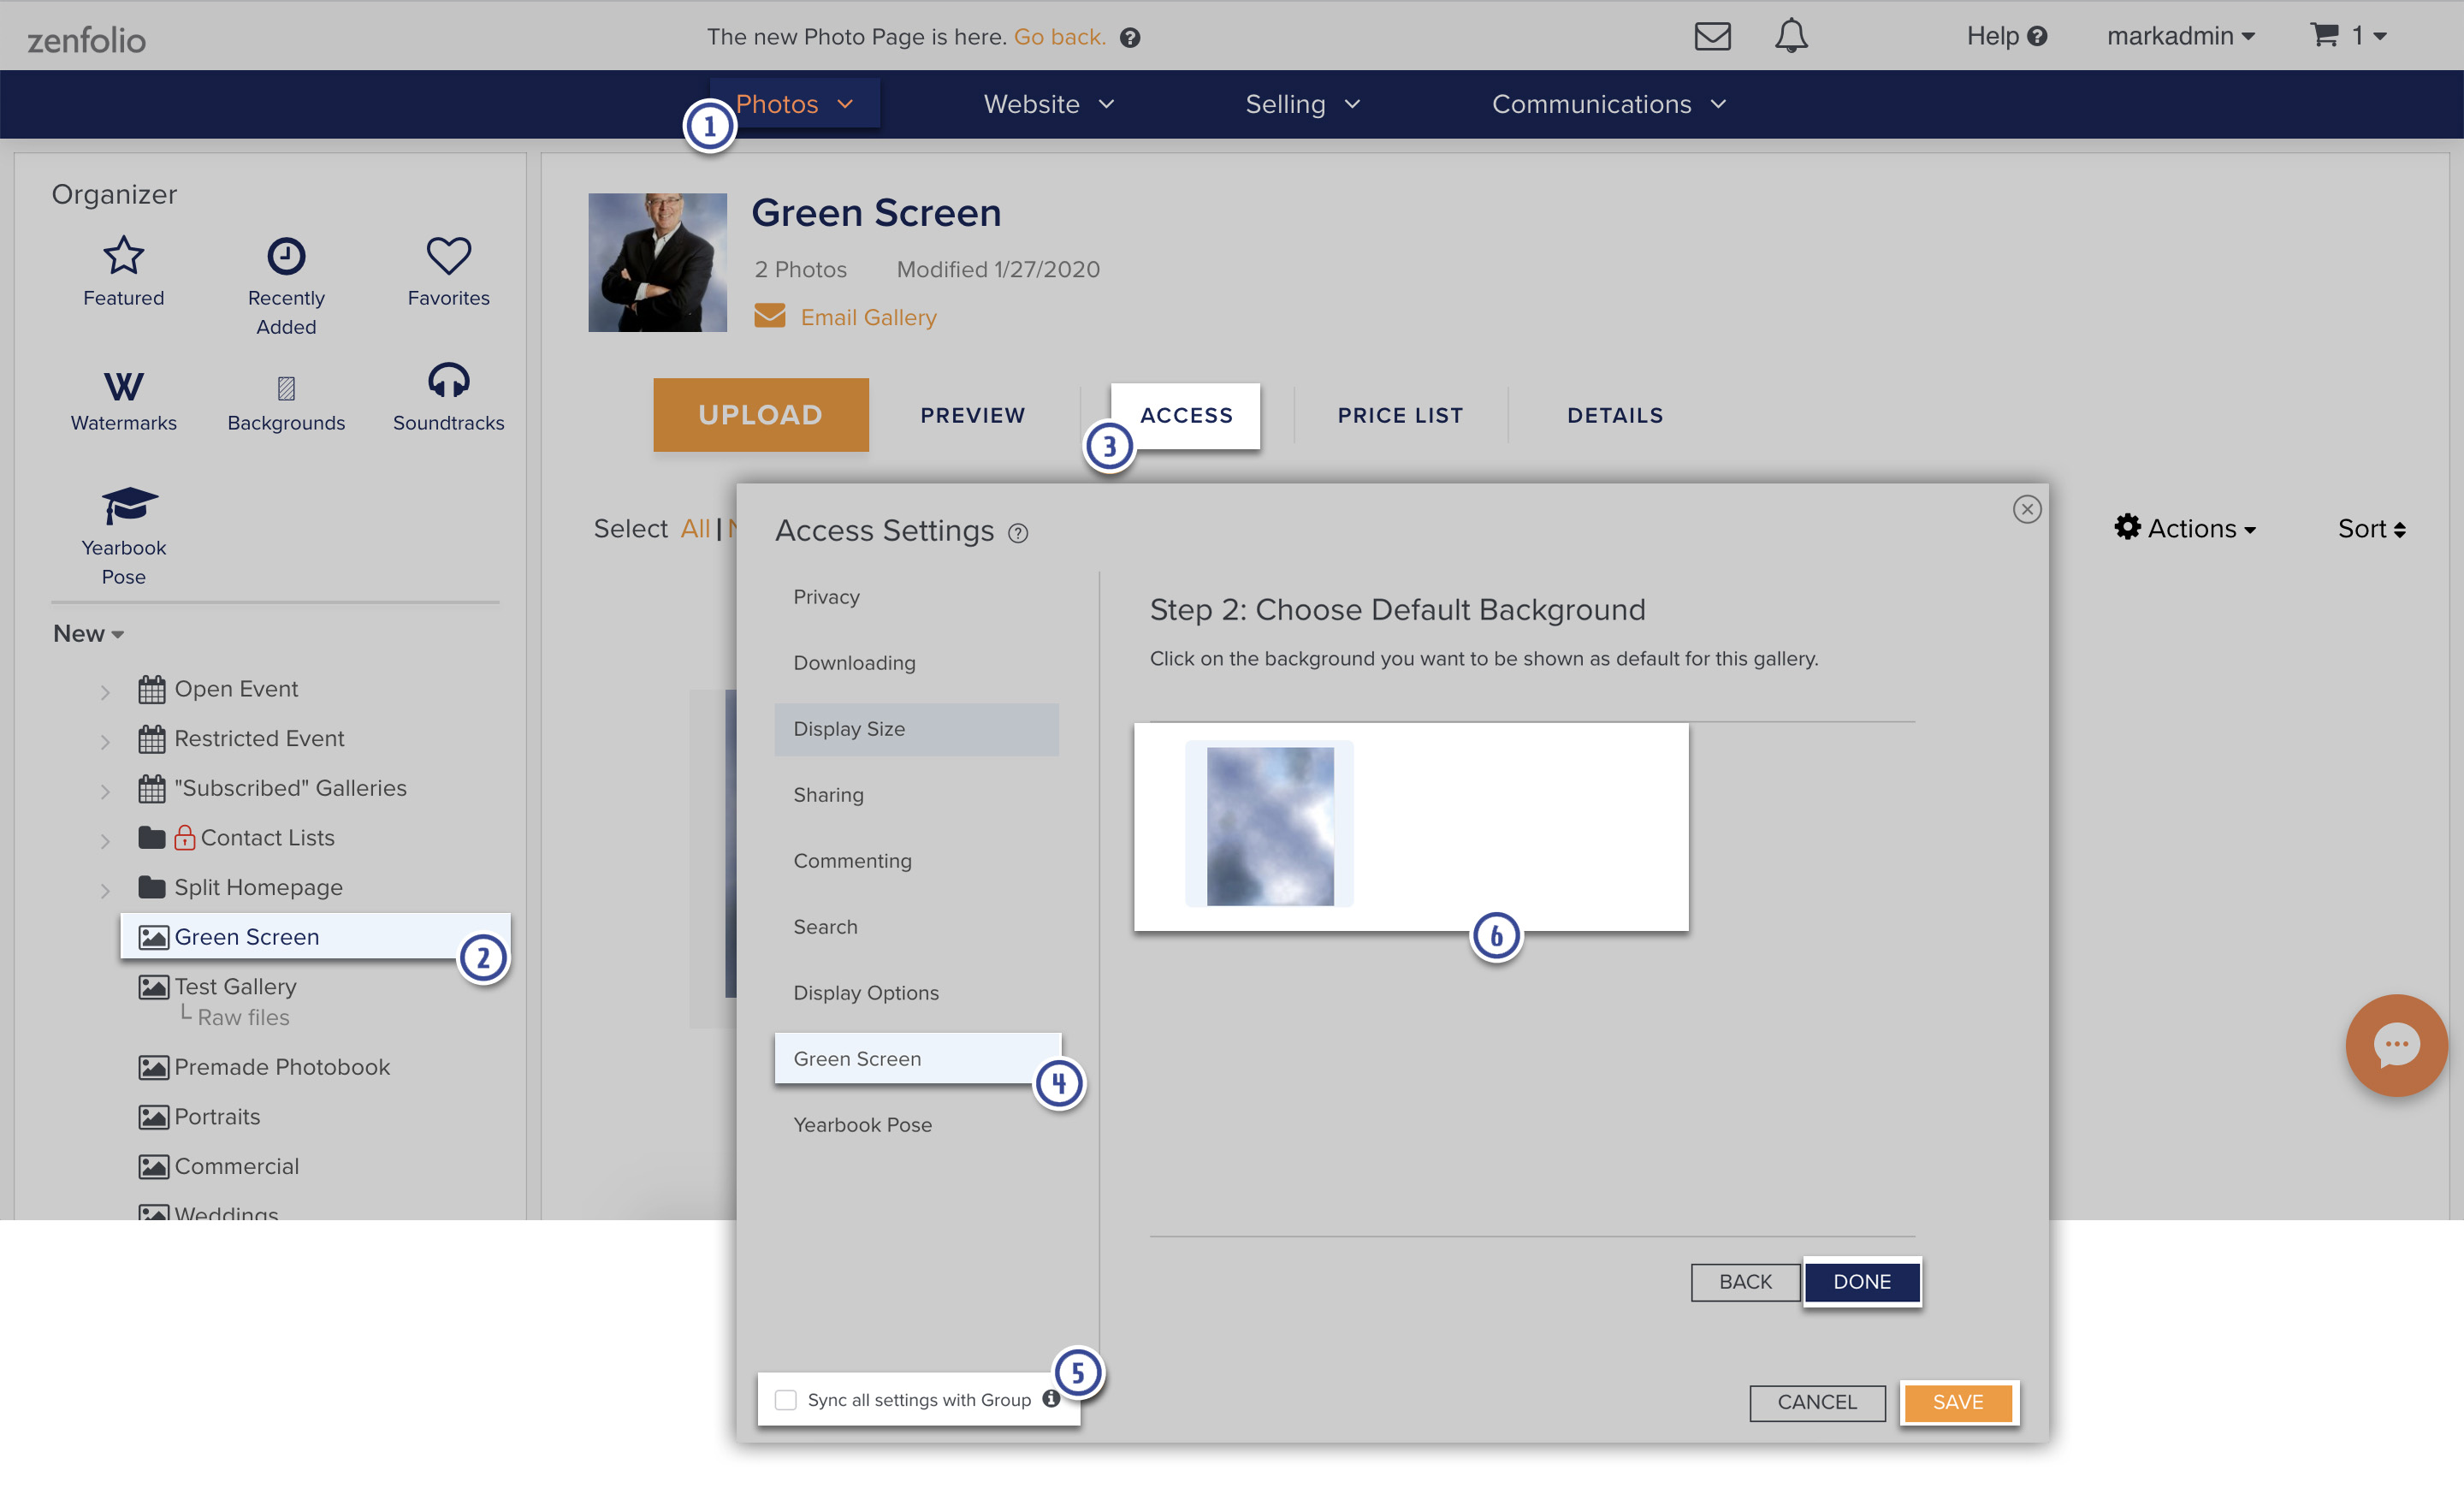
- In your account, click on Photos in the menu across the top.
- Click on the gallery in the Organizer column.
- Click on Access
- Click on Green Screen
- Uncheck the box for Sync all settings with Group if necessary.
- Select all of the backgrounds that you would like enable in this gallery and then click Next.
The Select Background window will then refresh. Next, select the default background that you would like applied to the gallery and click on Done. Click Save when you're done.
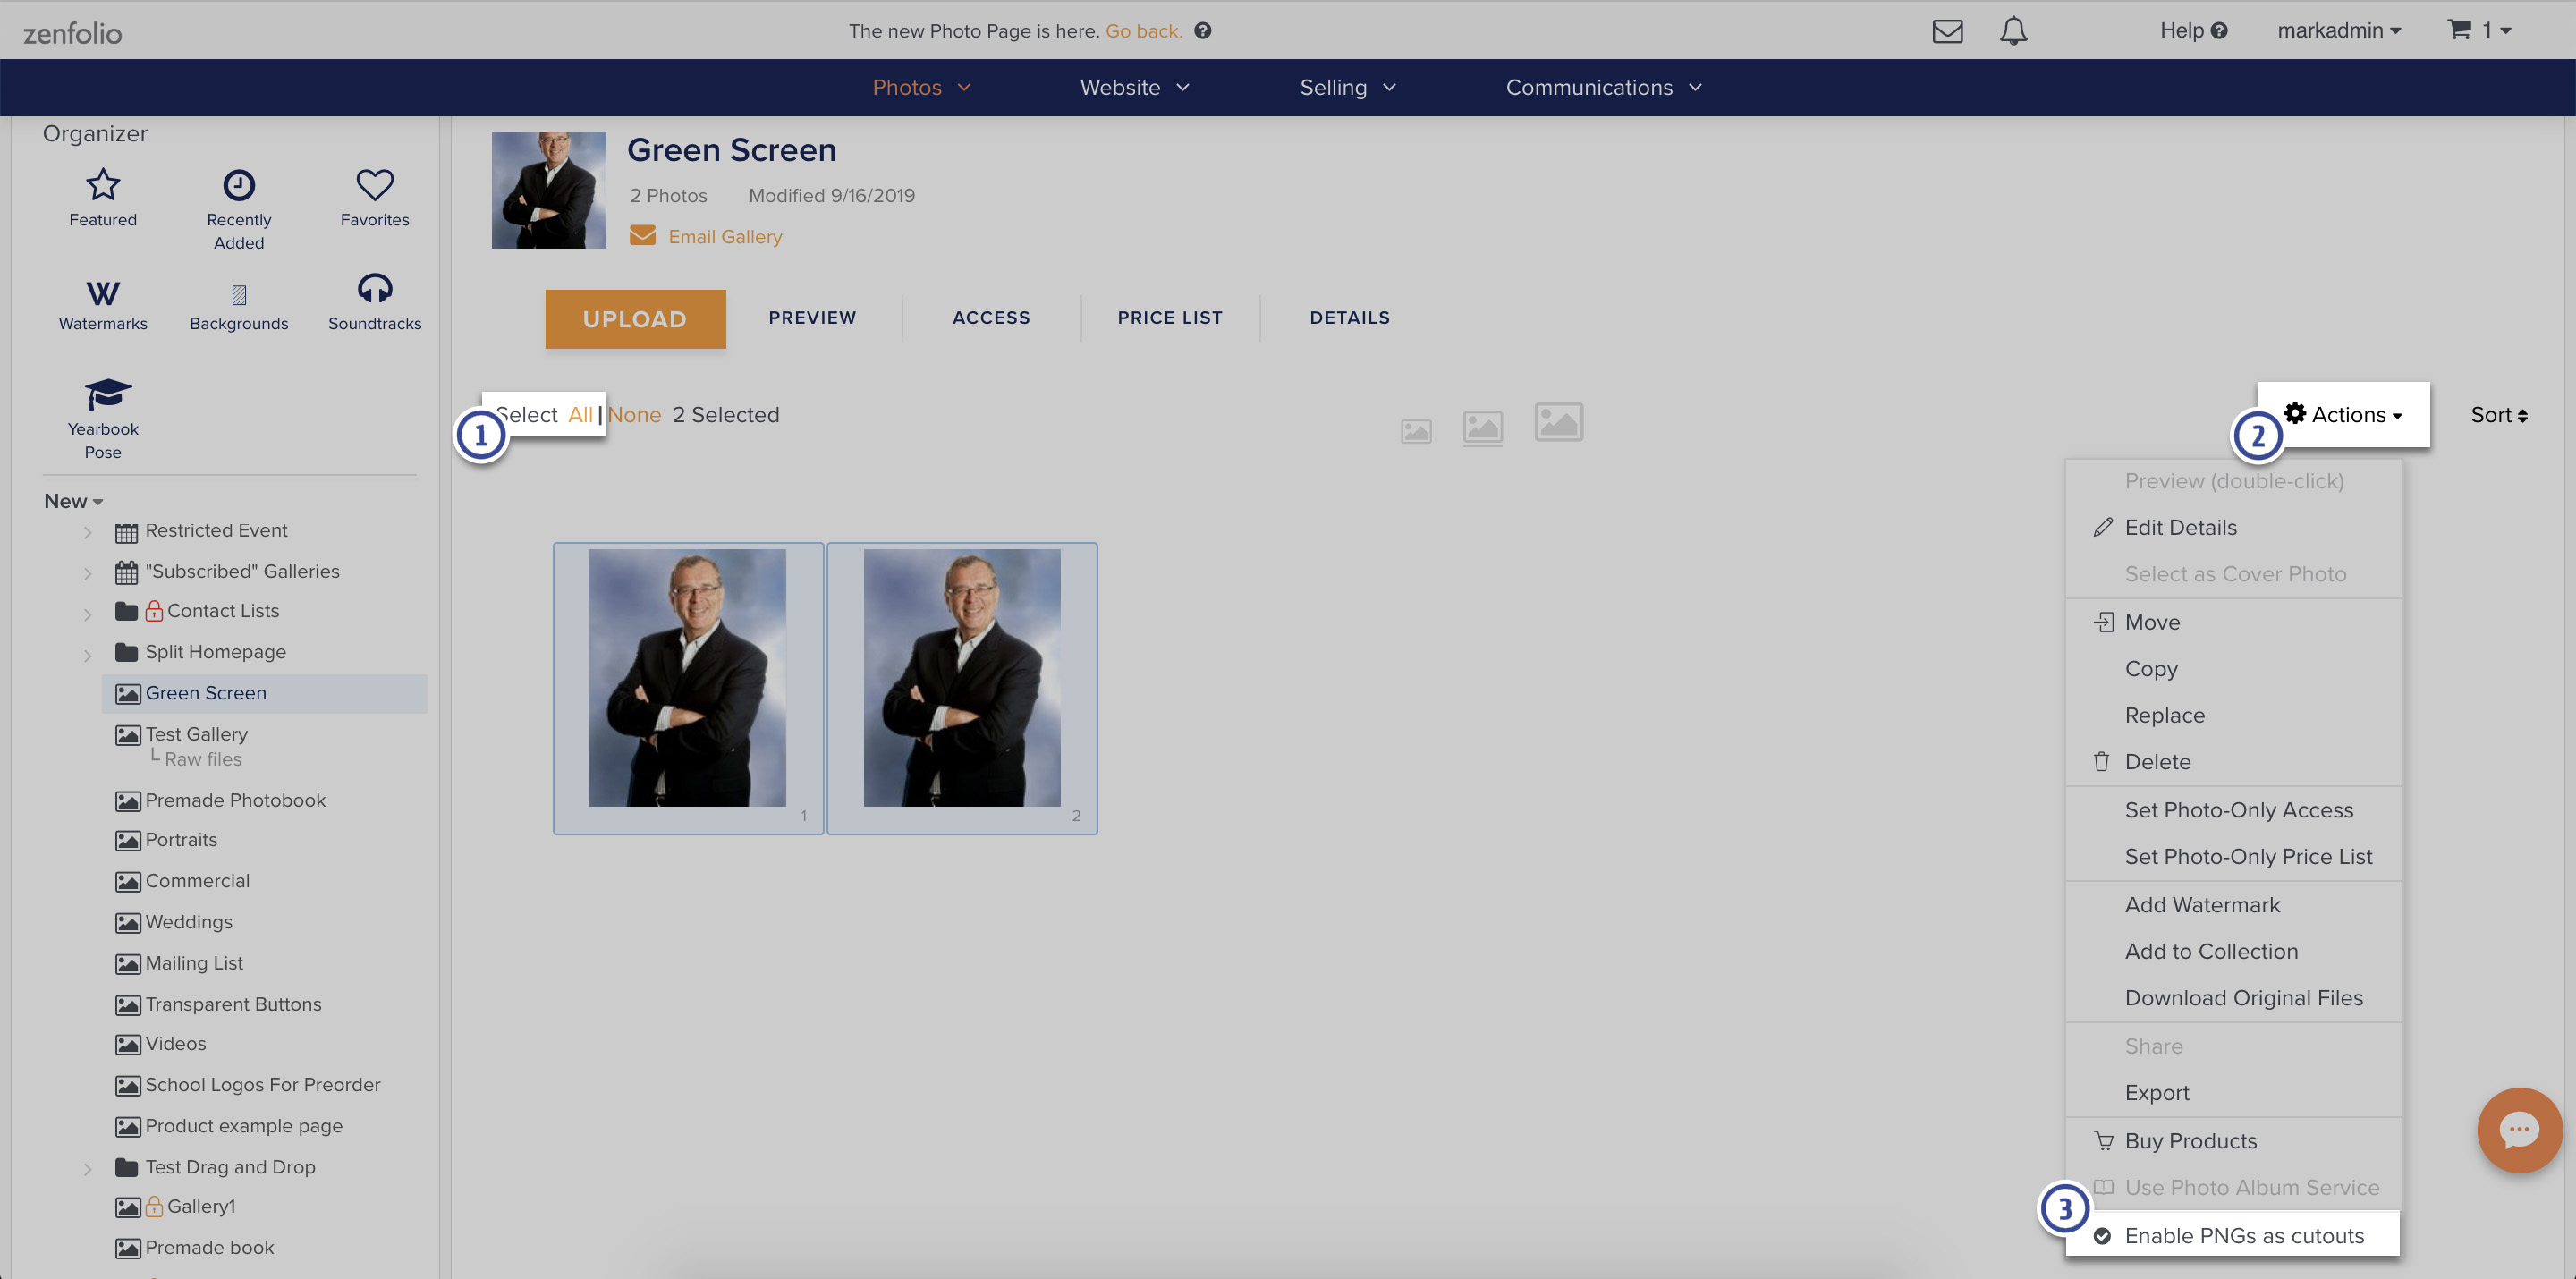
- After doing the above, scroll down then click on Select: All to select all of the photos in the gallery.
- Click on Actions. A dropdown will appear
- Check the box next to Enable PNGs as cutouts.
How Clients Select the Background
To allow the clients to select the background, you'll need to these two things:
Once both of the above conditions are met, your clients can go to the gallery and choose their background.
They can select their background by clicking on the image in the gallery thumbnails page, then clicking on Change Background, and then choose the background from the options displayed.
If a price list is not assigned to the gallery, the images will be displayed with the default background. Visitors will not be able to apply different backgrounds, nor will they be able to purchase the images or pay for premium backgrounds.