This feature is only available for Pro and Advanced plan subscribers.
Triggered emails can be used to automatically send an email to a client based on a triggered action they've taken on your site.
The available triggers are:
- When the client signs in to a gallery via Visitor Sign In.
- When they create a Client Account under your site.
- When they create a new Favorites list.
- When they share a Favorites list with you.
- When they place an order in your site.
- When they enter their email address into your Contact Page.
When the client performs one of the above triggers, you can choose to have the system send them an email automatically. You can choose which specific triggers you would like to be used as the trigger for the automatic emails.
The triggered emails can have a time delay, measured in days. This means that you can set up the triggered email to be sent a days after the action is performed, instead of sending the email immediately after the action is performed.
When assigned a delay, the delayed email is sent at the same time of day as when the action was originally performed. So for example, if a triggering action was a visitor sign in at 3PM, the delayed email will be sent the next day at 3PM if the email was delayed by a day.
You can choose the content of the triggered email sent to the client by choosing from one of your custom email templates. Please see this guide for how to create email templates.
You'll need to create the custom email template before creating the Triggered Email.
How to Create Triggered Emails
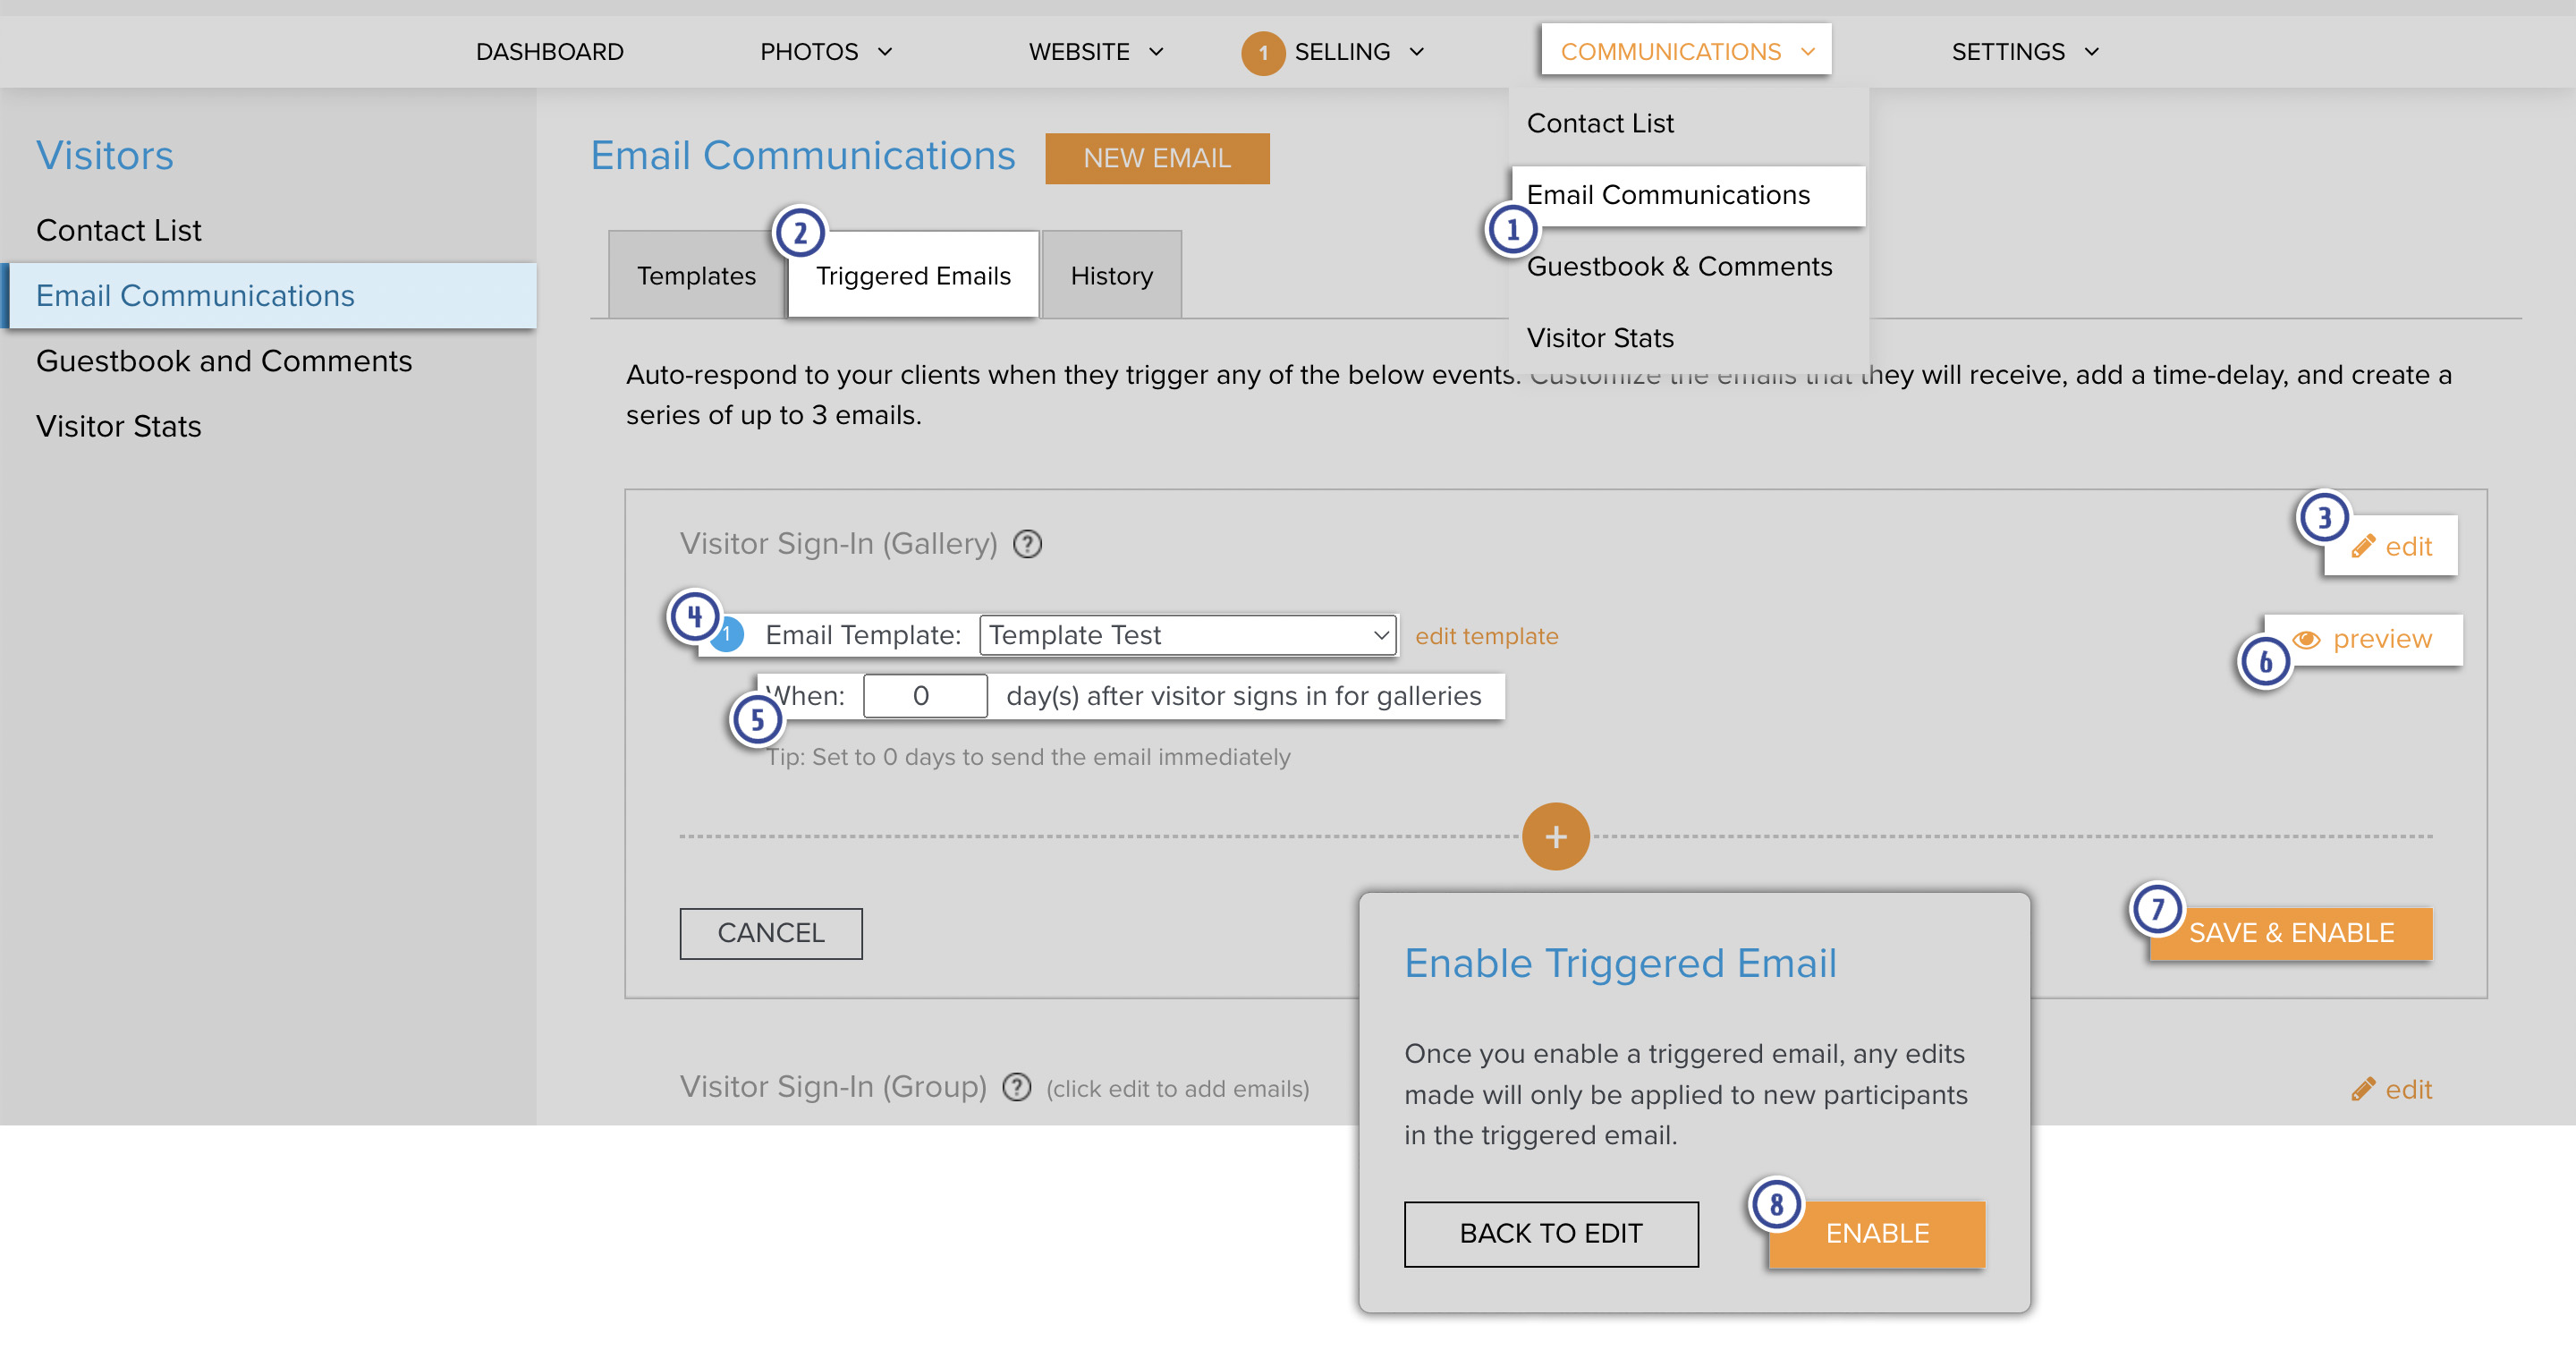
- In your account, hover the mouse pointer Communications over then click on Email Communications.
- Go to the Triggered Emails tab.
- Click Edit next to the triggered action for which you would like to set up the automatic emails.
- Choose the email template that you would like to sent to the client when the triggered action is performed.
- Enter the number of days that you would like the system to wait before sending the email.
- Click Preview to see what the email will look like when sent to the client.
- Click Save & Enable.
- Click Enable to confirm your decision. This will enable the triggered email immediately.
Triggered Email Series
Triggered emails can also be a series of emails. This means that you can choose to to send more than one email for each triggered action. You can choose to set a delay on the sending of the subsequent emails so they are sent at some time after the previous email.
So for example, you can create a triggered email series for when the client enters their email address into the Visitor Sign in. The first email could contain a message that welcomes them to your site.
Since this is an email series, you can also choose to automatically send a second email to the client a few days later with a coupon that they can use to receive a discount on a new order.
Please note that if the series is turned off, emails that have been scheduled will still be sent out. No other recipients will be added to the Series after the series is disabled.
When the series is edited, only new people will see the changes. People with scheduled emails will continue to receive the old emails.
To create a Triggered Email Series, follow the steps above to create the Triggered Email.
While editing the Triggered Email, click on the + sign to create the series and create the second email.
Choose the desired template for the second email and set the desired delay (in days) for when the second email is sent after the first email.
Repeat to add a third email. Each series can have a maximum of three emails.
Click the trash icon next to the second or third email to remove it from the series.
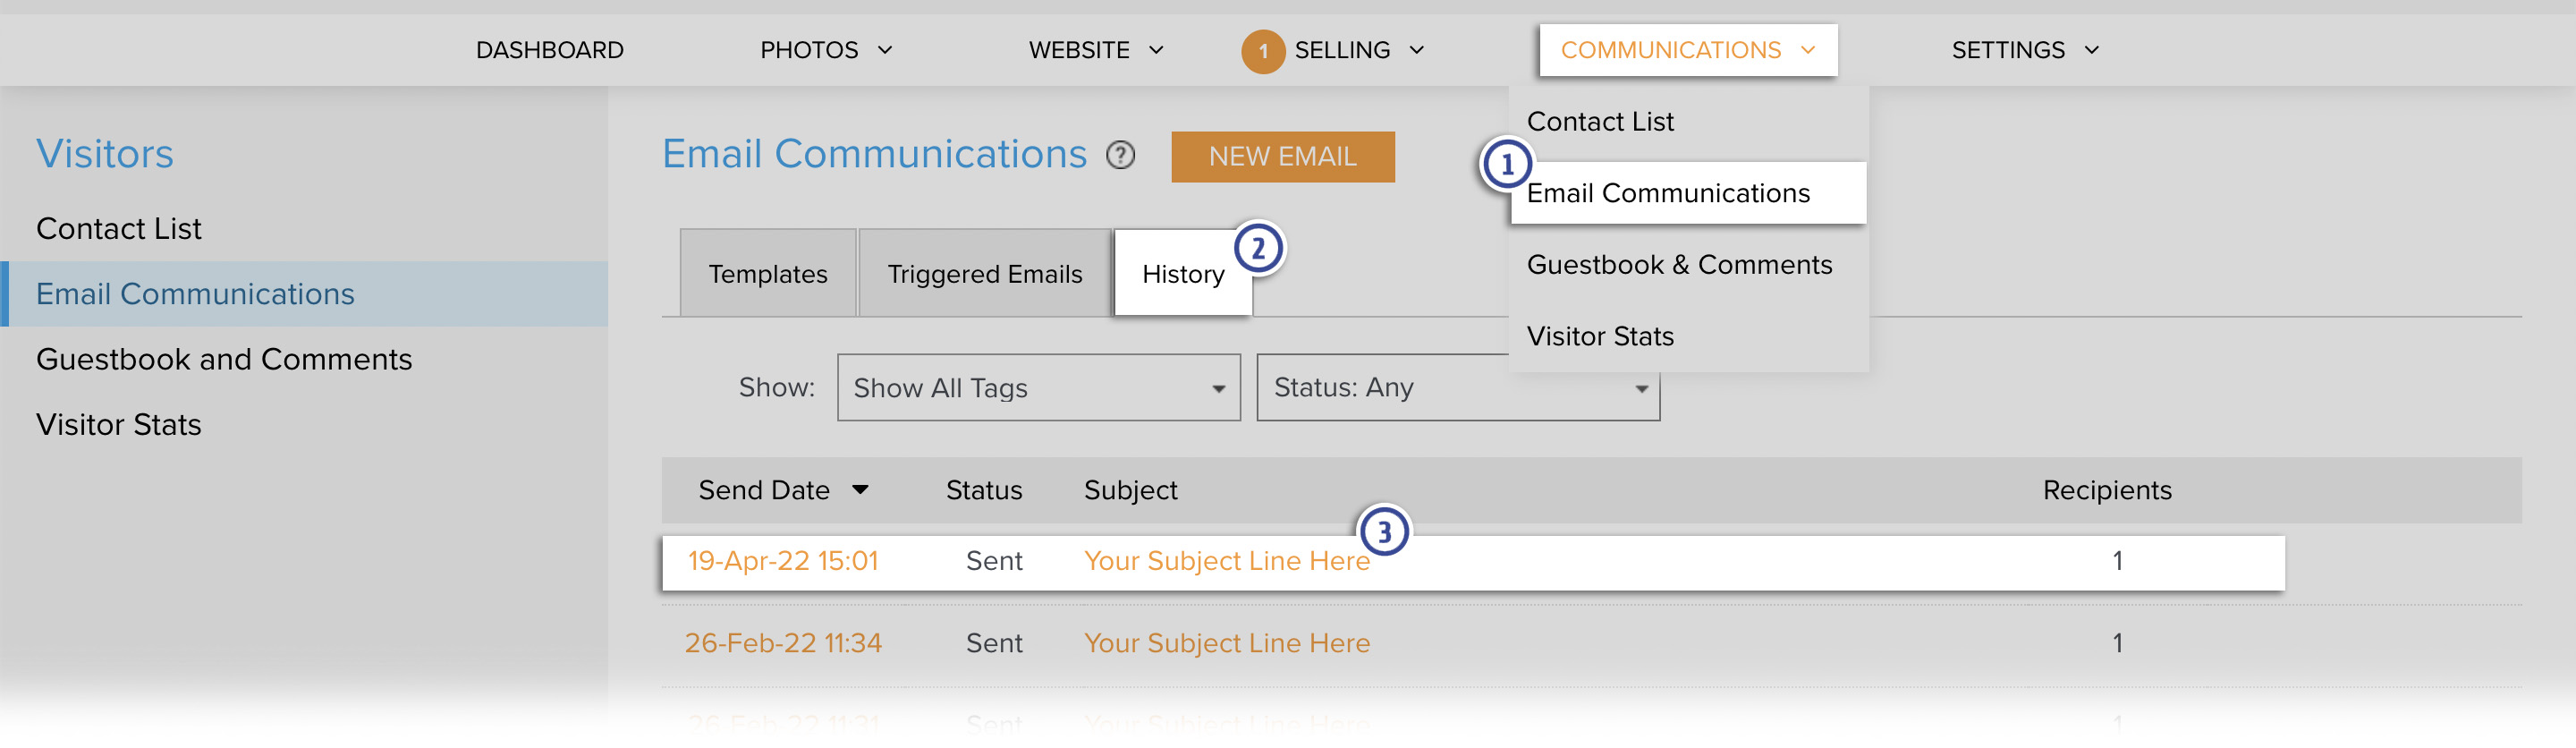
Viewing Sent Triggered Emails
Emails that are sent due to triggered events are stored in Email History.
- In the Dashboard, hover the mouse pointer Communications over then click on Email Communications.
- Click on the History tab.
- Emails that have been sent from the account will be displayed. This will include emails sent by the photographer, gallery invite emails and triggered emails.
Triggered Email Template Variables
Since the contents of triggered emails are obtained from Email Templates, the variables in the email templates can be used to automatically enter specific information into the triggered emails. However, not all variables are compatible with all triggered emails.
For example, the {gallery_url} variable automatically adds the link to the gallery to the email. Since this needs to reference a gallery, this variable can only be applied to emails that are related to a gallery. It will not be possible to use this in a triggered email for when a client sends a message through the Contact page as there is no gallery for the variable to reference.
| Triggering Action | Compatible Variables |
| Visitor Sign In (for Gallery/Group/Collection/Event) | {gallery_url} (or group_url etc) {gallery_link} (or group_link etc) {gallery_name} (or group_name etc) {media_type} {folder_type} {display_name} {site_link} {referral_link} {photomoments_url} |
| Account Created | {display_name} {site_link} {referral_link} |
| Favorite Set Created | {display_name} {site_link} {referral_link} |
| Favorite Set Shared | {display_name} {site_link} {referral_link} |
| Order Placed | {display_name} {site_link} {referral_link} |
| Contact Page | {display_name} {site_link} {referral_link} |
See this guide for more details on the the available email template variables.