As with other online retailers, photo and products are purchased from a photographer's site by adding the photos and products to the cart. As the products are being added to the cart, the photos will need to be configured specifically for the selected product. Depending on the product, some product options are offered and these options can be selected as the photos are being added to the cart.
Once in the cart, the images can still be configured and product options can be changed.

This guide covers how to configure photos for the selected print product and how to choose from the various product options.
The Photographer is also able to choose which options are available to their clients. This means that not all options displayed in this guide may be found when ordering from the photographer's site.
Use these links to navigate directly to the desired section.
- Cropping to match print size, if available
- Paper type, if available
- Color correction, if available
- Color conversion, if available
- Finish and Coating, if available
- Frame or Mounting, if available
- Customization of template based products such as greeting cards, calendars, etc may also be available
- Canvas Sides, for canvas gallery wraps
Cropping to match print size
Cropping is often necessary when ordering prints and many photo products, as the desired print size doesn't always match the aspect ratio of the photograph. For example if you order a 10x10 inch print from a photo that is formatted at 11x14 inches, some of the image would need to be cropped. Think of it as printing a wide rectangular image into a square shaped print.
Zenfolio offers a cropping solution built in to the ordering process. Before an order can be completed you will be prompted to confirm cropping.
Cropping options:
- Centered (may trim some parts of the image)
- Fit, and do not crop (may leave white margins)
- Manual - allows you to manually crop the image into the print
Note: The default cropping setting is Centered.
- In the Shopping Cart, click on the Thumbnail preview for the image you would like to crop. A pop-up window will load with the cropping options.
- Click Center to center the image into the print. Click Rotate to rotate the image.
- You can also choose to manually crop the image. Use the Zoom slider to zoom in and out of the image.
- Edit the cropping applied to the image by dragging the corners of the orange rectangle.
- Click Save or Save and Close. You will be returned to the shopping cart. Repeat for other images if necessary.

Please Note: Everything within inner rectangle that is inside of the orange rectangle will be printed. The areas outside of inner rectangle but just inside the orange borders of the rectangle are likely to be printed but may be cropped out during the printing process.
Critical parts of the image (such as the head of the subject) must be contained within inner rectangle inside of the orange rectangle.
Paper type
You will need to select a paper type for each print item when in the Preview and Configure window, or in the Shopping Cart.
Please note: The default paper type for Mpix and MpixPro powered by Miller's Lab prints is E-Surface color paper.
When Black and White Paper is selected, the final print will be in black and white. This is regardless of whether or not the image is in color or if the Color Conversion options are applied to the image.
To choose a different paper option, you can make the change through the Product Configuration window.
- In the Shopping Cart, click on the Thumbnail preview for the image you would like to edit. A pop-up window will load with the paper options.
- Under Paper Type, select the desired photographic paper on which you would like this image printed.
- Click Save or Save and Close. The shopping cart will be displayed. Repeat for any other images that require a change to their paper selection.

Note: Click the [?] icon next to the paper for more information.
Color correction
In the item Preview and Configure window and for each print item in the Shopping Cart, you have the option of Color Correction. Color correction is not an automated process. It is executed by highly trained technicians.
If selected, color, contrast, and sharpness will be manually adjusted to achieve the best tonal response and color density. Slight shifts in color may occur.
There is no additional fee for this service.
The default for print orders enables color correction. Color correction is not offered by all labs.
Please Note for Miller's orders: Color Correct and non Color Corrected images are processed separately. Products that are processed separately will require that the order be split into two orders, one for Color Corrected images and another for non-Color Corrected images. To avoid splitting the order and incurring an additional shipping fee, it is recommended that the order only contain Color Corrected images or non-Color Corrected images, not both at the same time.
To choose to apply color correction or disable it, use the Edit All options or make the change through the Product Configuration window.
- In the Shopping Cart, click on the Thumbnail preview for the image you would like to edit. A pop-up window will load.
- Under Color Correction, select Apply color correction or Do not enhance.
- Click Save or Save and Close. The shopping cart will be displayed. Repeat for any other images that require a change to their color correction settings.
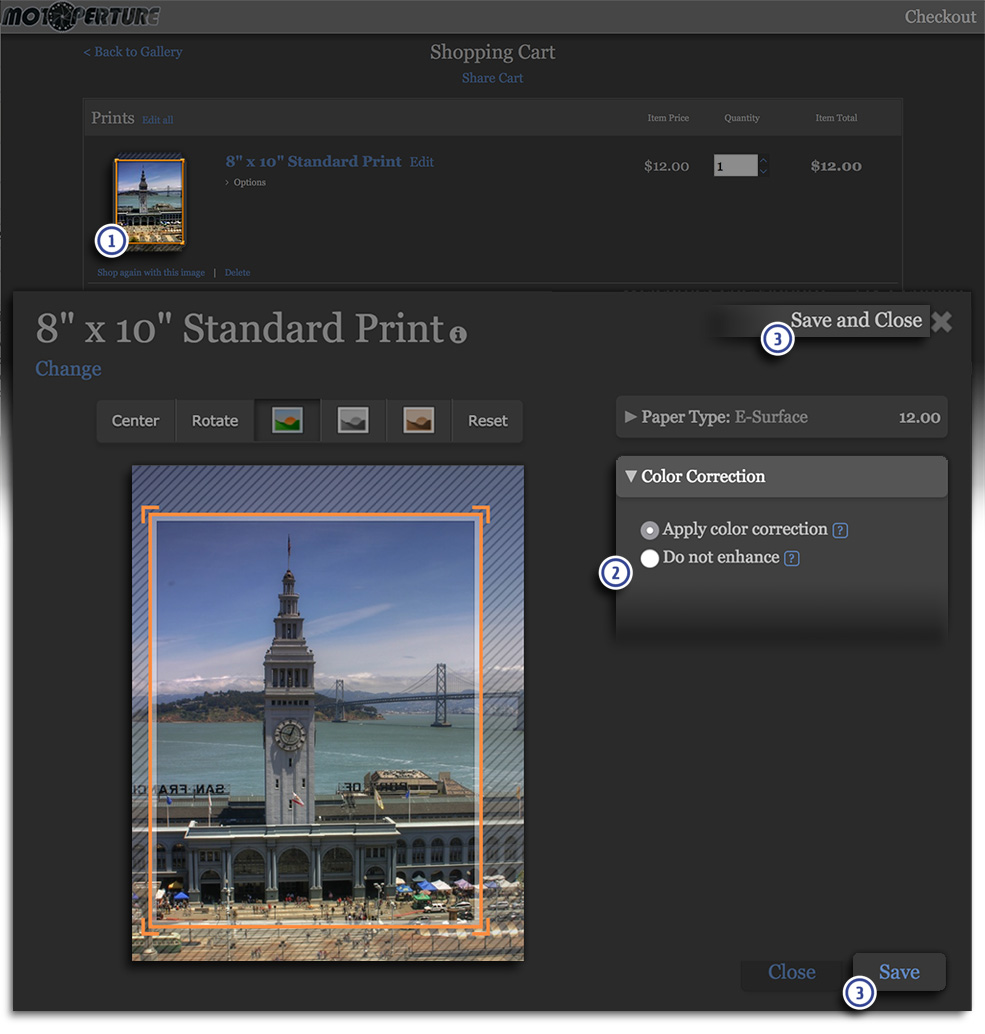
Note: Clicking the [?] icon next to an item will provide more information on that option.
Color conversion
For each print item in the shopping cart you have the option of Color Conversion. Color conversion offers the option of converting photos to Black & White or Sepia tone. There is no additional fee for this service.
Please note: If Black and White Paper is selected, the final print will be in black and white regardless of the Color Conversion setting applied.
- In the Shopping Cart, click on the Thumbnail preview for the image you would like to edit. A pop-up window will load.
- Using the toolbar above the image, select No-changes, Black & White or Sepia using the corresponding buttons. The Preview image will be modified to reflect your change.
- Click Save or Save and Close. The shopping cart will be displayed. Repeat for any other images that require a change to their color conversion setting.

Finish and Coating
Lustre Coating is an environmentally friendly, non-flammable coating which protects against UV light, fingerprints, and dust. With the coverage and appearance similar to lacquer, the Lustre Coating gives your prints a rich, glossy sheen.
Note: One extra day is required for processing. Lustre coating is available for all print sizes but not available on Metallic paper.
Lustre Coating is not offered by all labs.
- In the Shopping Cart, click on the Thumbnail preview for the image you would like to edit. A pop-up window will load.
- Under Options, check the box for Lustre Coating if you wish to apply this service to the print.
- Click Save or Save and Close. The shopping cart will be displayed. Repeat for any other images that require a change to their Lustre Coating settings.

Note: Clicking the [?] icon next to an item will provide more information on that option.
Frame or Mounting
Many framing and finishing services are available and can be added to your order during checkout.
Framing options:
- Most print sizes can be framed
- Choose from no glass, regular clear glass and non-glare glass
- Black & White Mats come in 2" width and are optional
- Adding a mat to a framed print increases the width and height by 4", for example, an 8x10" print that is framed and has a mat will end up being 12x14" plus the width of the frame
- With mat, glass is required and mounting option is not available
- With no mat, mounting is required and glass is optional
Mounting options:
- Single weight backboard mounting
- Double weight backboard mounting
- Foam Core Mount
Please note that not all Framing and Mounting Options are offered by all labs. Also the photographer is able to choose which Framing and Mounting Options are available so not all options may be found when ordering from the photographer's site.
- In the Shopping Cart, click on the Thumbnail preview for the image you would like to edit. A pop-up window will load.
- Under Frame or Mounting, click on the small Preview window or click on Add one now. A pop-up window will load with available options.
- Scroll down to see the frames and click to select the frame you are interested in. The image preview will load with the selected frame around the image.
- Click the Mat dropdown menu to select the color mat you would like. Click the Glass dropdown menu to select the type of glass you would like.
- When you are happy with your selection, click Save or Save and Close. You will be returned to the shopping cart. The image's Item Total will reflect the new price including the Framing and Mounting option selected. Repeat for any other images that require Framing and Mounting.

Note: Clicking the [?] icon next to an item will provide more information on that option.
Canvas Sides
For canvas gallery wraps in the shopping cart you have the option to choose what is printed on the sides of the canvas. You may use the original image extended into the wrap area. You may also use a mirror-flip of the original image, a black border, or a white border.
When choosing Extend images to sides, parts of the top, bottom and sides of the image will be cropped from the face of the Canvas Wrap so they can be printed on the top, bottom and sides of the product. Consider this when cropping and when choosing this option so as to avoid cropping important parts of the subject from the face of the Canvas Wrap.
Please note that not all Canvas Wrap Side options are offered by all labs.
- In the Shopping Cart, click on the Thumbnail preview for the image you would like to edit. A pop-up window will load.
- Under Canvas Sides, select Mirrored sides, Extend image to sides, Black sides, or White sides. The Preview image will be modified to reflect your change. In the case of Extend image to sides, you will see the extended area in the preview.
- Click Save or Save and Close. The shopping cart will be displayed. Repeat for any other Canvas Wraps that require a change to their Canvas Side settings.

Note: Clicking the [?] icon next to an item will provide more information on that option.