Please note that the ability to upload your own logo is only available for Pro and Advanced plan subscribers.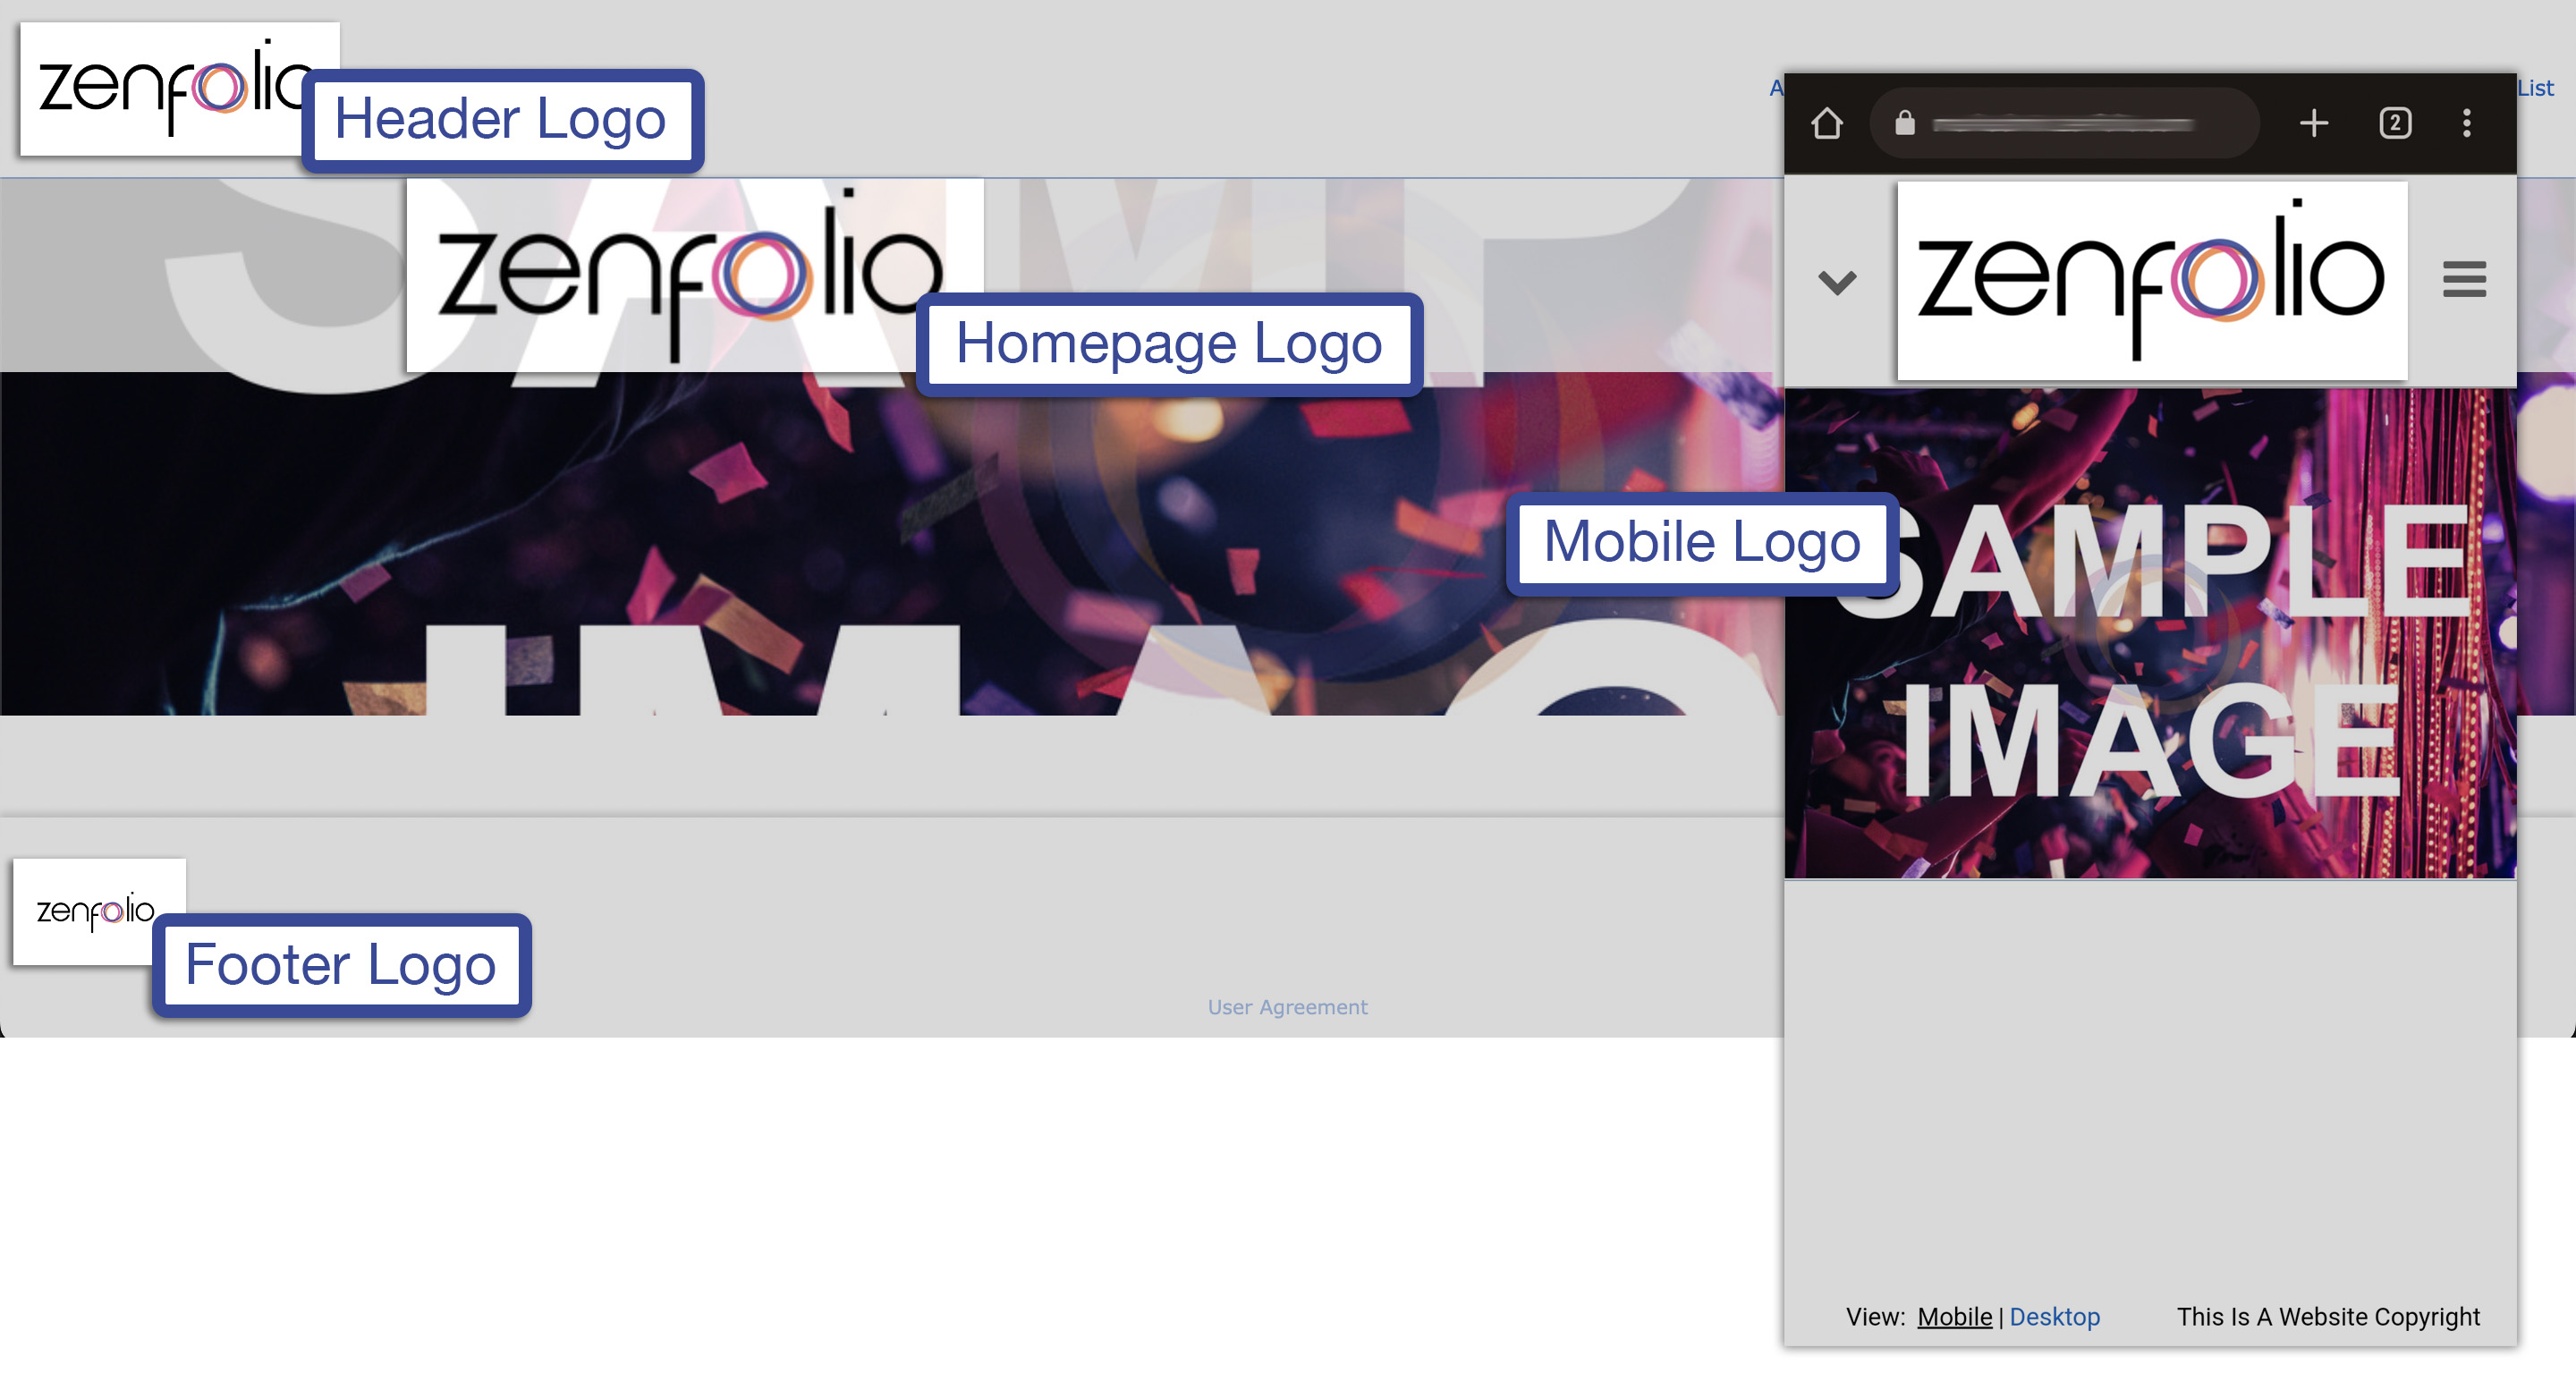
You can upload several different types of custom logos for your Zenfolio pages, including:
- Header Logo
- Footer Logo
- Homepage Logo
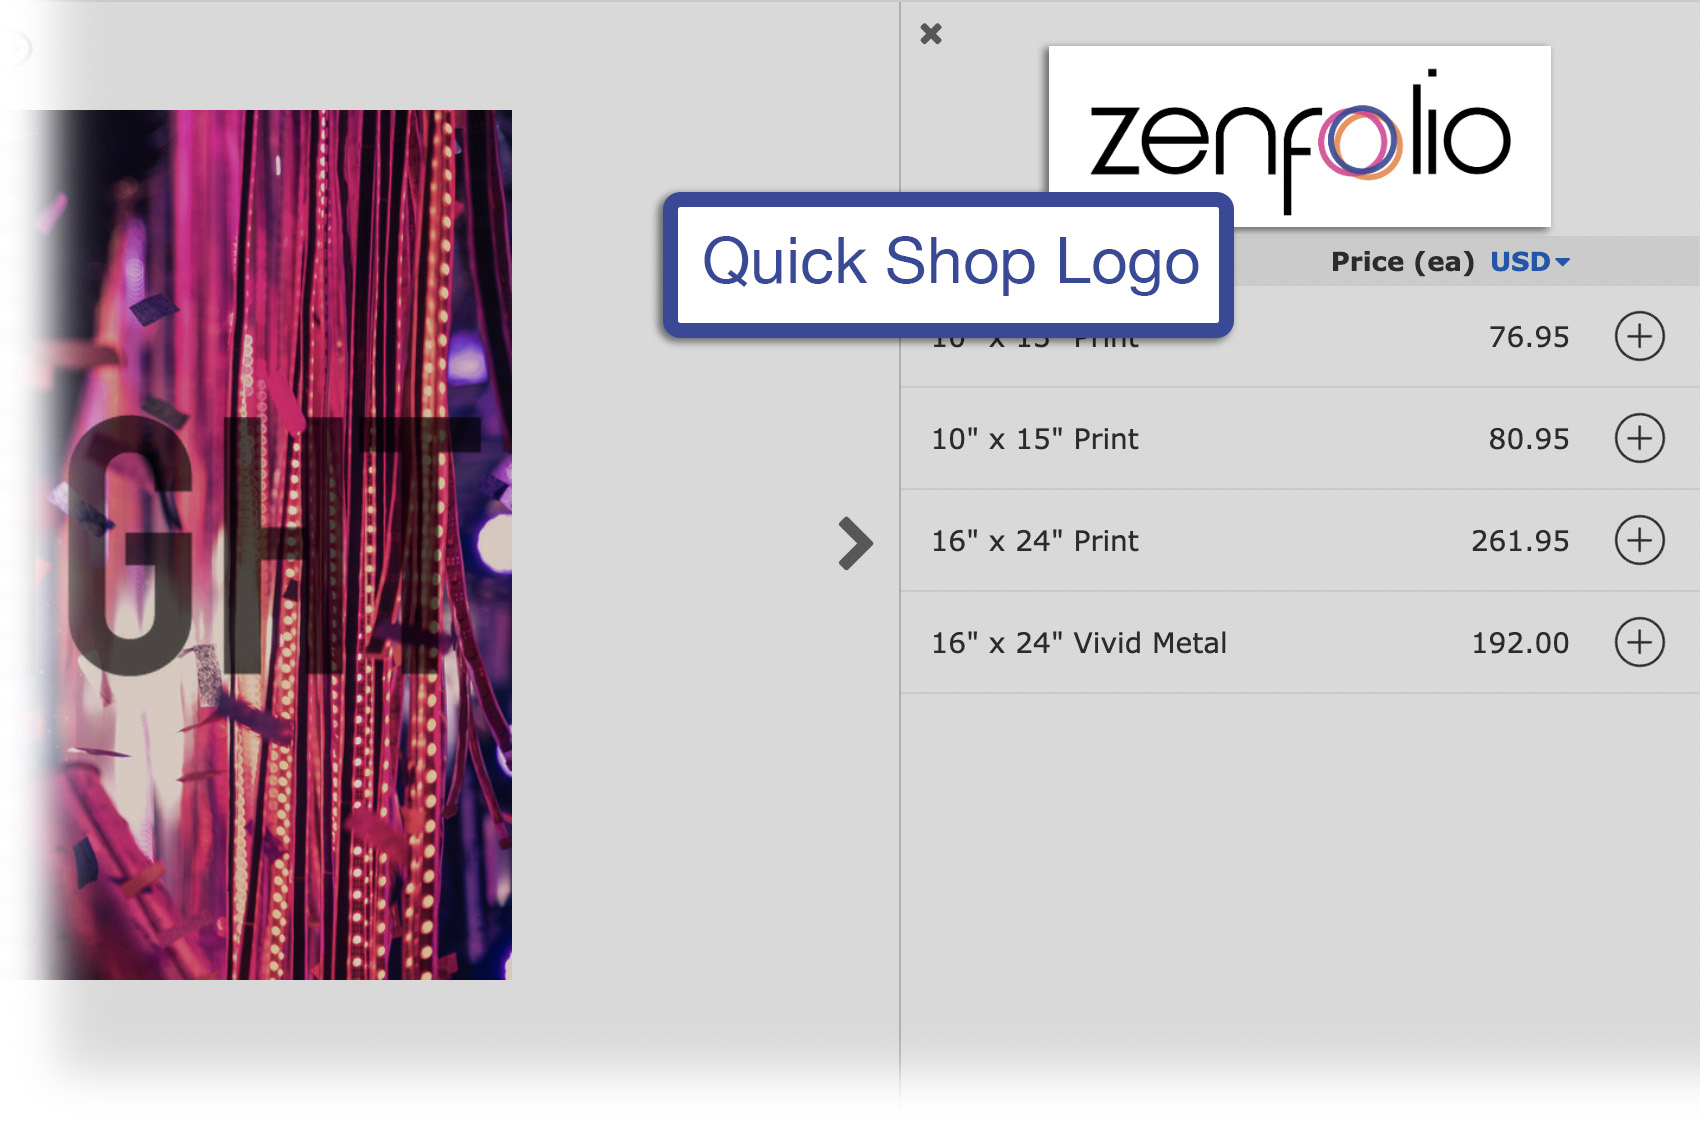
- Quick Shop Logo
- Web browser icon (or Favicon)
- Mobile Logo
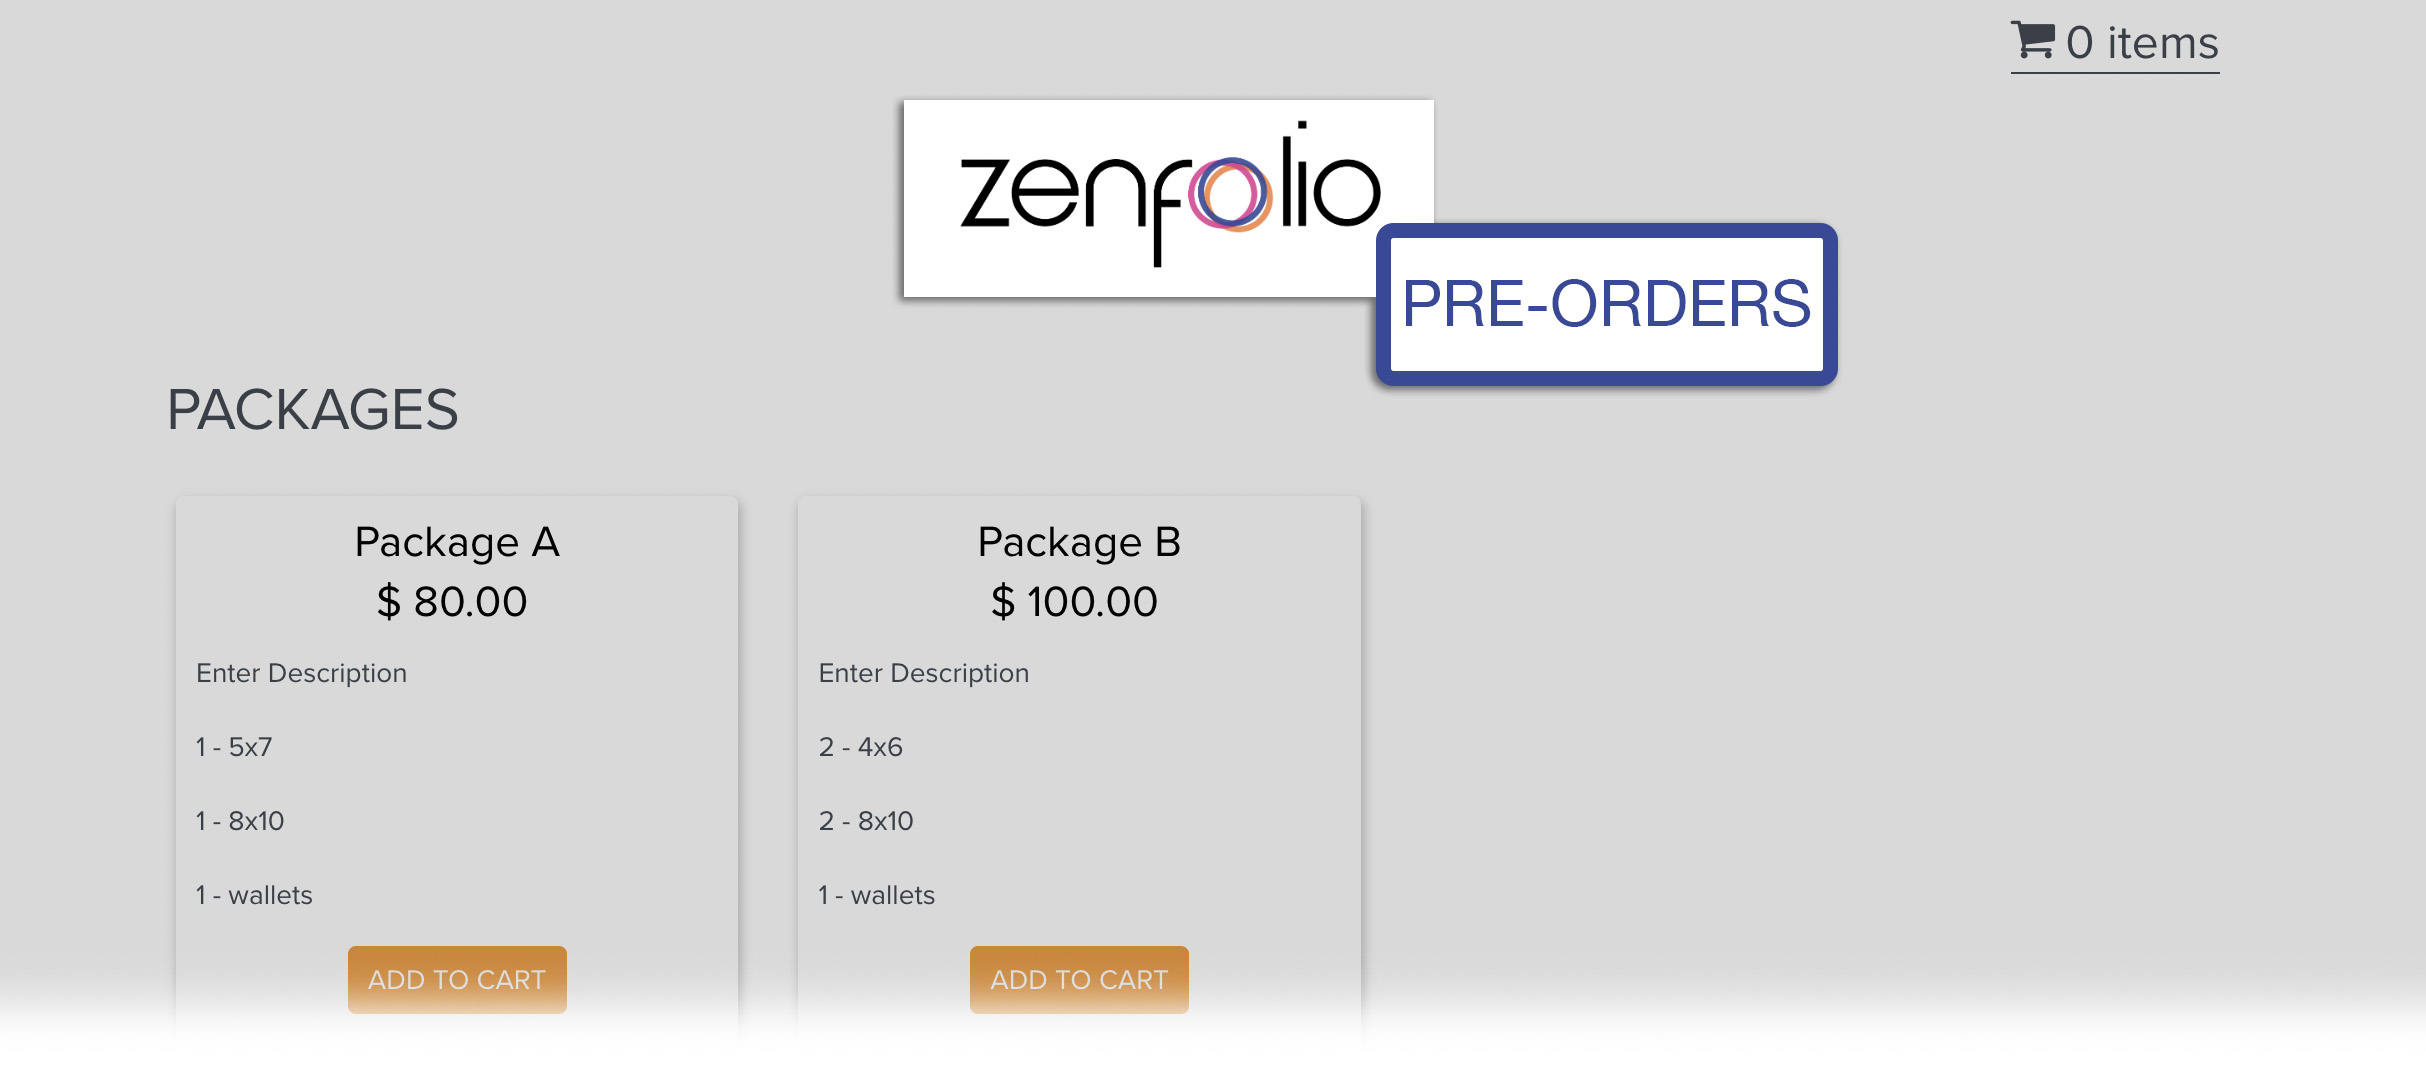
- Pre-order Page Logo
For our recommendations and tips on creating and preparing a great looking logo for your site, please click HERE.
More of a visual learner? Awesome. Check out this video tutorial on uploading logos here:
Start by going to Customize Website View
To change the logos for the Header, Homepage, Quick Shop and Browser/favicons you will need to switch over to the Customize Website View.
In the Main Menu within your account, hover your mouse pointer over Website then click Customize Website.
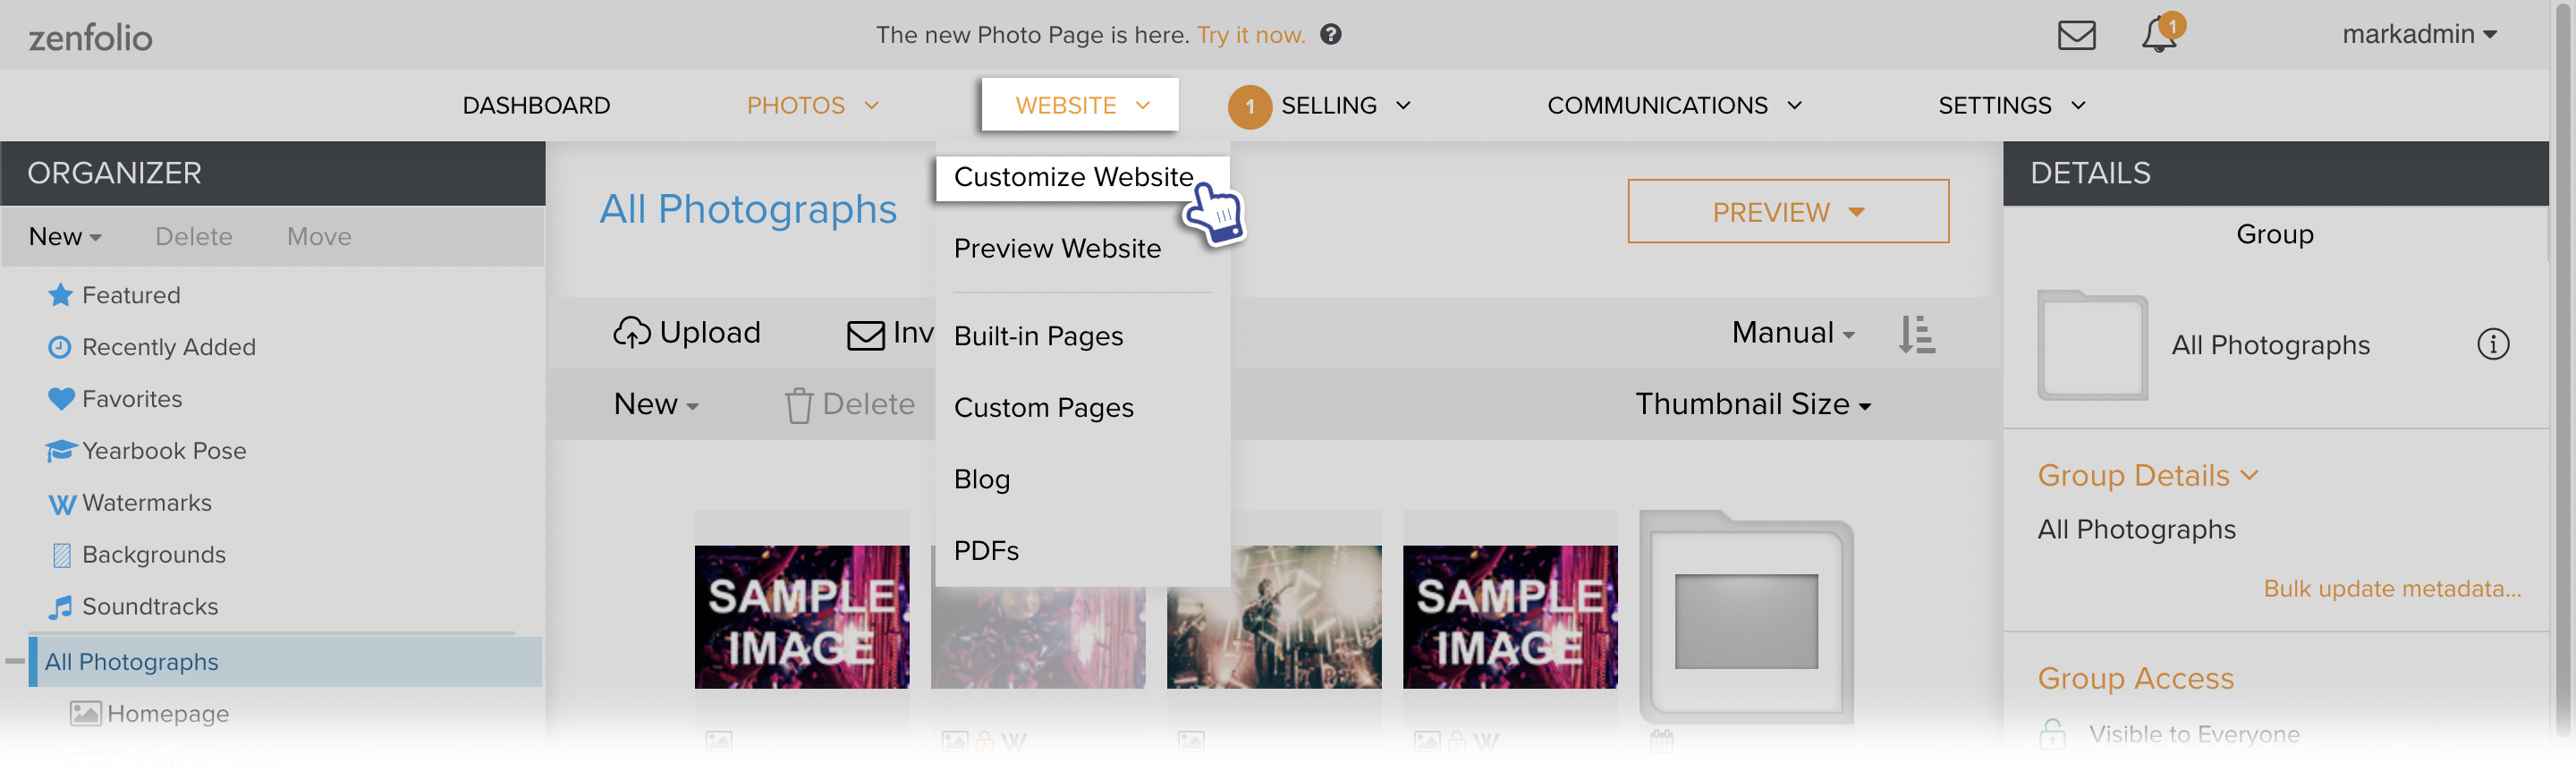
The page will refresh with a new customization menu at the top, confirming that you are in the Customize Website View.
Uploading the Header Logo
Using a Header logo is one of the best ways to make sure that your Homepage and all of the subsequent pages have the same logo position and size - a great start to ensuring that all of your pages are uniform and consistent in their aesthetic.
The Header logo (or your Display Name if there is no logo uploaded) is displayed in the Header on all the pages of your website. You may upload the Header logo, specify the Header’s height (up to 240 pixels), and determine the logo’s position all within the Site Header menu (on the left) within the Customize Website View.
Please note: logos may be added to both Header layouts A and B. Please click here for more info on configuring the Header!
As far as Header logo file format, you can upload a JPEG, GIF, PNG or TIFF file. We recommend using a PNG file with a transparent background.
-
From the Customize Website View, click on Site Header on the left.
-
In the pop-up window go to the Logo tab.
-
Click to select Upload logo image.
-
Click Browse to select the desired file from your computer.
-
Click Upload.
- Click Apply to apply your changes.
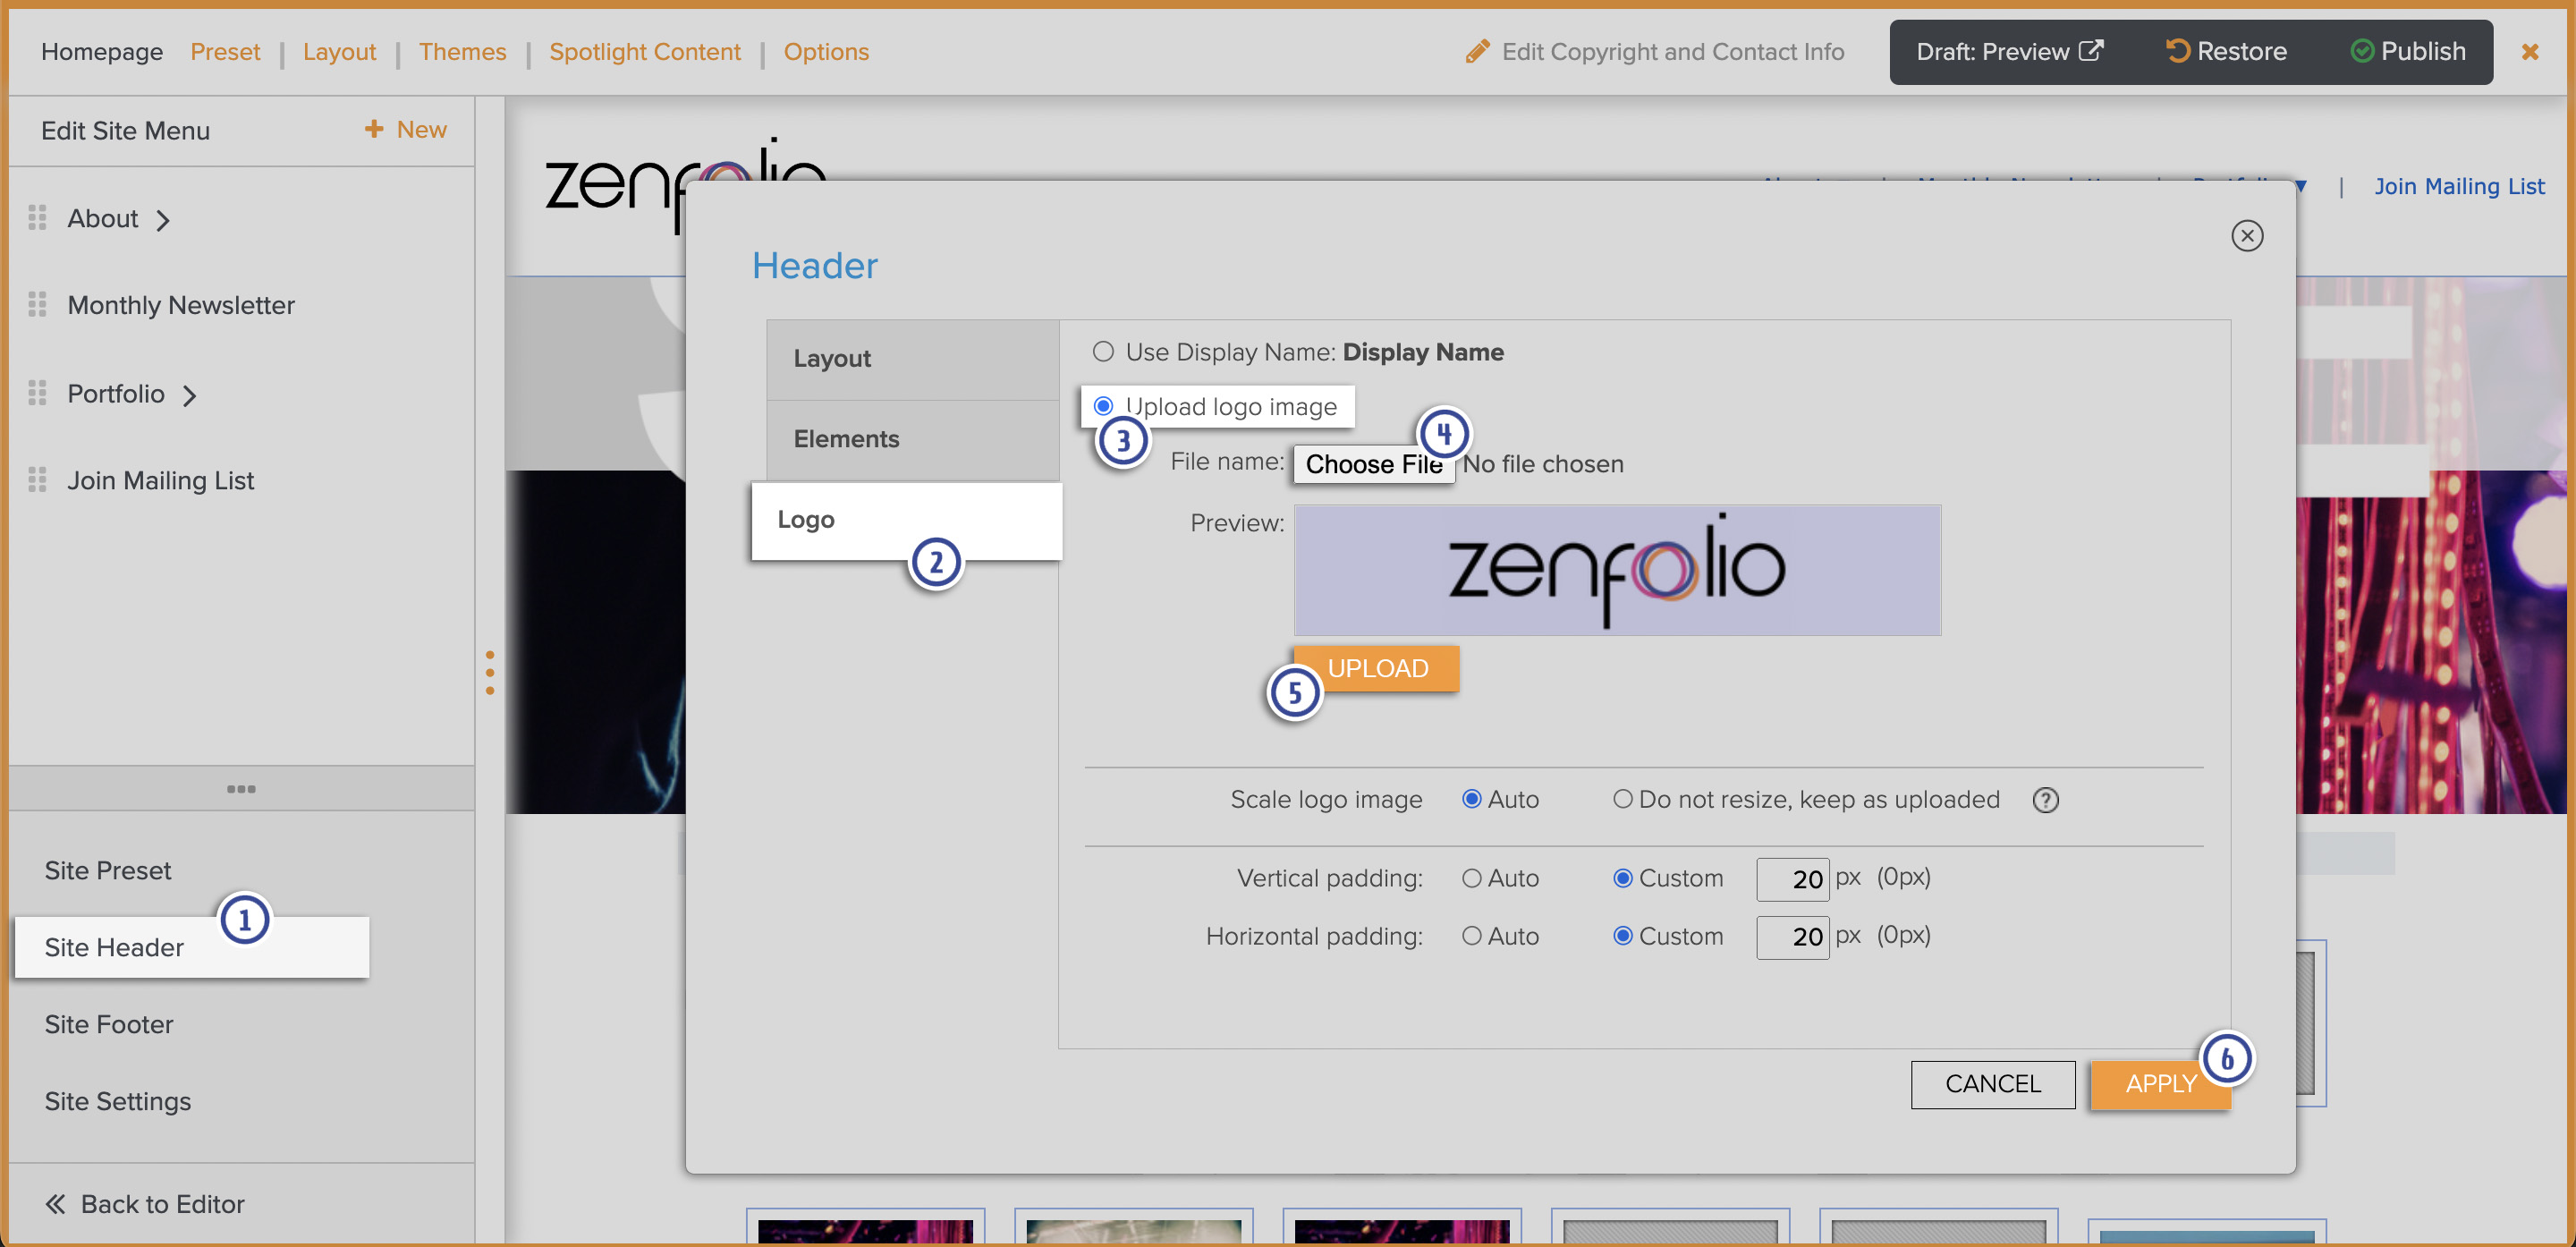
When you are done customizing, click PUBLISH and confirm that you would like your changes to be live.
Uploading the Footer Logo
Using a Footer logo is one of the best ways to make sure that your Homepage and all of the subsequent pages have the same logo position and size - a great start to ensuring that all of your pages are uniform and consistent in their aesthetic.
Your Footer logo (or your Display Name if there is no logo uploaded) is displayed in the Footer on all the pages of your website. You may upload the Footer logo, specify the Footer’s height (up to 360 pixels), and determine the logo’s position all within the Site Footer menu (on the left) within the Customize Website View.
Please note: a logo may only be added to Footer layout B. Please click here for more info on configuring the Footer!
As far as Footer logo file format, you can upload a JPEG, GIF, PNG or TIFF file. We recommend using a PNG file with a transparent background.
- From the Customize Website View, click on Site Footer on the left.
- Click on the Logo tab.
- Click to select Upload logo image.
- Click Browse to select the desired file from your computer.
- Click Upload.
- Click Apply to apply your changes.
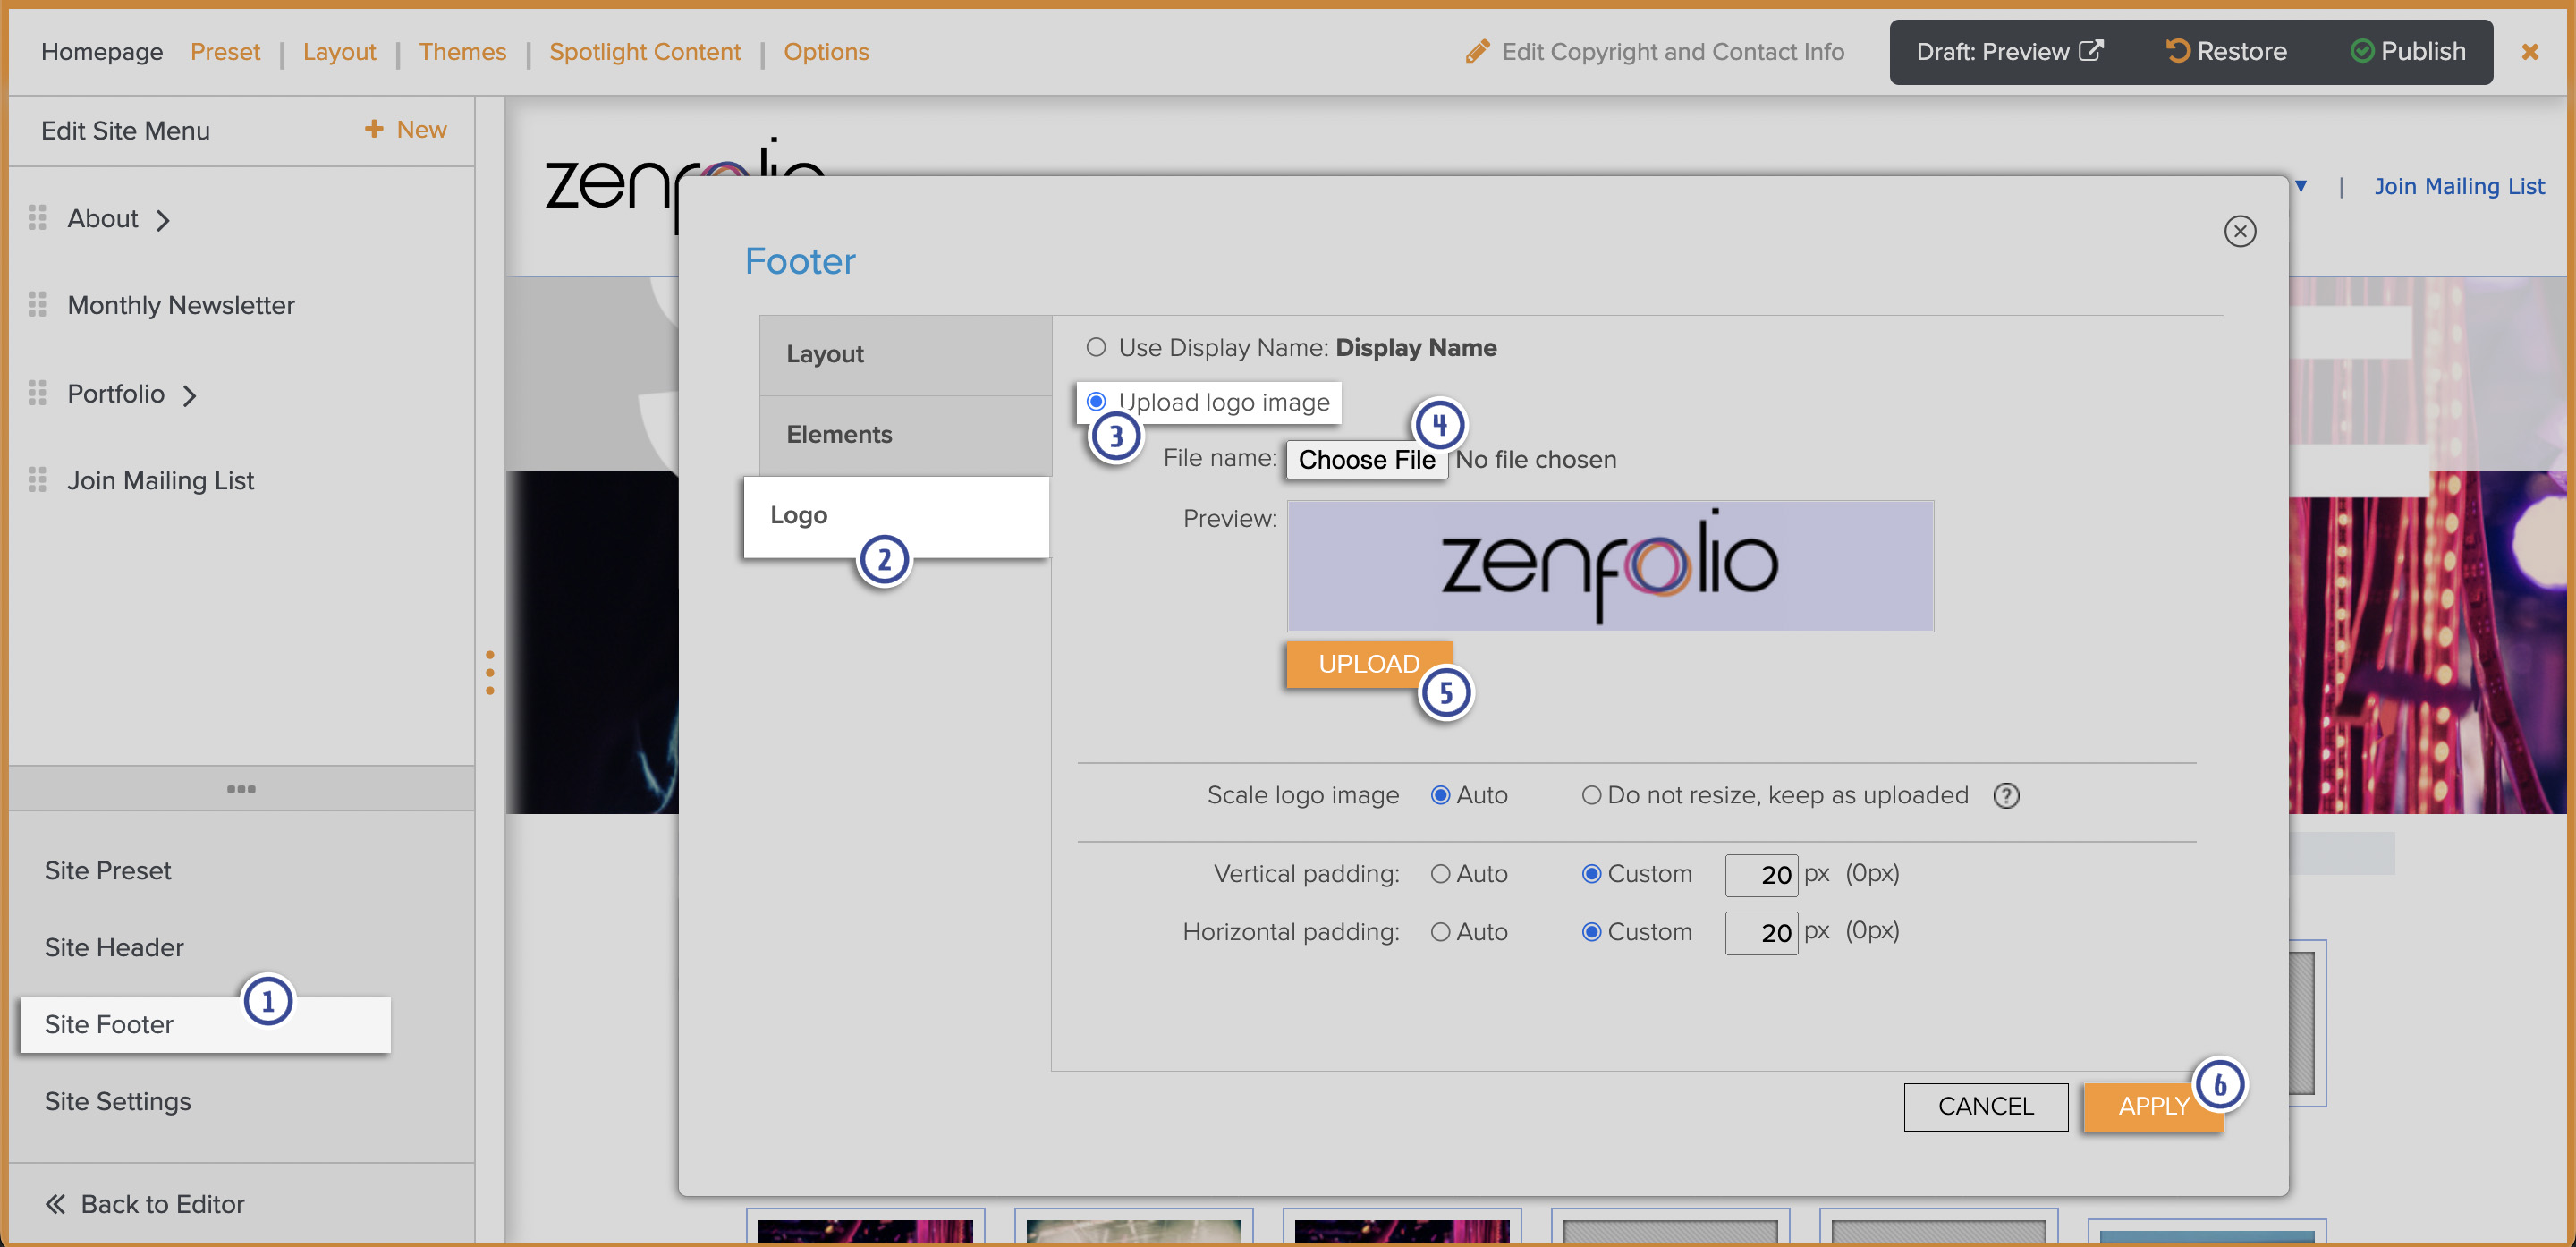
When you are done customizing, click PUBLISH and confirm that you would like your changes to be live.
Uploading the Homepage Logo
The Homepage logo (or Display Name if there’s no logo uploaded) is used on portfolio-style Homepage layouts. The uploaded image will be resized to fit the selected page layout.
For layouts where the logo is placed above or below the slide show, the maximum dimensions are 910(w) x 100(h) pixels. For layouts where the logo is placed to the left or right of the slide show, the logo is resized to a maximum width of 290 pixels.
You can upload a JPEG, GIF, PNG or TIFF file. We recommend using a PNG file with transparency.
- From the Customize Website View toolbar, click on Options.
- From the pop-up go to the Logo tab.
- Click to select Upload logo image.
- Click Browse to select the desired file from your computer.
- Click Upload.
- Click Apply to apply your changes.
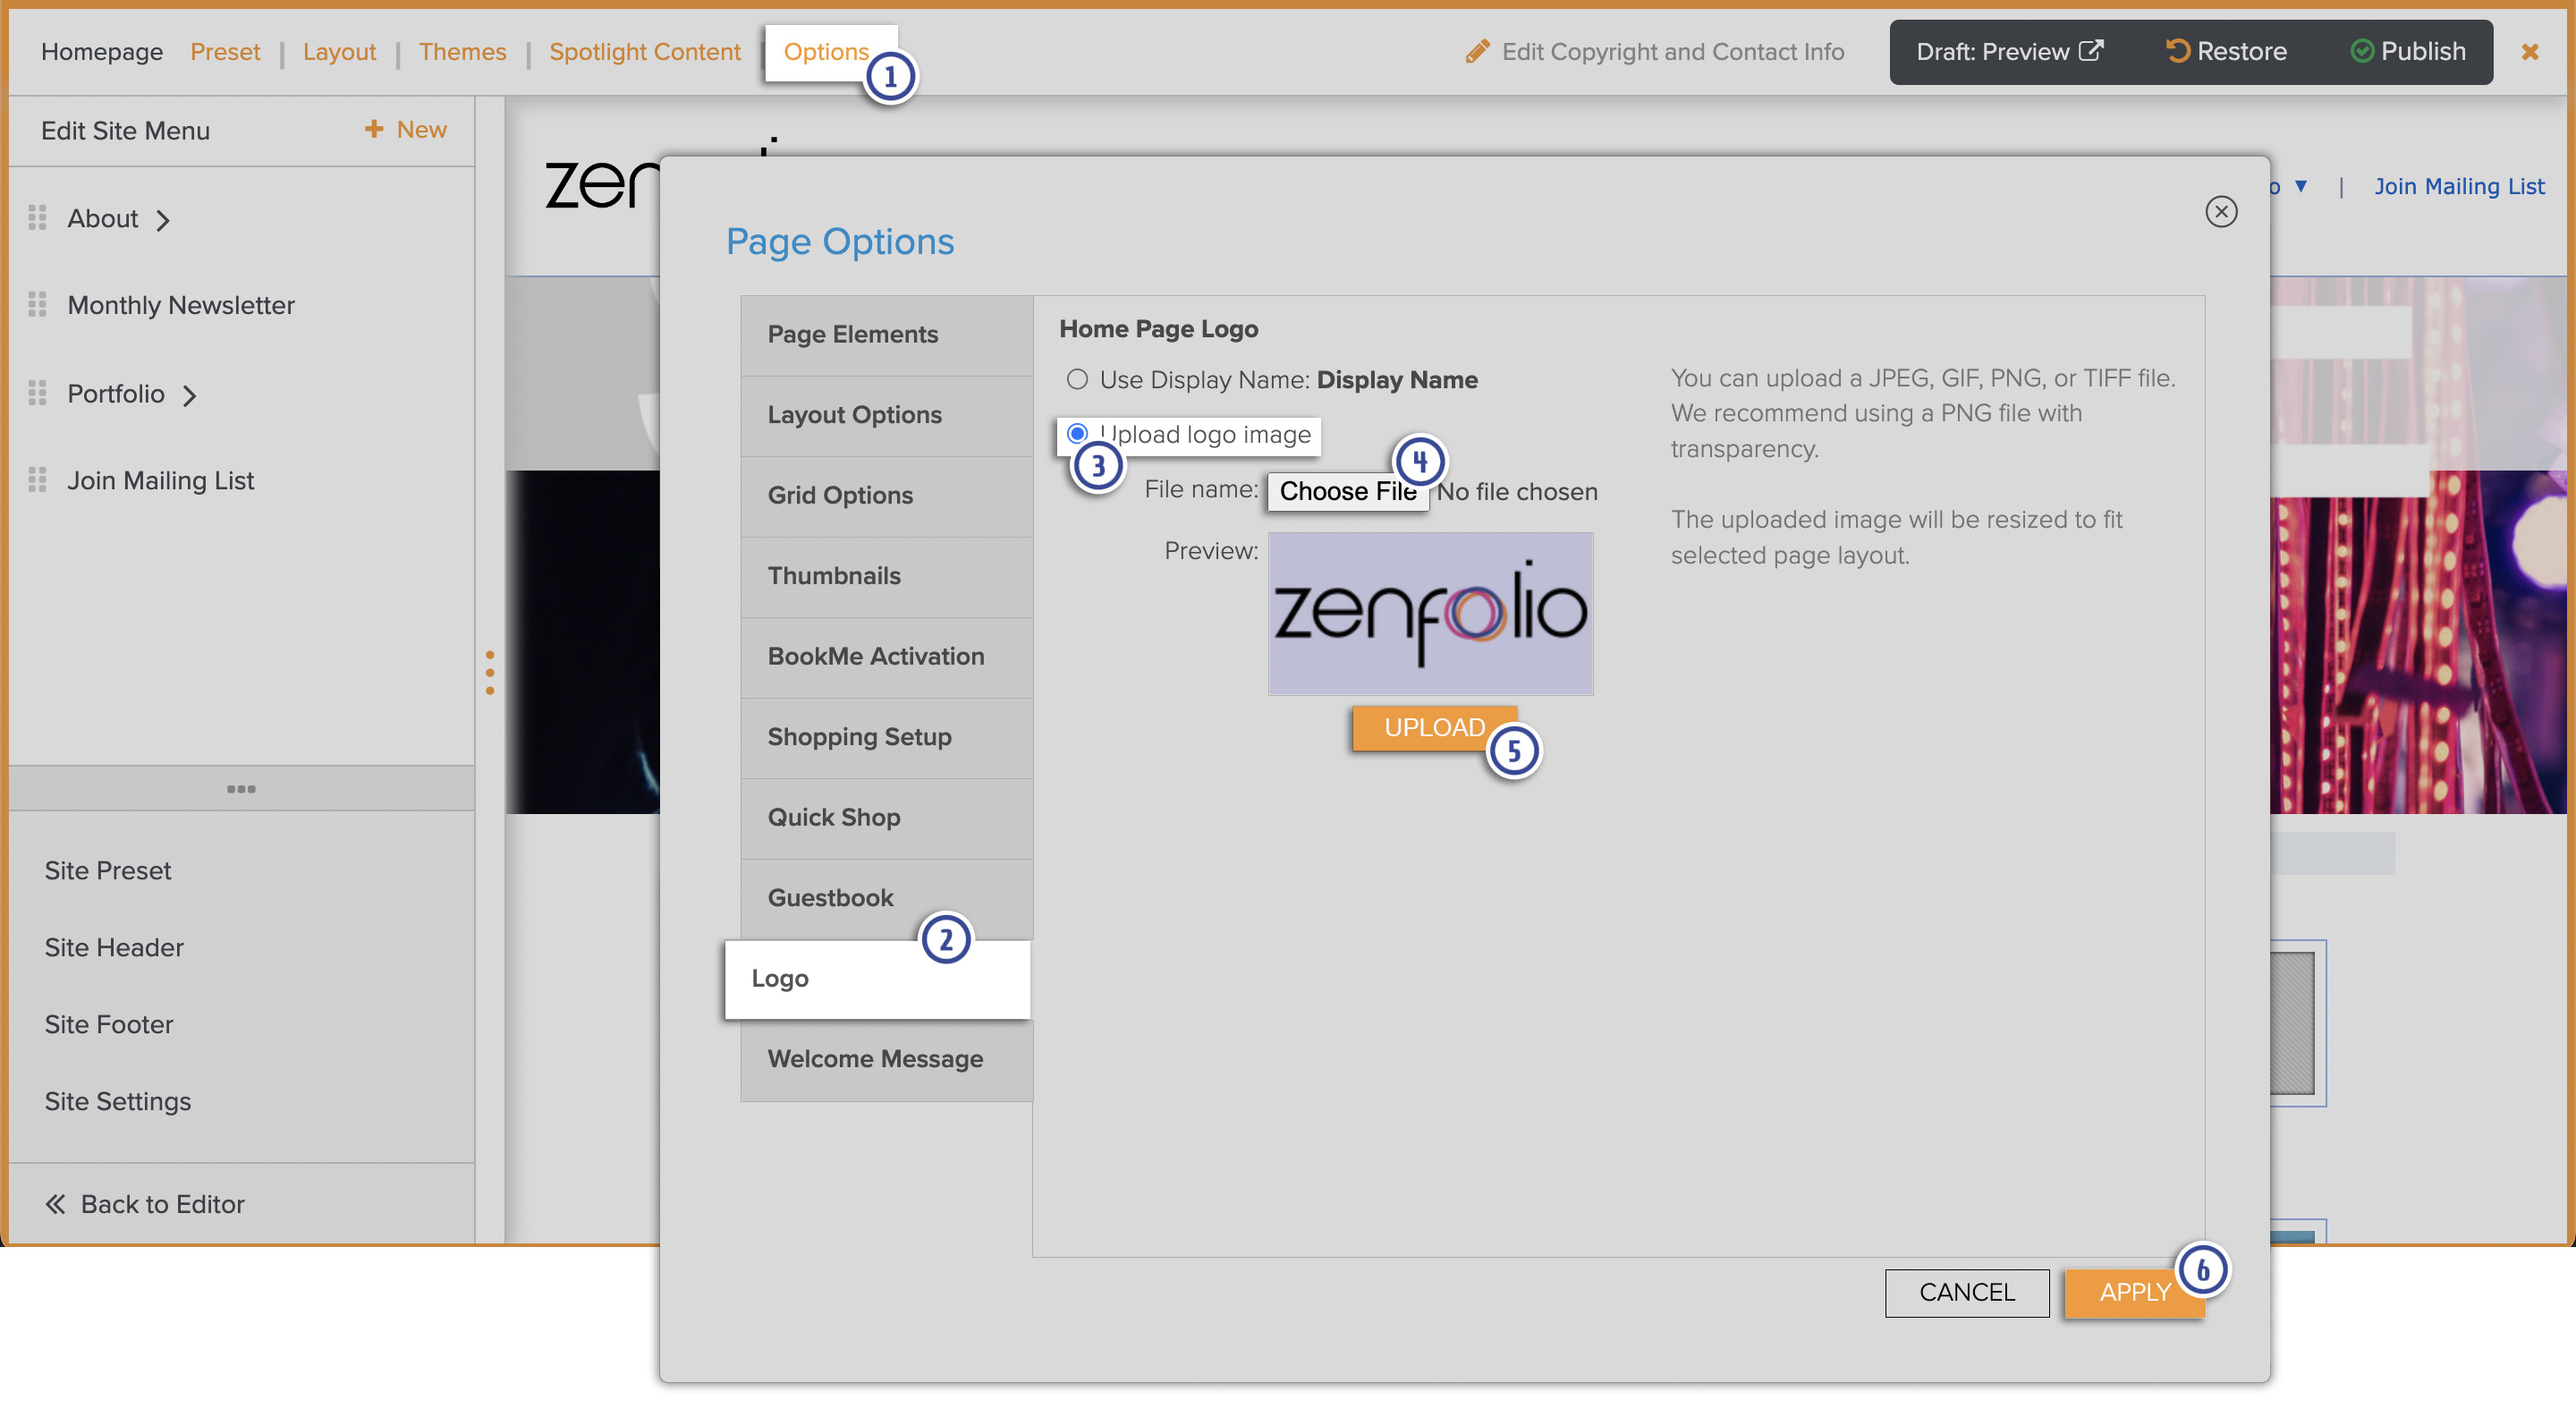
When you are done customizing, click PUBLISH and confirm that you would like your changes to be live.
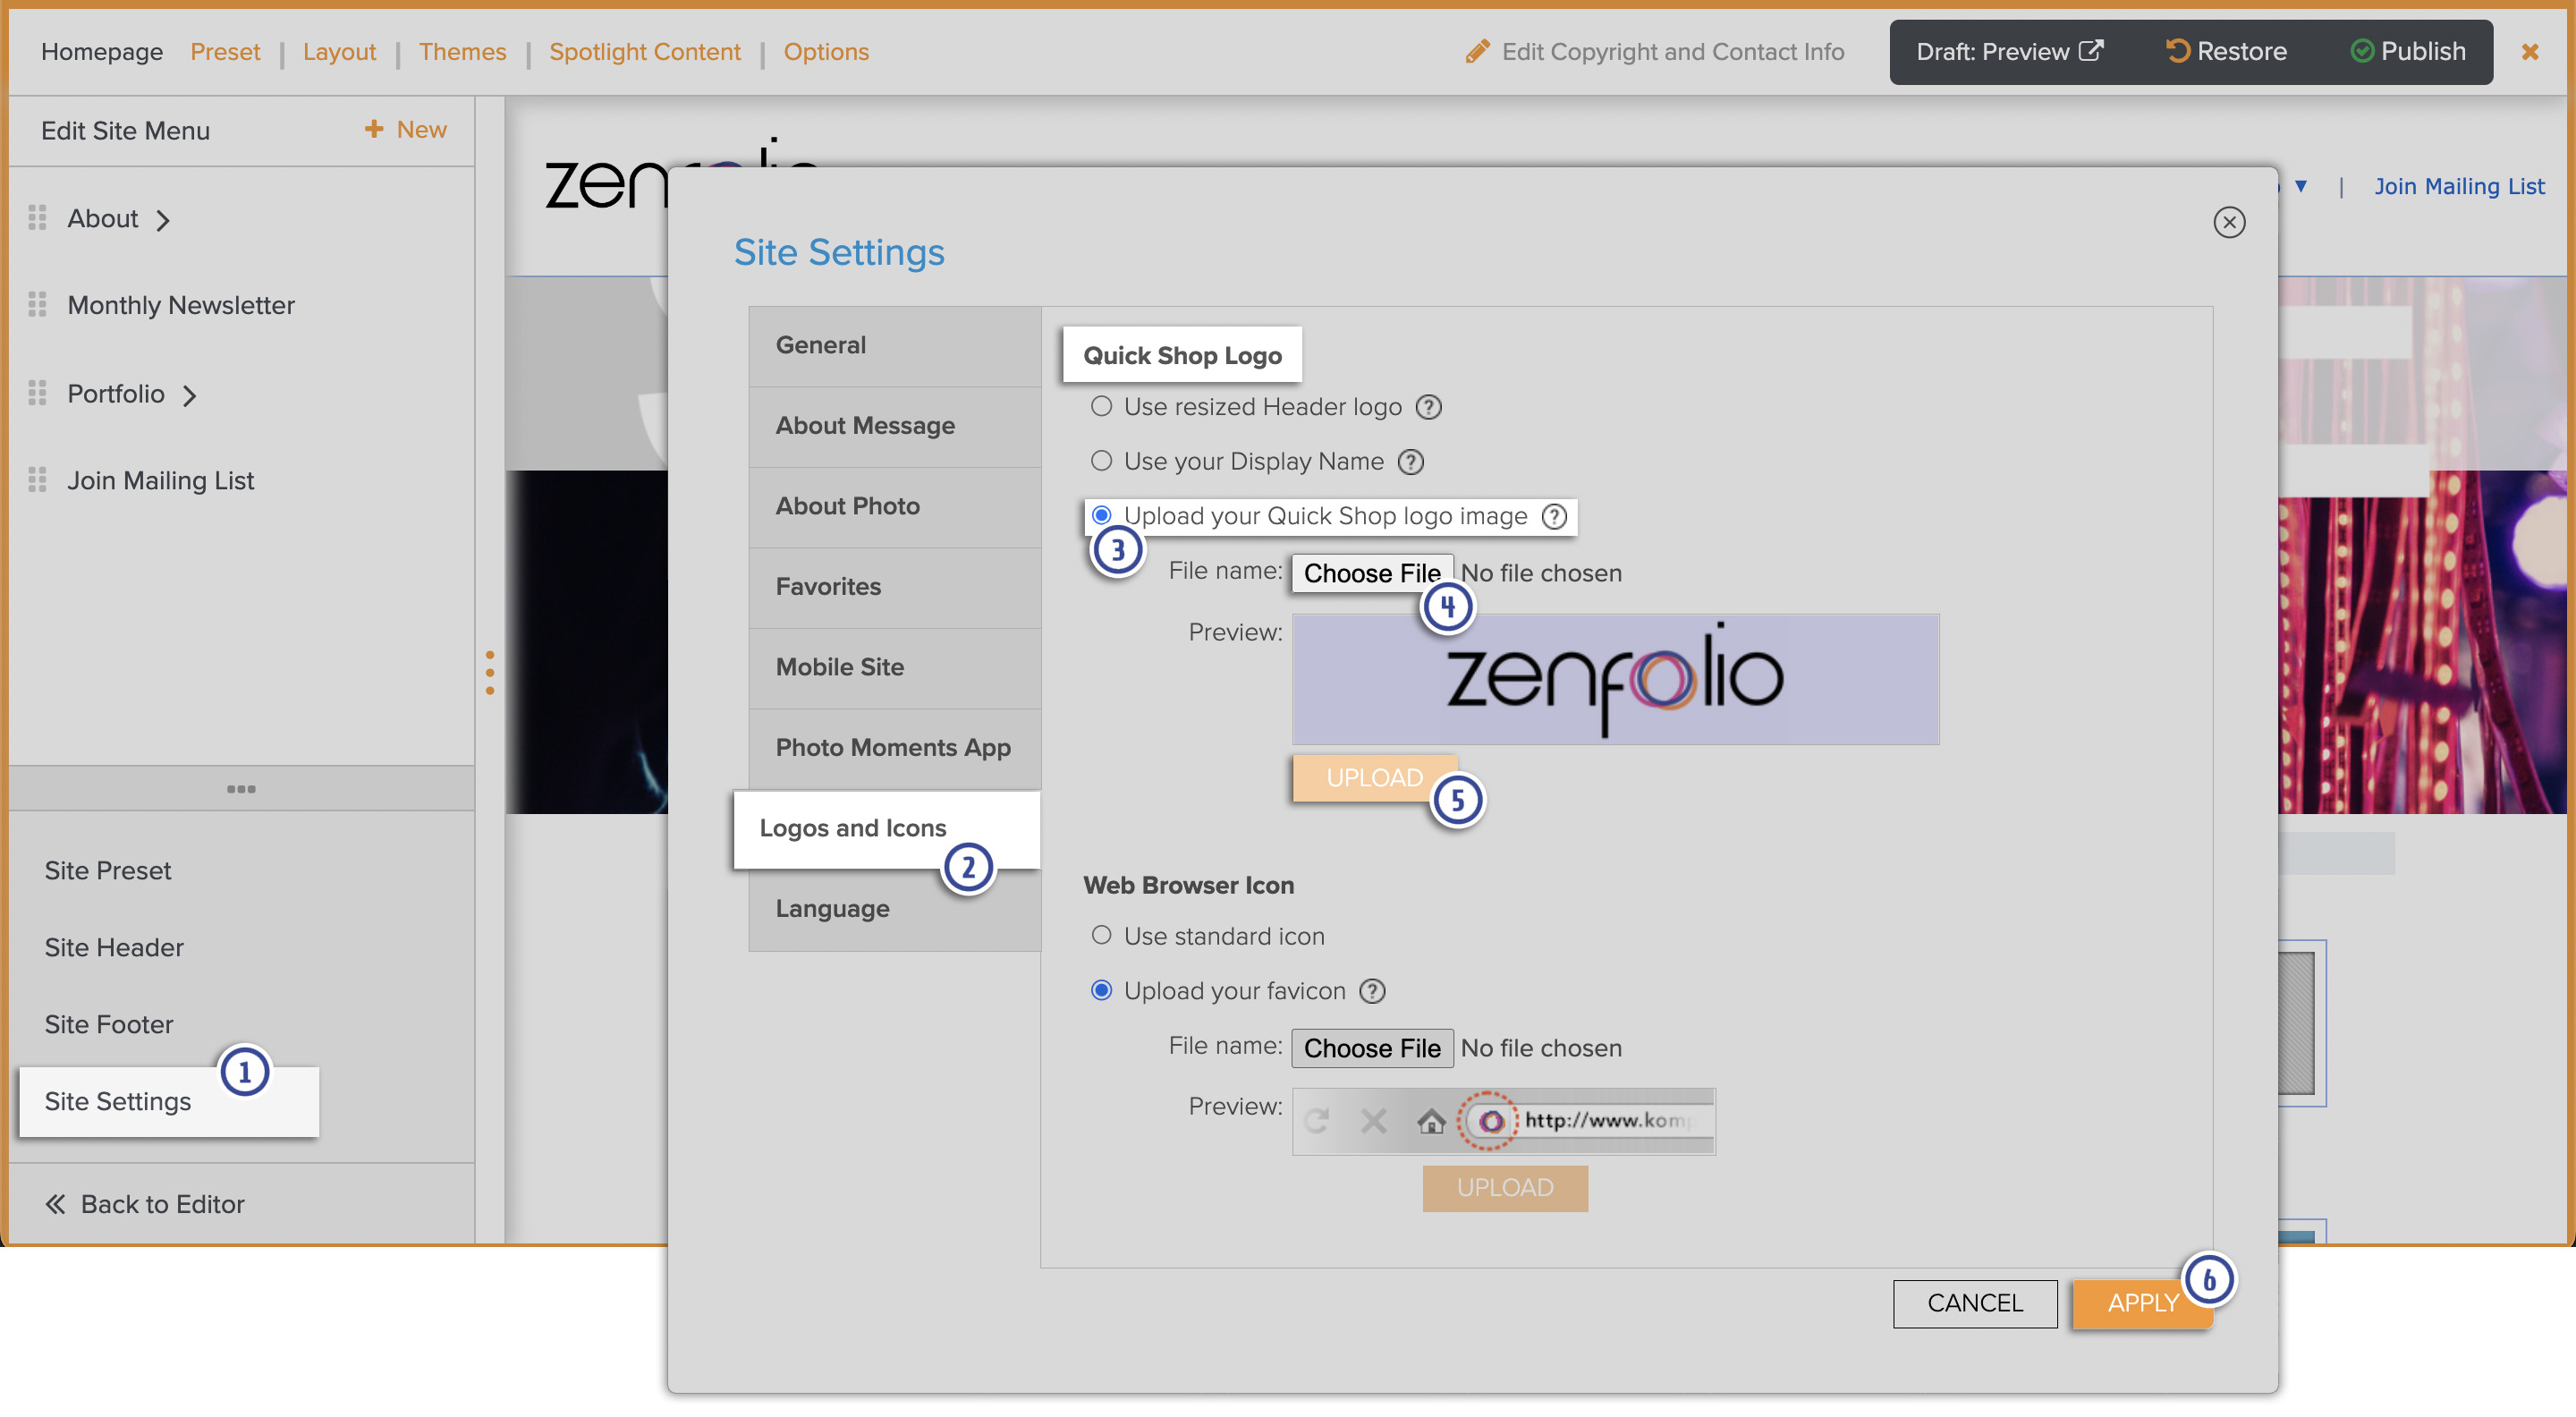
Uploading a Quick Shop Logo
On your Quick Shop page, your logo can be displayed in the top right corner, over the menu of purchasable items. Click HERE for more information on the Quick Shop page.
By default, your Header Logo will be displayed in the Quick Shop page (if a logo has been uploaded to the Header Logo). The option is also available to just show your site's Display Name in the Quick Shop page instead of showing a logo.
The image uploaded for use as the Quick Shop logo is automatically resized to fit the available space, but we recommend using a logo that is 400 pixels wide and 80 pixels tall.
You can upload a JPEG, GIF, PNG or TIFF file. We recommend using a PNG file with transparency.
-
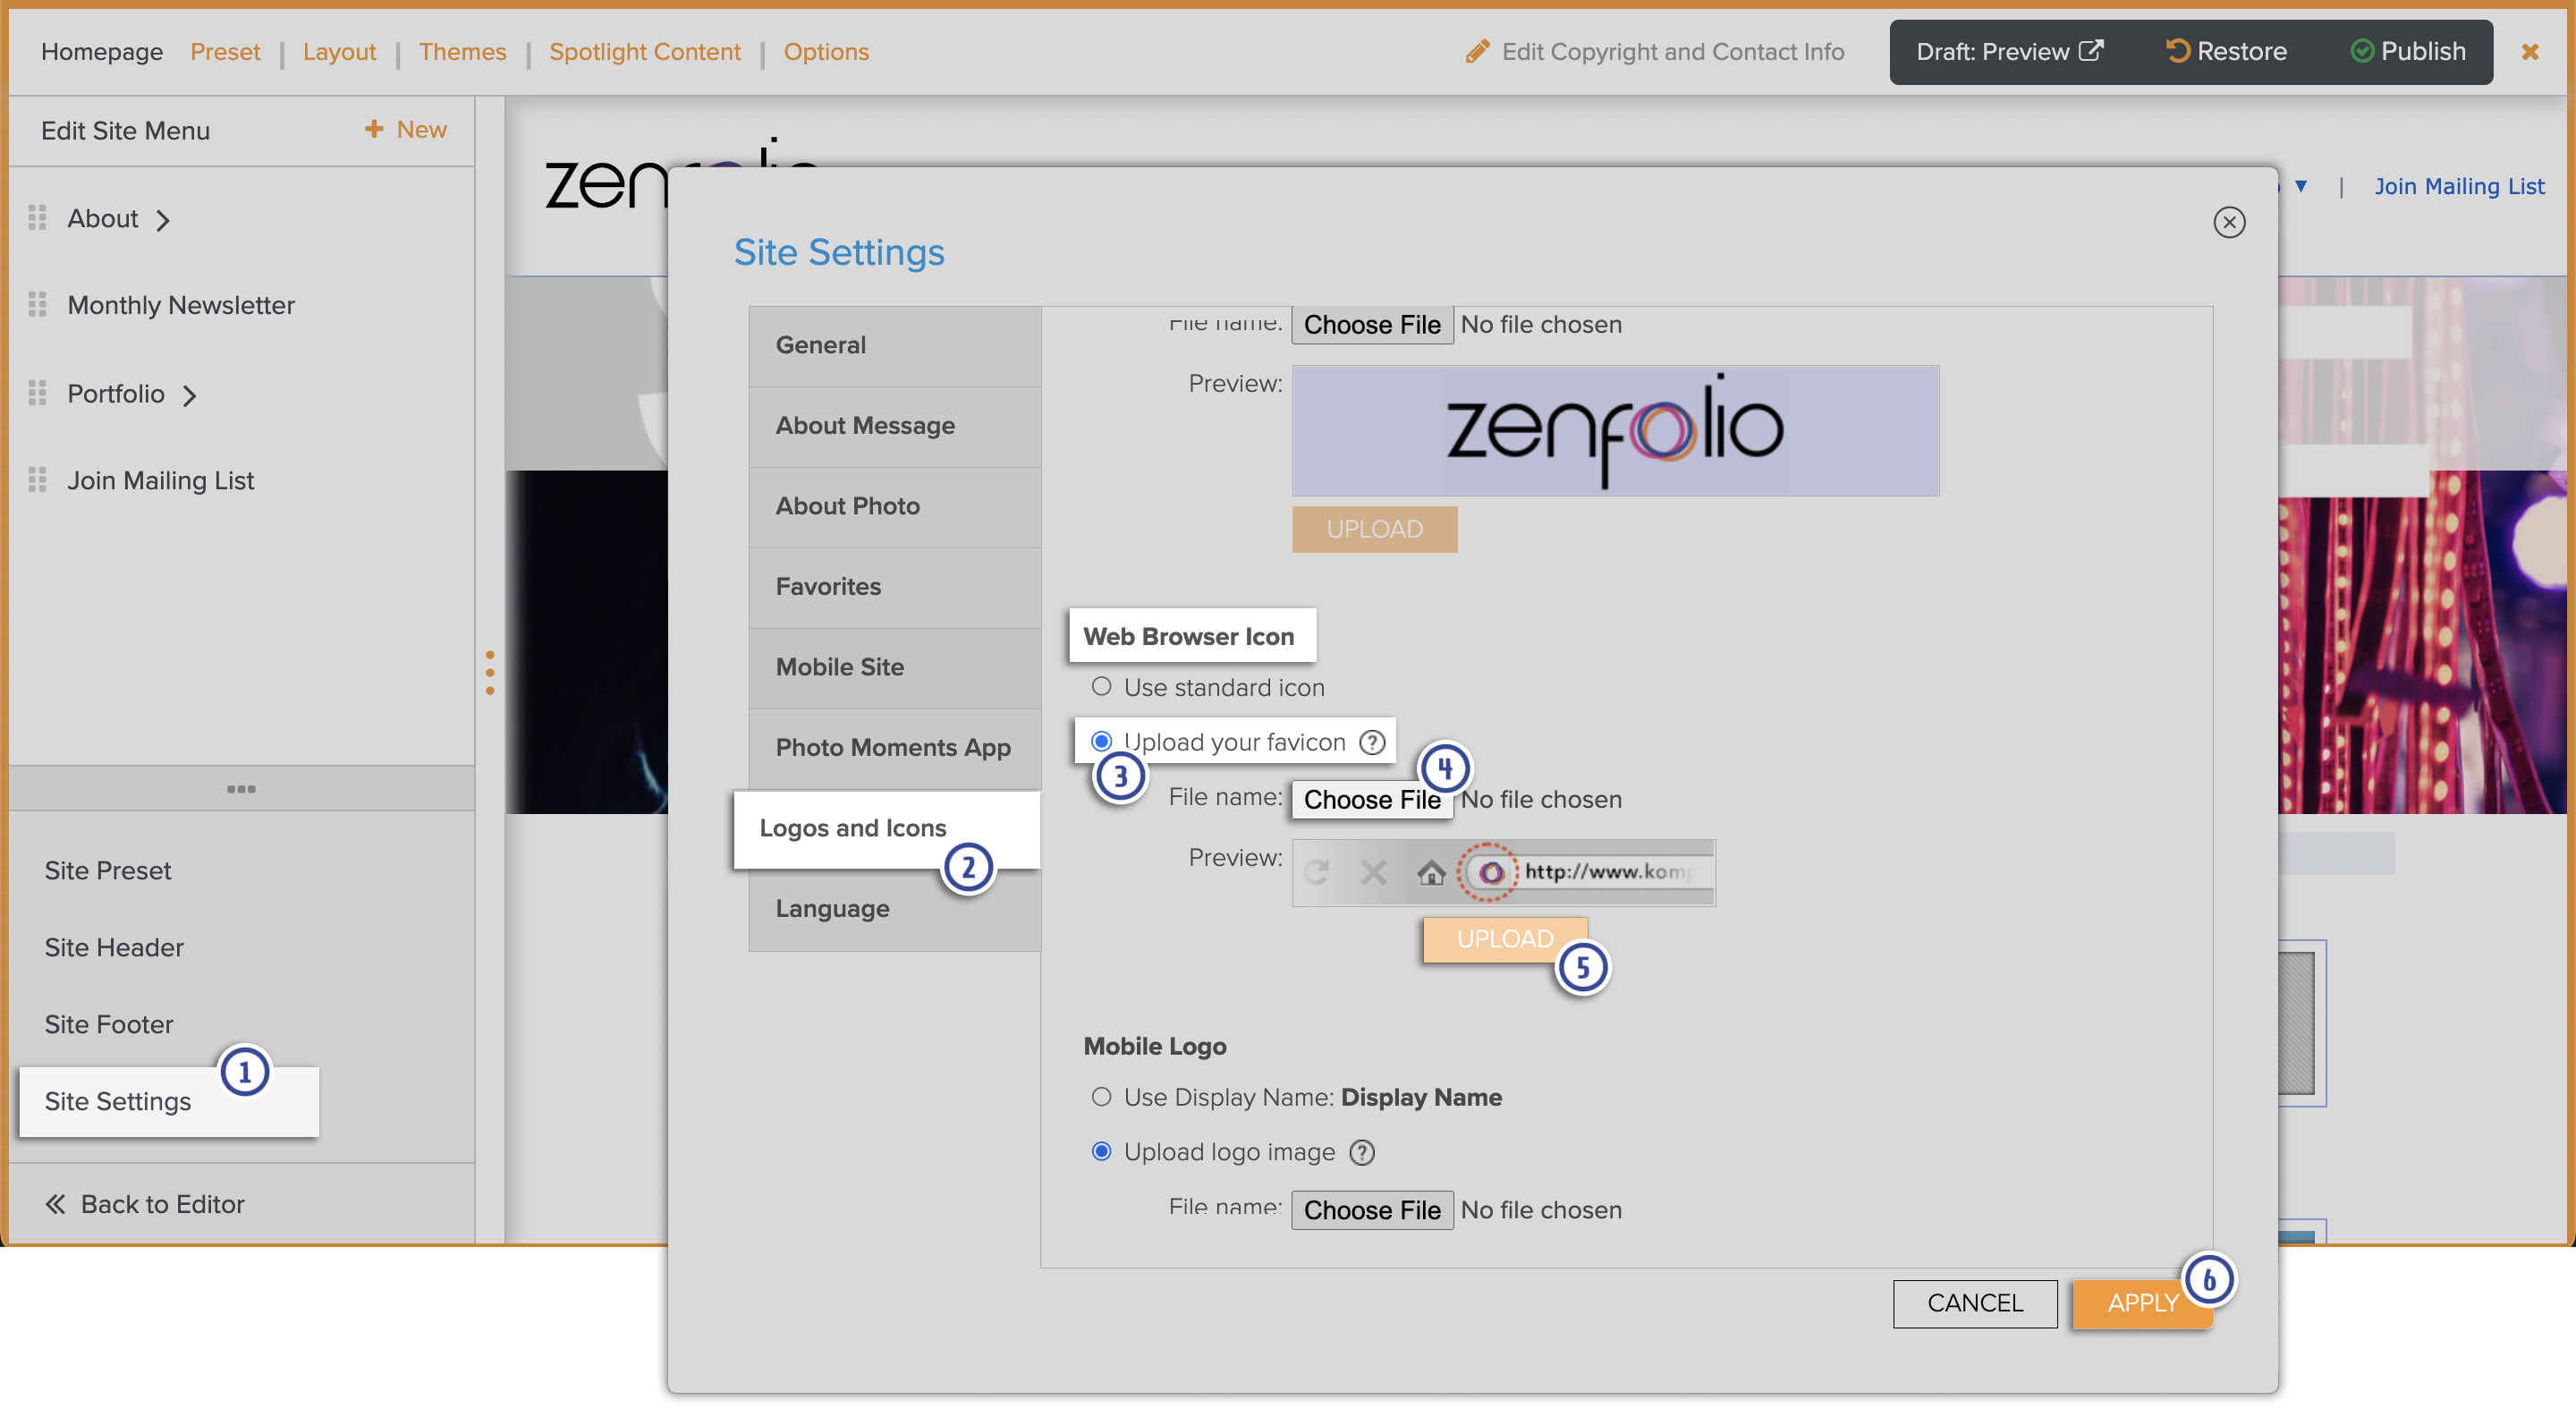
From the Customize Website View, click on Site Settings on the left.
-
Go to the Logos and Icons tab.
-
Mark the circle next to Upload your Quick Shop logo image.
-
Click Browse to select the desired file from your computer.
-
Click Upload.
- Click Apply to apply your changes.
When you are done customizing, click PUBLISH and confirm that you would like your changes to be live.
Uploading a Web Browser Icon
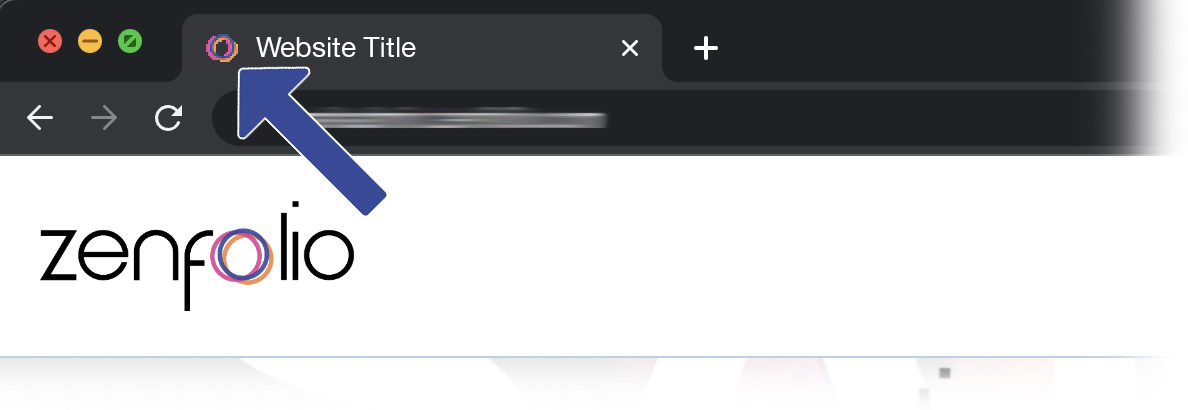
A Web browser icon (aka Favicon) is a small custom icon displayed next to a site's URL in the address bar. The icon is also often used in bookmarks, within the tabs of tabbed browsers, and in Internet shortcuts located on your desktop.
Please note that in order for all browser types to recognize the favicon properly, you must upload a JPEG, GIF, PNG or TIFF file that is sized to 16x16 pixels and without any transparent layers.
- From the Customize Website View, click on Site Settings on the left.
- Go to the Logos and Icons tab.
- Click to select Upload your favicon.
- Click Browse to select the desired file from your computer.
- Click Upload.
- Click Apply to apply your changes.
When you are done customizing, click PUBLISH and confirm that you would like your changes to be live.
Uploading a Logo for your Mobile site
The mobile site logo is what appears for your visitors when they visit your Zenfolio website on a mobile device (iPhones and most Android phones), assuming you have your mobile site enabled.
For the mobile logo, you may upload a JPEG, GIF, PNG, or TIFF file. We recommend using a PNG file with transparency up to 640 pixels in width and 200 pixels in height.
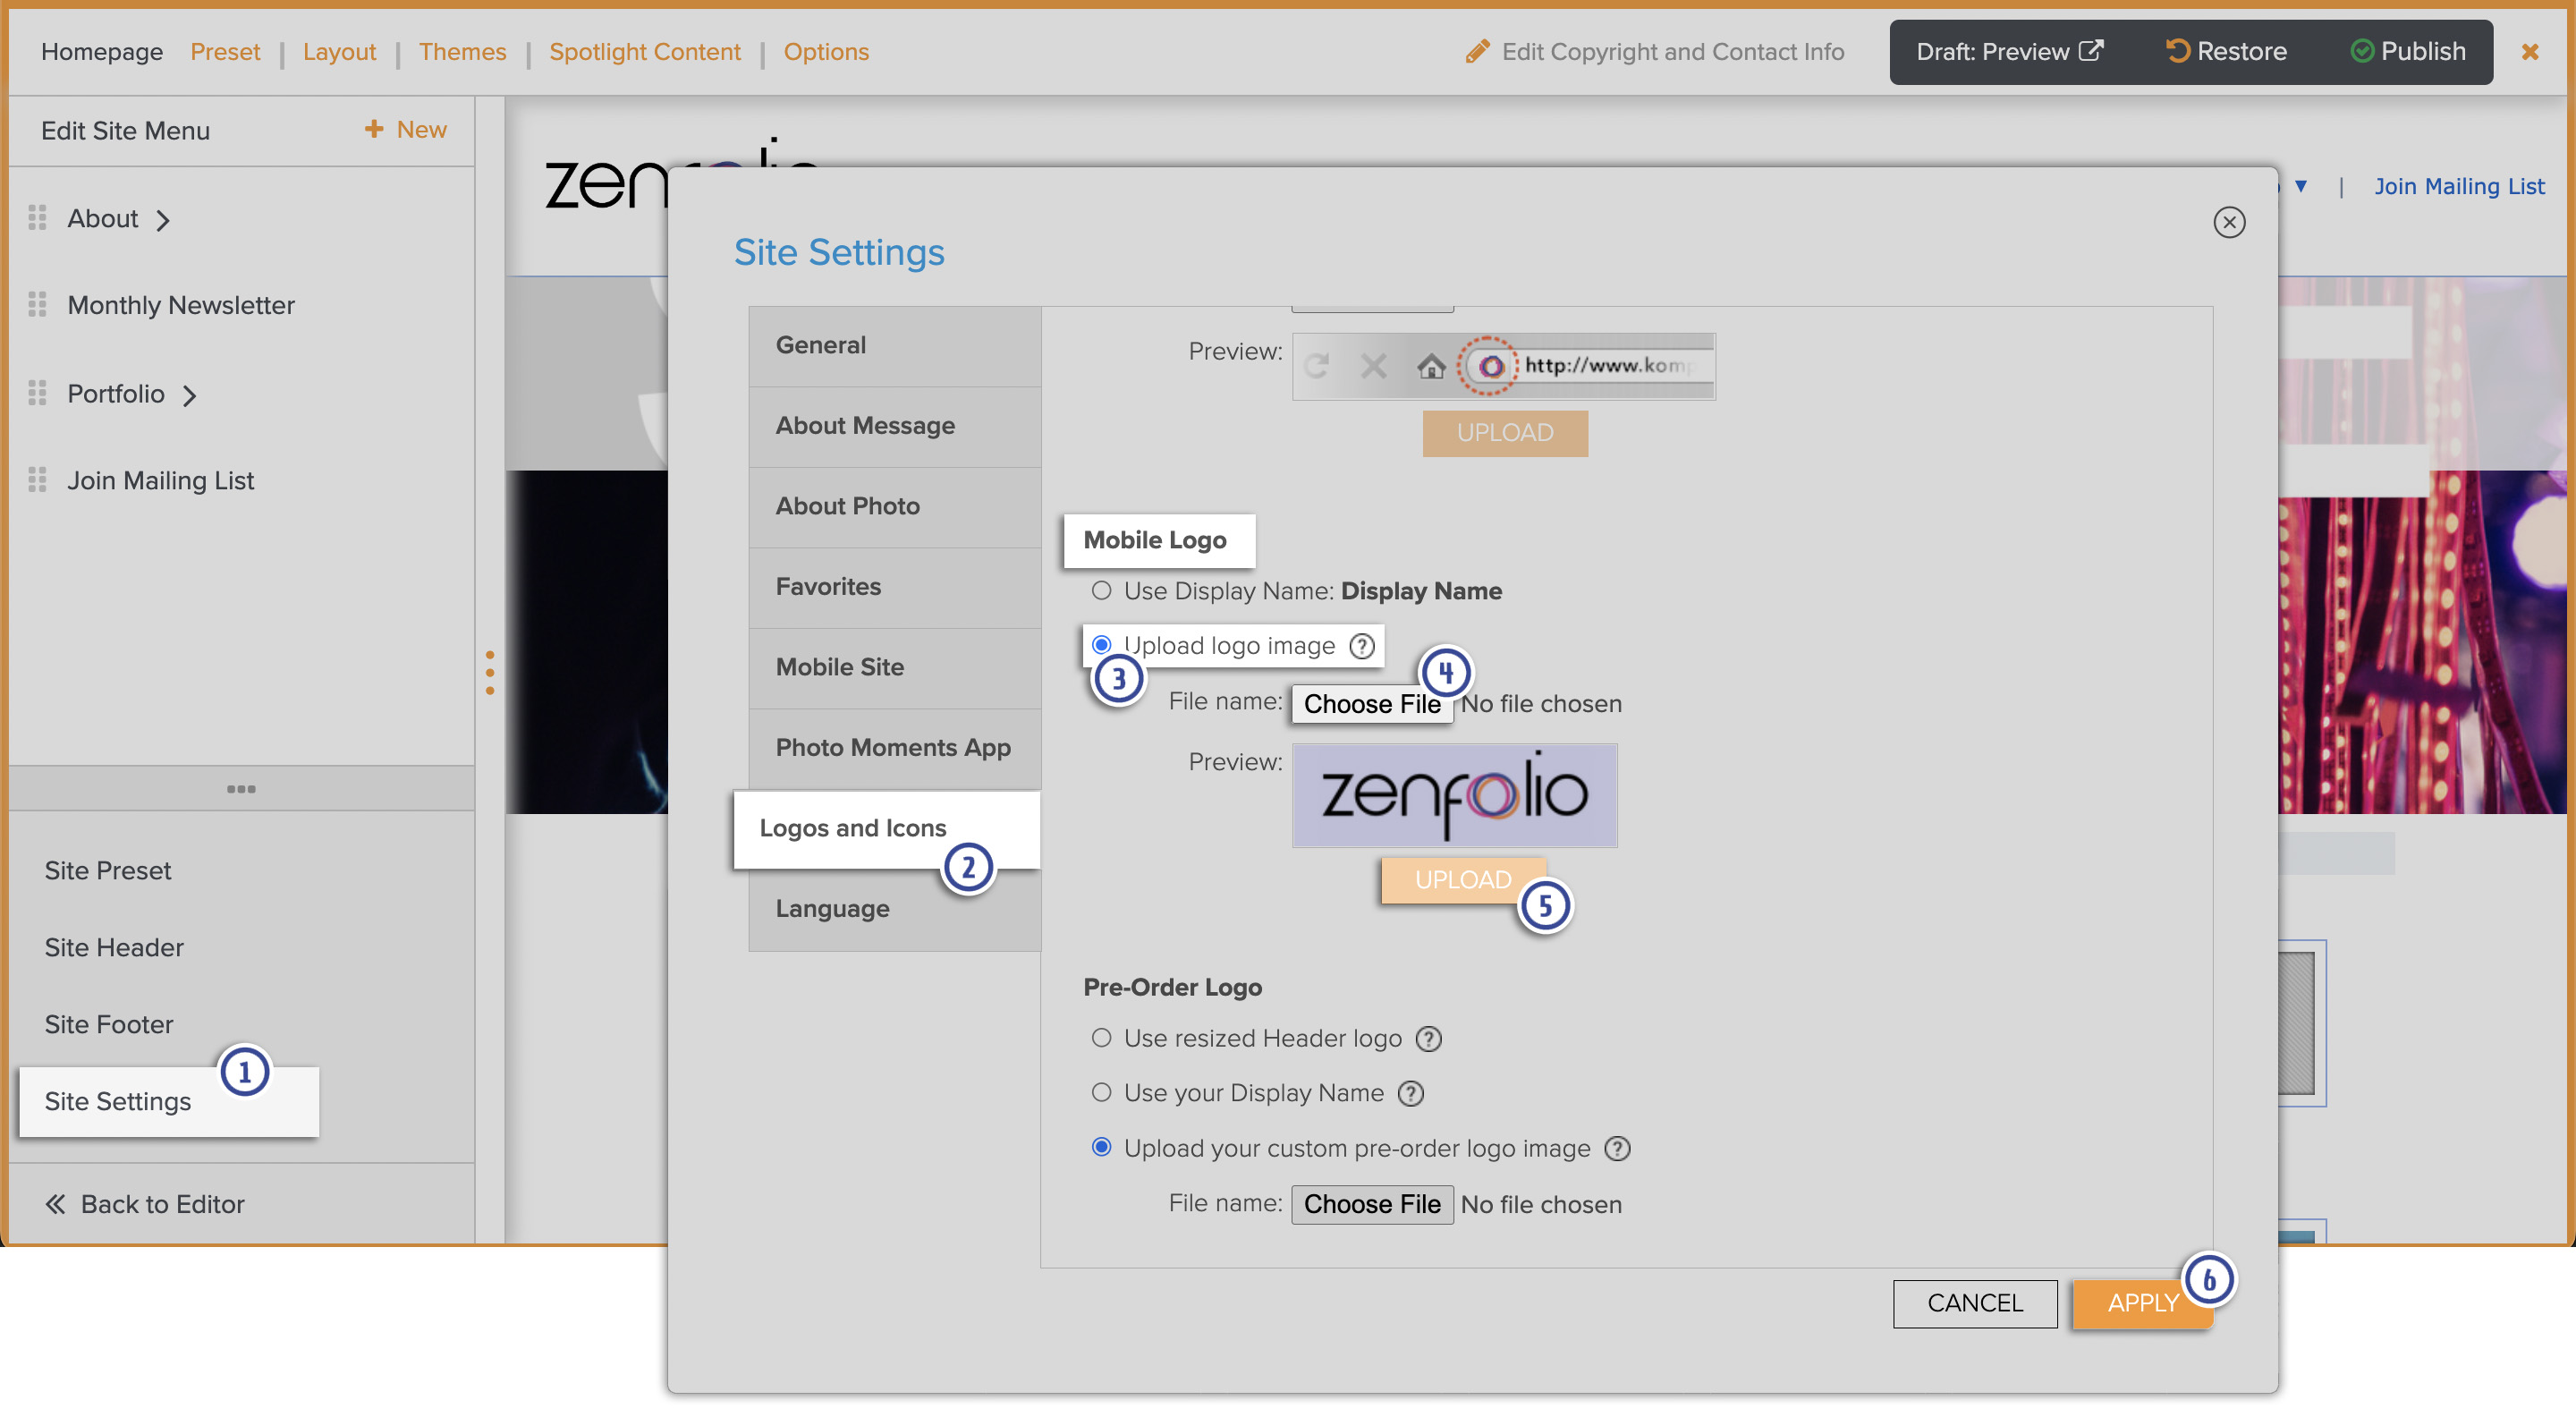
- From the Customize Website View, click on Site Settings on the left.
- Go to the Logos and Icons tab.
- Scroll down in the Site Settings window to see the Mobile Logo section. Click to select Upload logo image.
- Click Browse to select the desired file from your computer.
- Click Upload.
- Click Apply to apply your changes.
When you are done customizing, click PUBLISH and confirm that you would like your changes to be live.
Finally, for our recommendations and tips on creating and preparing a great looking logo for your website, please click HERE.