Exclusive to Advanced plan subscribers.
The Yearbook Pose feature allows school photographers to provide a way for their school photography clients to select the image they would like printed in their school's yearbook.
It also allows the photographer to quickly create a list of those selected images.
Here is the outline of all of the steps required in using the Yearbook Pose feature:
- Enable the Yearbook Pose Feature in a Specific Gallery (New Photos Page)
- Send Yearbook Pose Invitation Emails to Your Clients (New Photos Page)
- Client Selects Their Yearbook Pose Photo
- Review the Selected Yearbook Pose Photo
What does your Account look like?
Original Photos Page: Enable the Yearbook Pose Feature in a Specific Gallery
Before clients can choose their yearbook photo, the feature must first be enabled in the Gallery.
- Go to the Photos page of your account.
- Find the Gallery in the Organizer, and then click on the Gallery to select it.
- Scroll down to the bottom of Toolbox column and check the box for Enable for gallery in the Yearbook Pose section.
When enabled for a group, the yearbook pose feature will be automatically enabled for all of the galleries within the group.
Send Yearbook Pose Invitation Emails to Your Clients
After enabling the Yearbook Pose feature, you'll need to email your clients to let them know that the images are available for viewing in your site and that they can now choose their yearbook photo. Also by sending your client the invitation to choose their yearbook pose photo, it adds their email address to a list of clients that are allowed to choose a yearbook pose photo.
Please note that it is important to send your client the yearbook post invitation email as they will not be able to select a yearbook pose otherwise.
If you have not already imported your clients' contact information into your Contact List, we recommend doing so as it will allow you to easily find their email addresses when sending emails from your Zenfolio account. Click HERE to learn how to import contacts into your Contacts List.
Sending the Email Using the Event Invite Feature
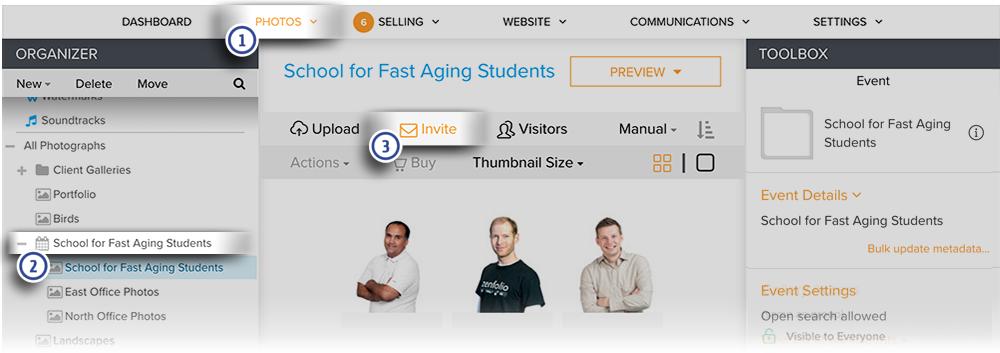
- Go to the Photos page of your account.
- Find the Event in the Organizer and then click on it.
- Click Invite in the toolbar above the main window.

Composing the Event Invite Email
- In the Email Template drop down menu, select Yearbook Pose Event Invite. Choosing this template adds the client to the list of clients that can choose a yearbook post photo.
- Enter the clients' email addresses into the To field.
- Edit the email message as desired.
- Click Continue to Preview to view the email.
Review the email then click Send when it's ready.
You can edit the contents of the default Yearbook Pose Email Templates. Click HERE for more information.
Inviting Directly to a Gallery
Sending the Email Using the Gallery Invite Feature
- Go to the Photos page of your account.
- Find the Gallery in the Organizer and then click on it.
- Click Invite in the toolbar above the main window.

Composing the Gallery Invite Email
- In the Email Template drop down menu, select Yearbook Pose Gallery Invite. Choosing this template adds the client to the list of clients that can choose a yearbook post photo.
- Enter the clients' email addresses into the To field.
- Edit the email message as desired. Make sure to include the password if the gallery has been locked with a password.
- Click Continue to Preview to view the email.

Review the email then click Send when it's ready.
You can edit the contents of the default Yearbook Pose Email Templates. Click HERE for more information.
Client Selects Their Yearbook Pose Photo
The client can select their yearbook pose photo through your website.
Selecting the Yearbook Pose Photo from the Gallery Thumbnails Page
Hover the mouse pointer over the desired image then click on the Yearbook Post icon ![]()
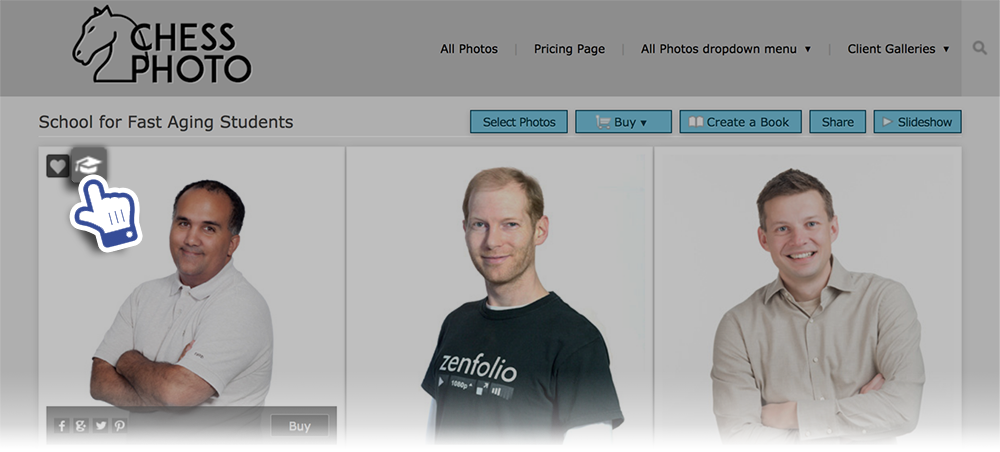
If the client is already logged in to their account in your site, then the photo will be selected as their Yearbook Pose photo. If they have not logged in to their account, the site will prompt them to log in to their account or create a new account. If you have not sent them a yearbook pose invitation email, they will not be able to select a yearbook post photo.
Selecting the Yearbook Pose Photo from the Gallery Photos Page
Hover the mouse pointer over the image and then click on the Yearbook Pose icon ![]() in the top right corner.
in the top right corner.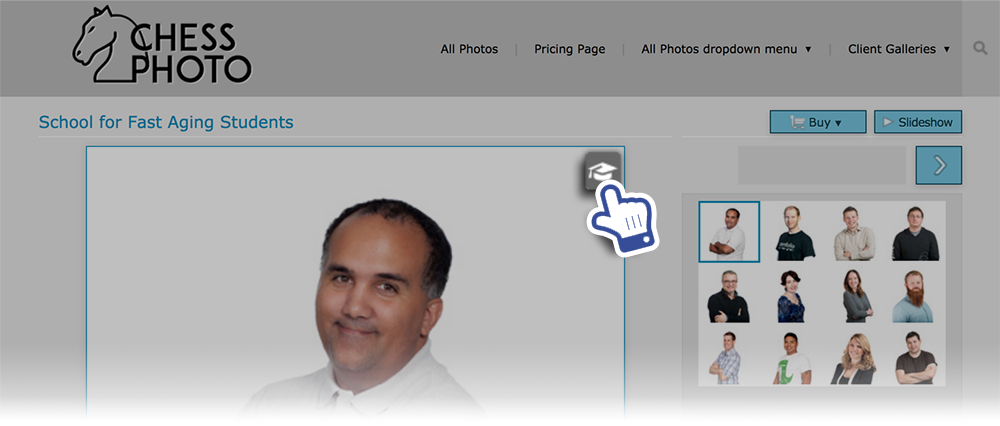
The client will need to be logged in to their account to select the photo. If they have not logged in to their account, the site will prompt them to log in to their account or create a new account. If you have not sent them a yearbook pose invitation email, they will not be able to select a yearbook post photo.
Selecting the Yearbook Pose Photo from the Quick Shop Page
To select an image as the Yearbook Pose photo from the Quick Shop page, click on the Yearbook Pose icon ![]() in the top of the page.
in the top of the page.
The client will need to be logged in to their account to select the photo. If they have not logged in to their account, the site will prompt them to log in to their account or create a new account. If you have not sent them a yearbook pose invitation email, they will not be able to select a yearbook post photo.
Selecting the Yearbook Pose Photo from the Events Search Results Page
Click on the desired image. That will direct you to the photo's Quick Shop page.
In the Quick Shop page, click the Yearbook Pose icon ![]() in the top of the page.
in the top of the page.
The client will need to be logged in to their account to select the photo. If they have not logged in to their account, the site will prompt them to log in to their account or create a new account. If you have not sent them a yearbook pose invitation email, they will not be able to select a yearbook post photo.
Instruction for your Clients
We've created a page that can show your clients how to select the Yearbook Pose photo. Click HERE to go to that page.
Feel free to send your clients to that page to show them how to select their photo.
Review the Selected Yearbook Photos
The Yearbook Pose page in the Dashboard will display a list of all contacts that have been emailed to select their Yearbook Pose. This page can be accessed under the Photos page of your account.
The list is split into two sections:
- Selected Yearbook Pose: shows a list of clients that have selected their Yearbook Pose photos.
- Pending Yearbook Pose: shows a list of clients that have been invited to select their Yearbook Pose photos but have not yet made their selection.

Sending Reminders
You can quickly send an email to clients who have not yet selected their Yearbook Pose photo.
- In the Pending Yearbook Pose section, check the box next to From to select all of the clients in the Pending Yearbook Pose section.
- Click the Message button.
- Make sure that the Yearbook Pose Reminder email template is selected or choose your own custom Yearbook Pose Reminder email template.
- Edit the body of the email as needed.
- Click Continue to Preview to view the email.
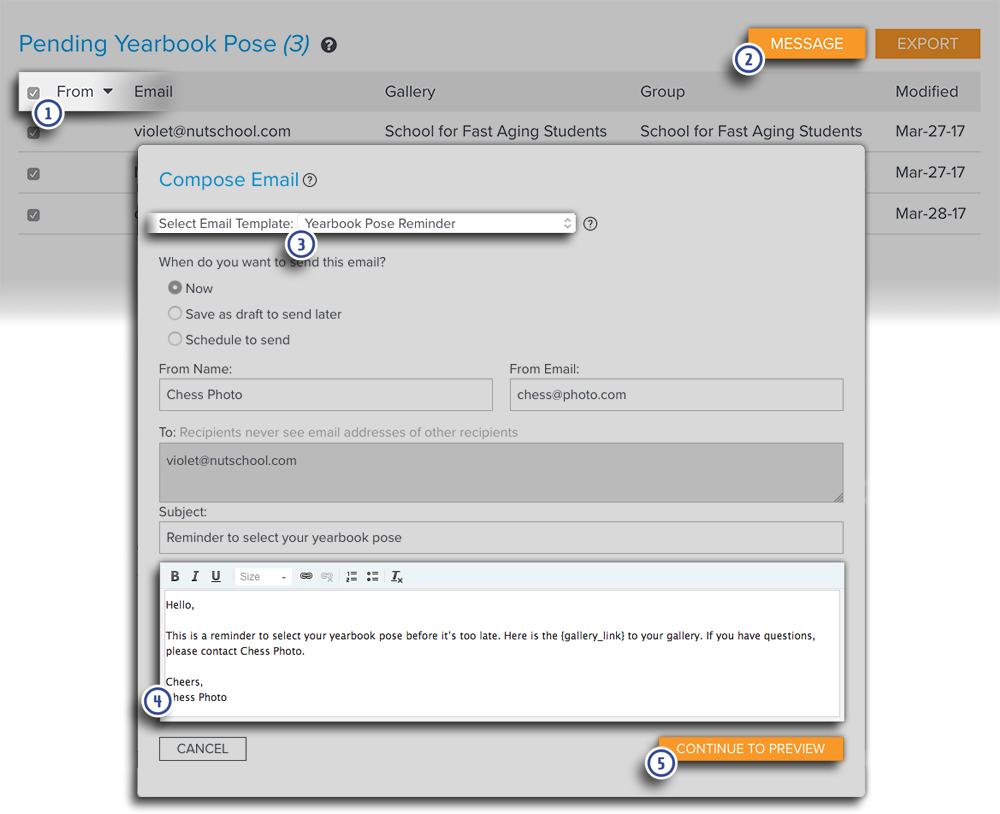
Review the email and then click Send when it's ready.
You can edit the contents of the default Yearbook Pose Reminder Email Templates. Click HERE for more information.
Exporting the Selected Yearbook Pose Photos
Once the clients have selected their photos, you can create a list of those clients and their selected photos.
- In the Selected Yearbook Pose section, check the box next to From to select all of the clients that have selected their Yearbook Post photo.
- Click the Export button.
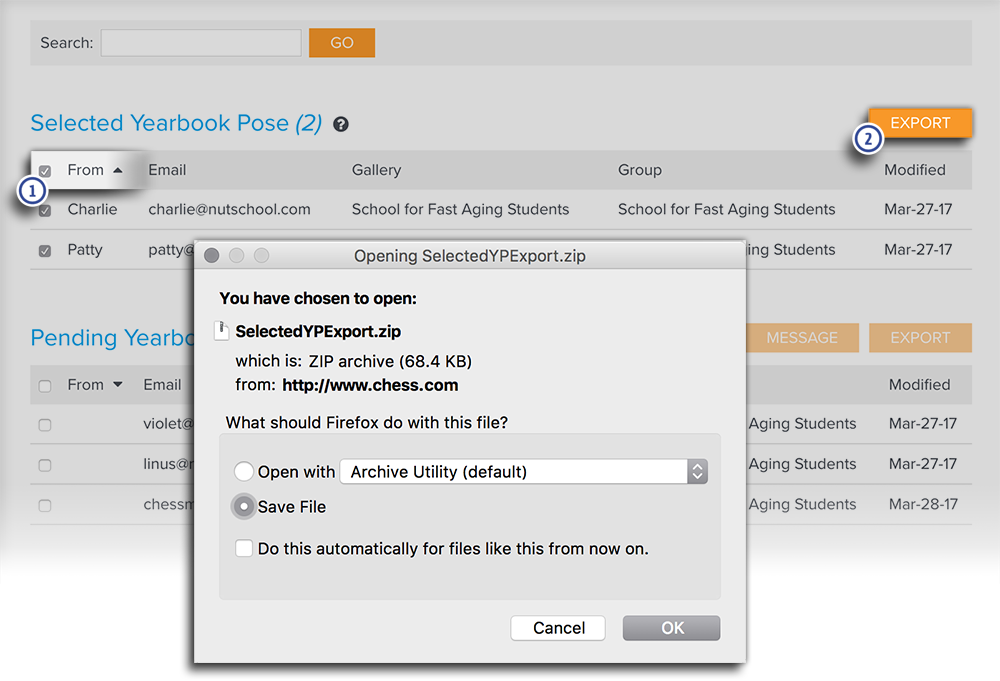
A zip file will then be saved to your computer. It will contain a CSV file with a list of the clients, their email address, the filenames of their selected photos, and their gallery info. The zip file will also contain a medium sized copy of the images that the clients have selected as their Yearbook Post photo (this is used to help designate which image the client has selected).
When exporting the list from an event with many clients and photos, the zip file can be quite large as it will contain copies of all of the selected photos. In these cases, the download may take a while depending on the quality of the connection between the browser and Zenfolio's servers.
Automatic Tagging of Selected Yearbook Photos
Photos that have been selected by the clients as their Yearbook Pose photo will be tagged in the gallery. The words Yearbook Pose will be added to the keywords of the images that have been selected.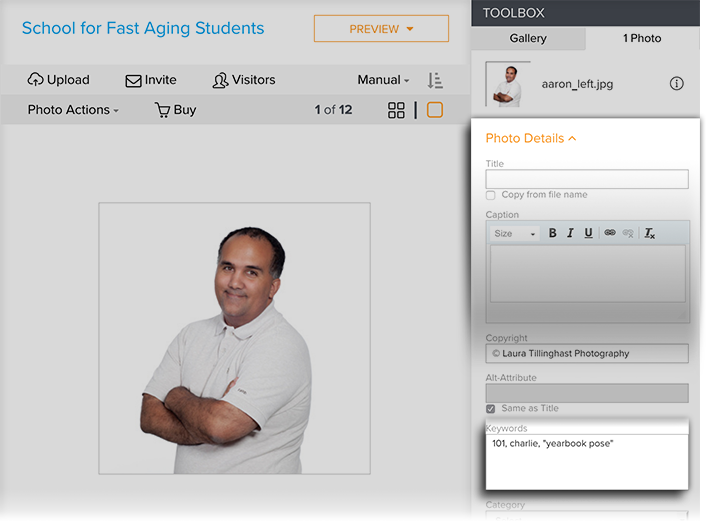
Click HERE to learn how to find an image's keywords.
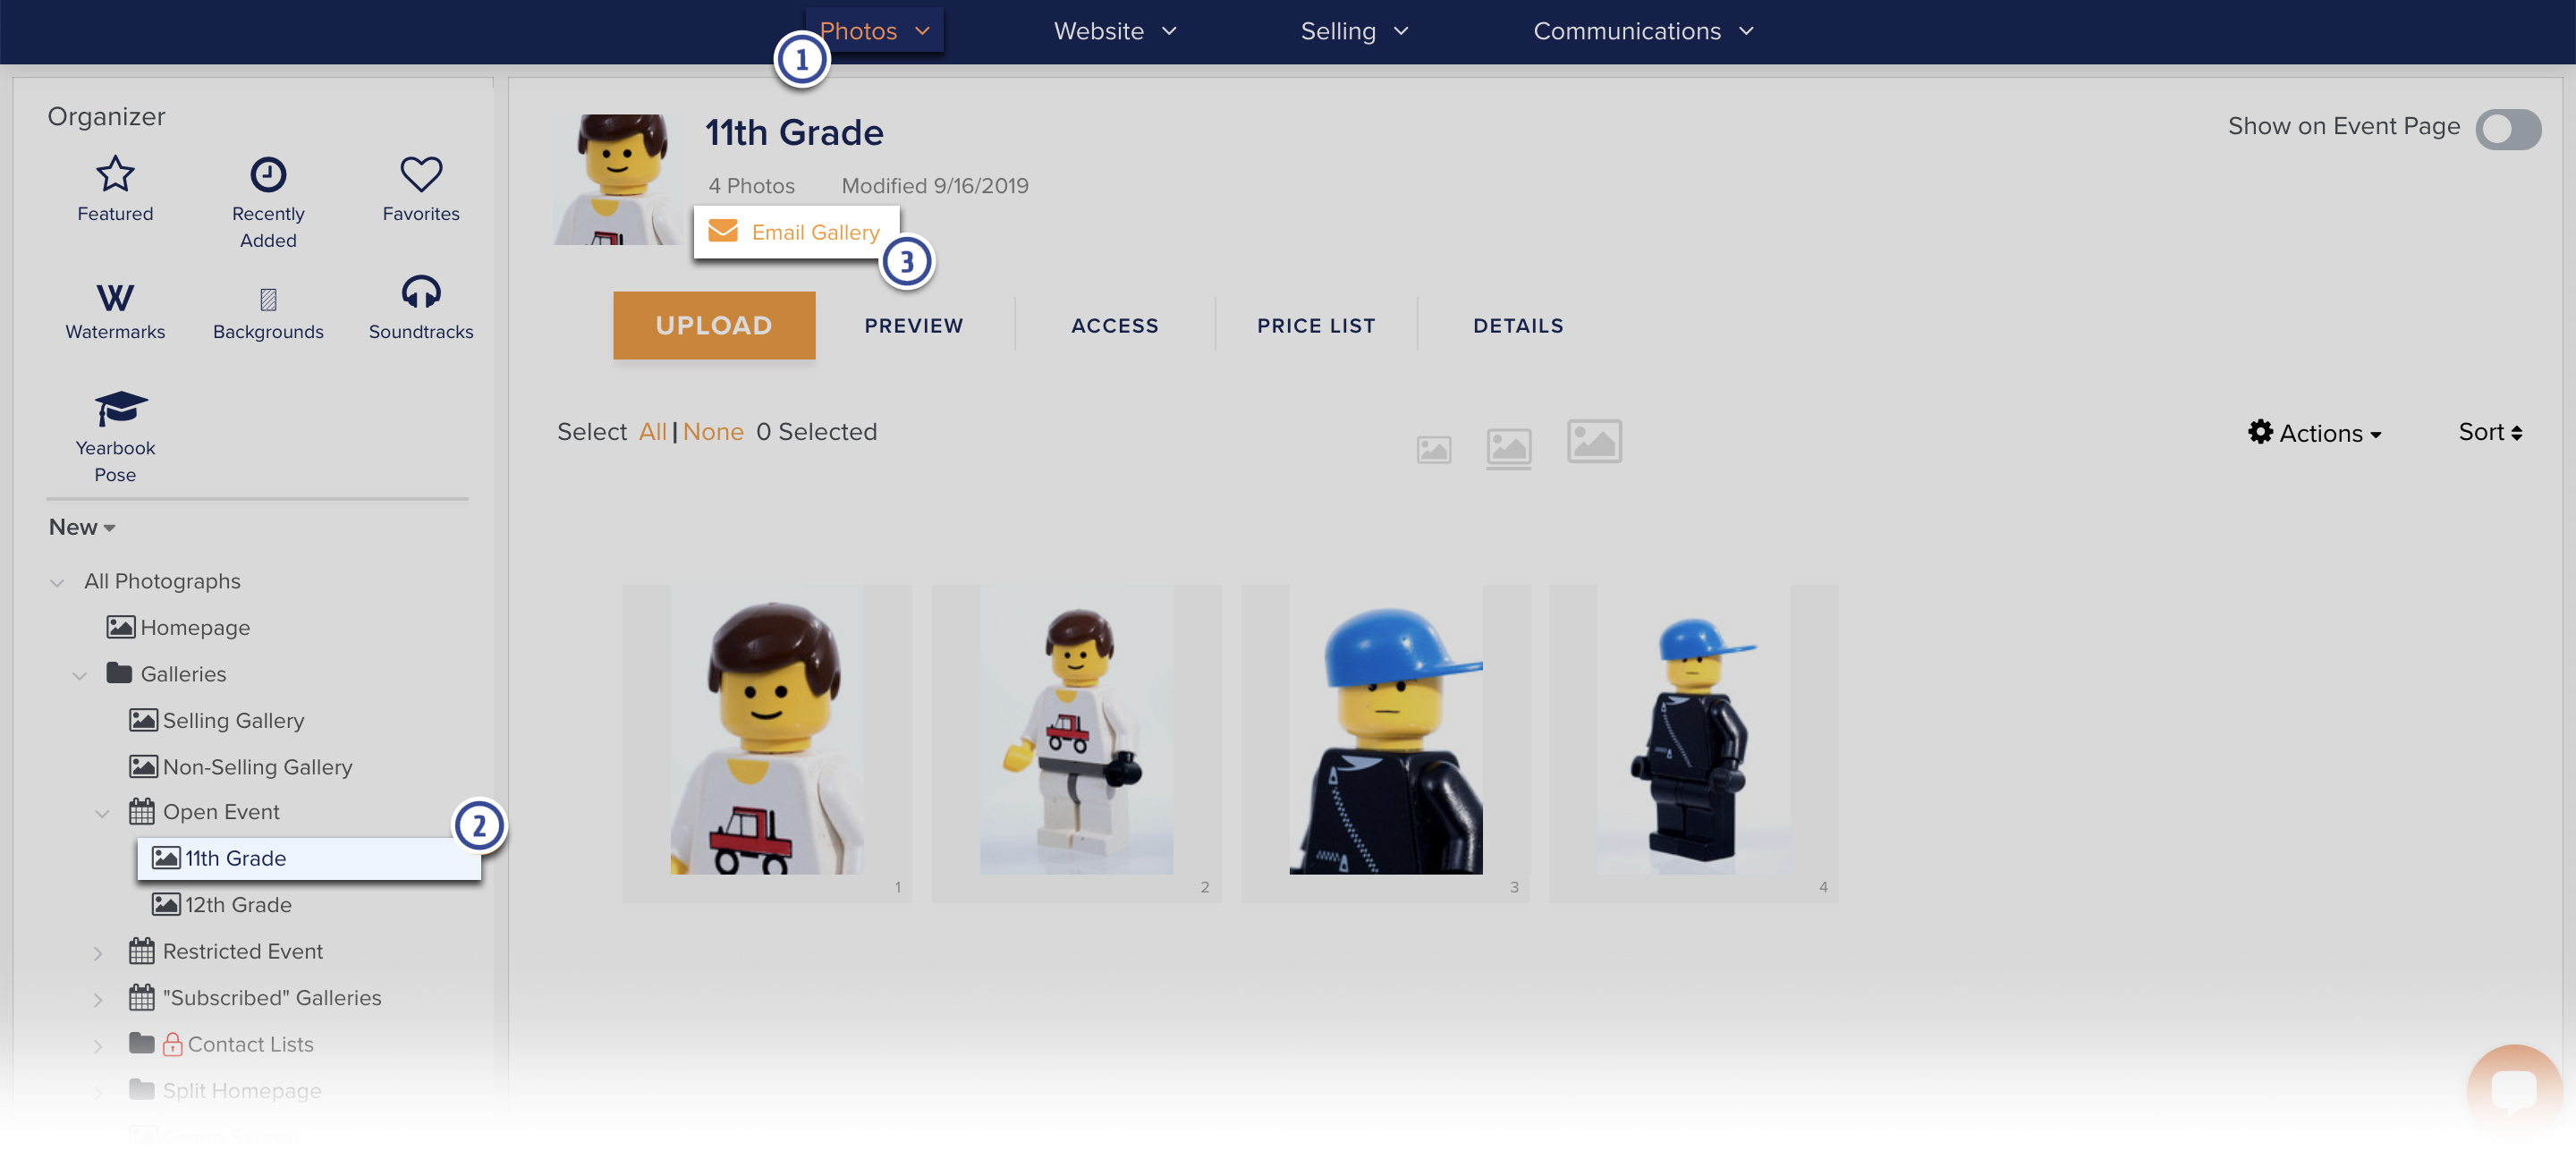
Enable the Yearbook Pose Feature in a Specific Gallery in the New Photos Page
Before clients can choose their yearbook photo, the feature must first be enabled in the Gallery.
- Go to the Photos page in your account
- Find the Gallery in the Organizer, and then click on the Gallery to select it.
- Click on Access. The Access Settings window will appear
- Choose the Yearbook Pose tab
- Uncheck the Sync all settings with Group option if needed
- Check the box to Enable for Gallery
- Click Save
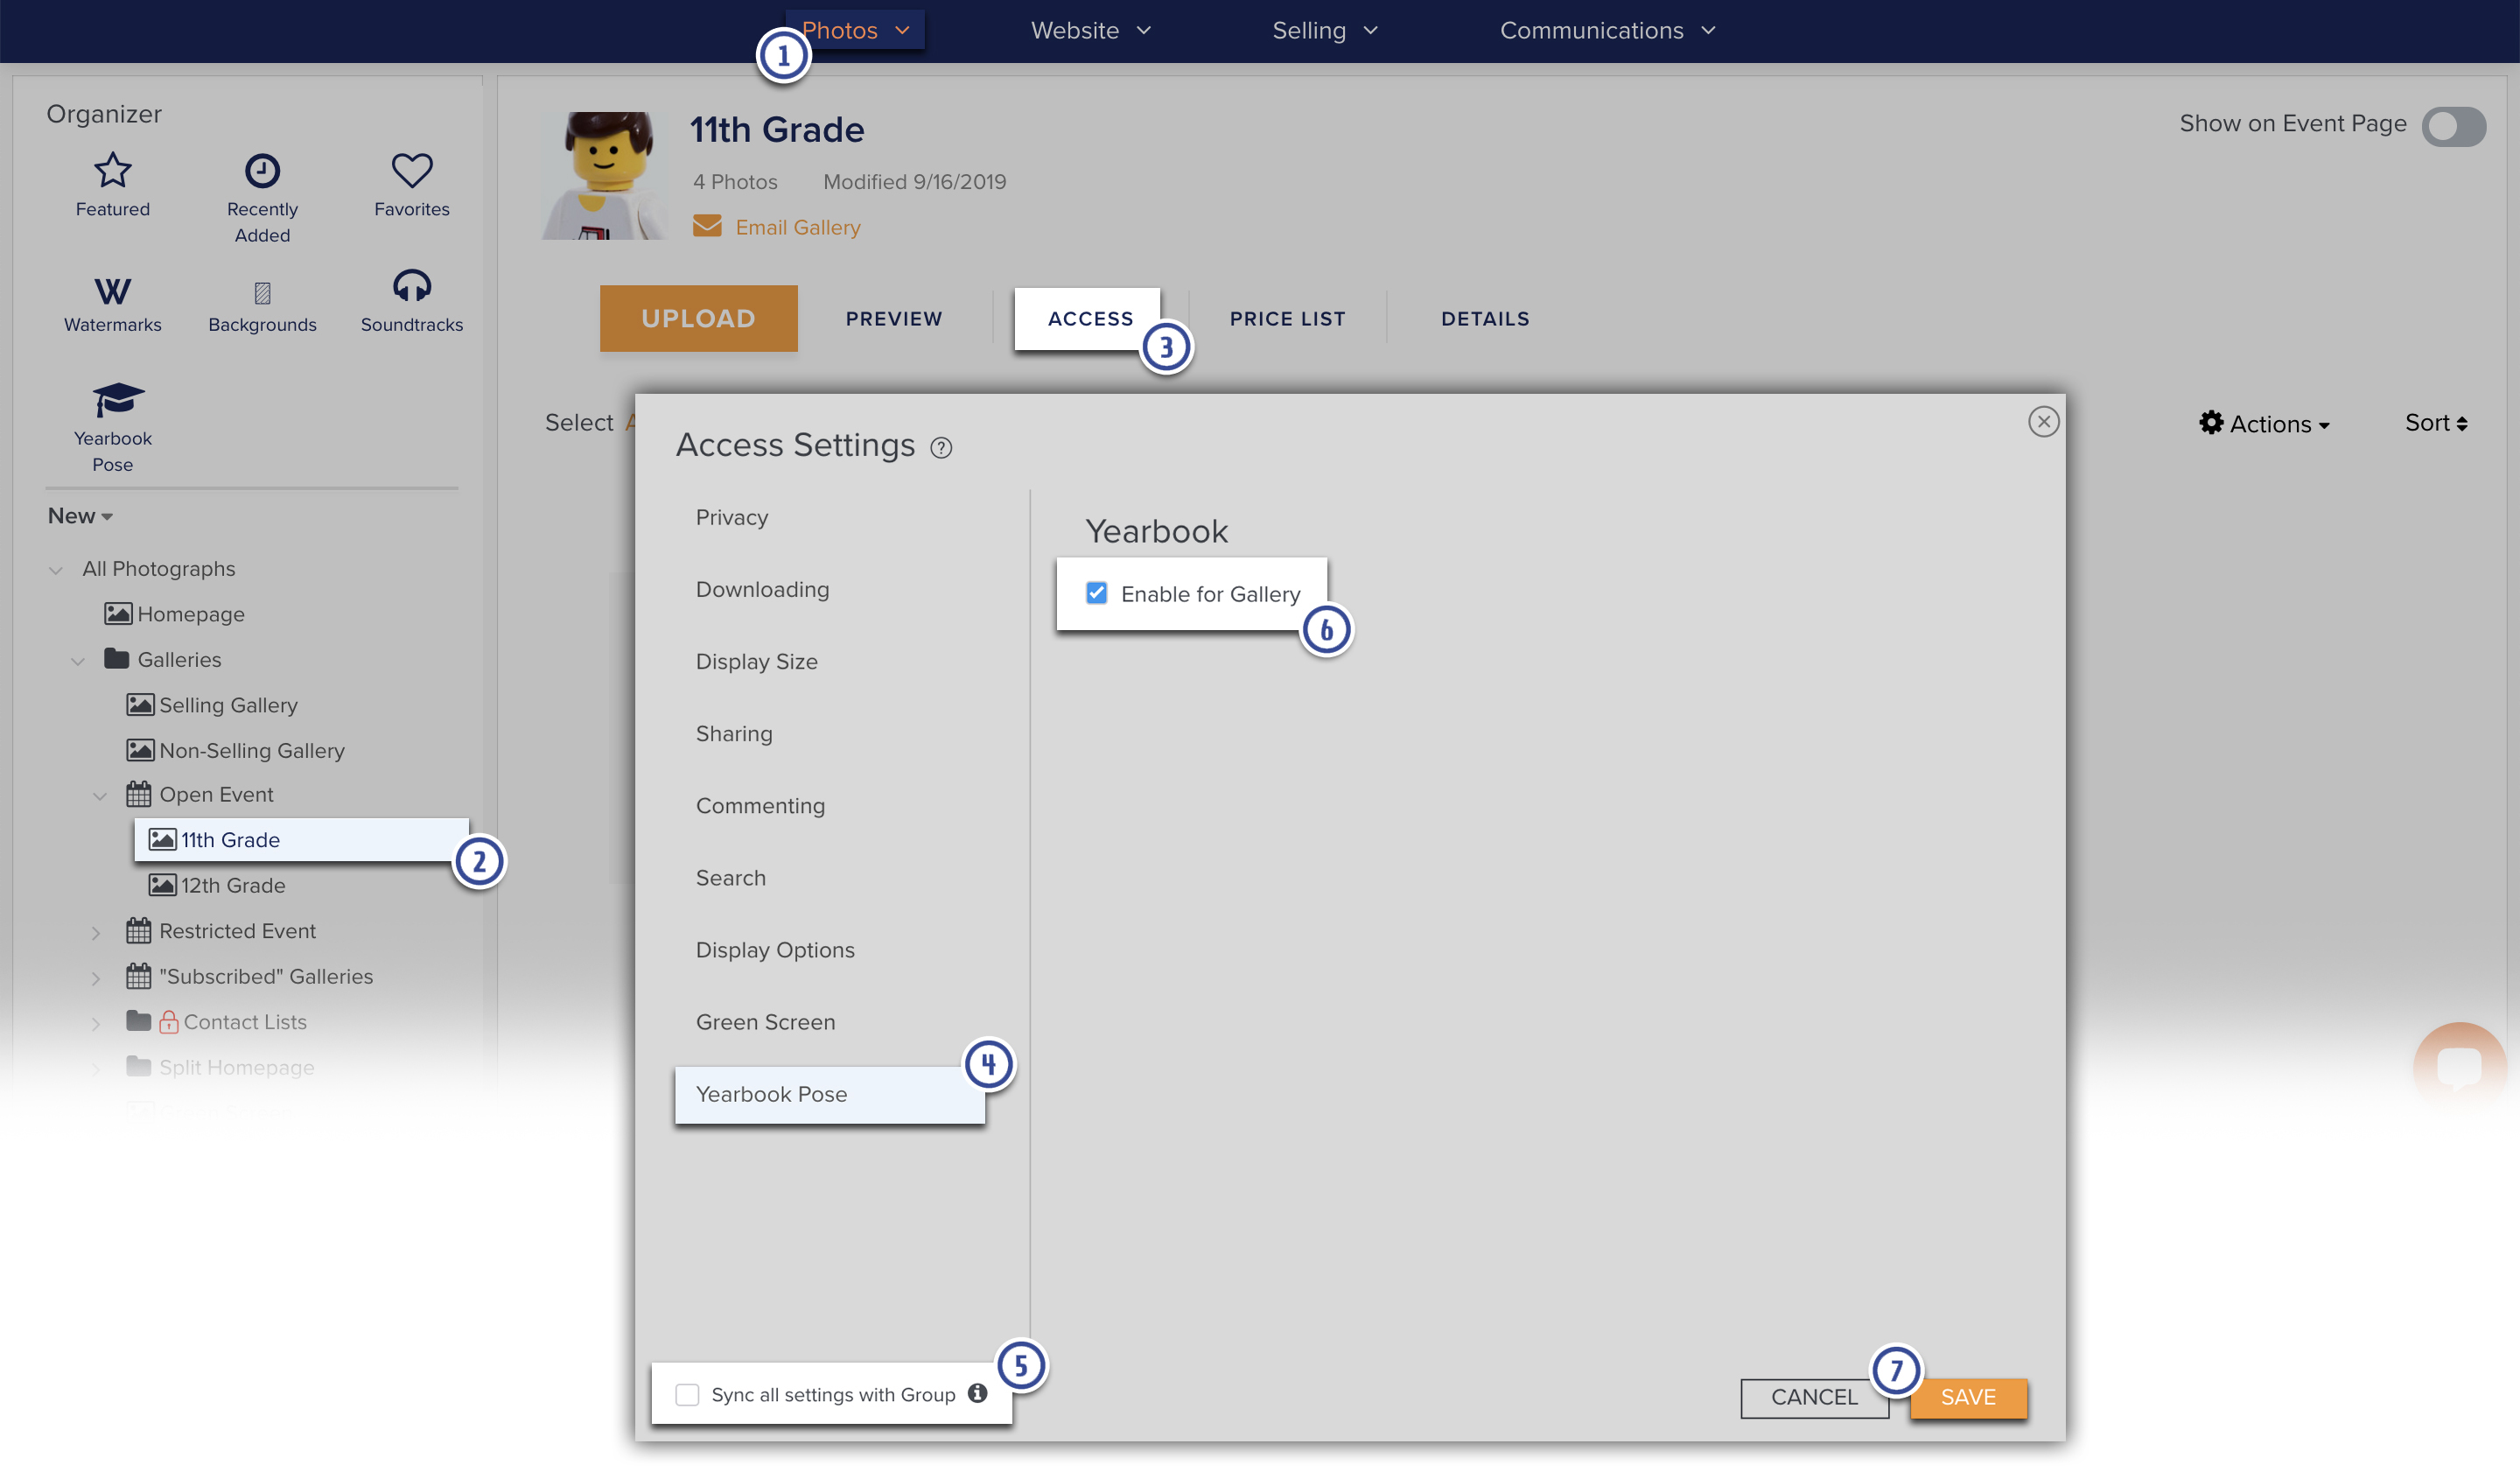
When enabled for a group, the yearbook pose feature will be automatically enabled for all of the galleries within the group.
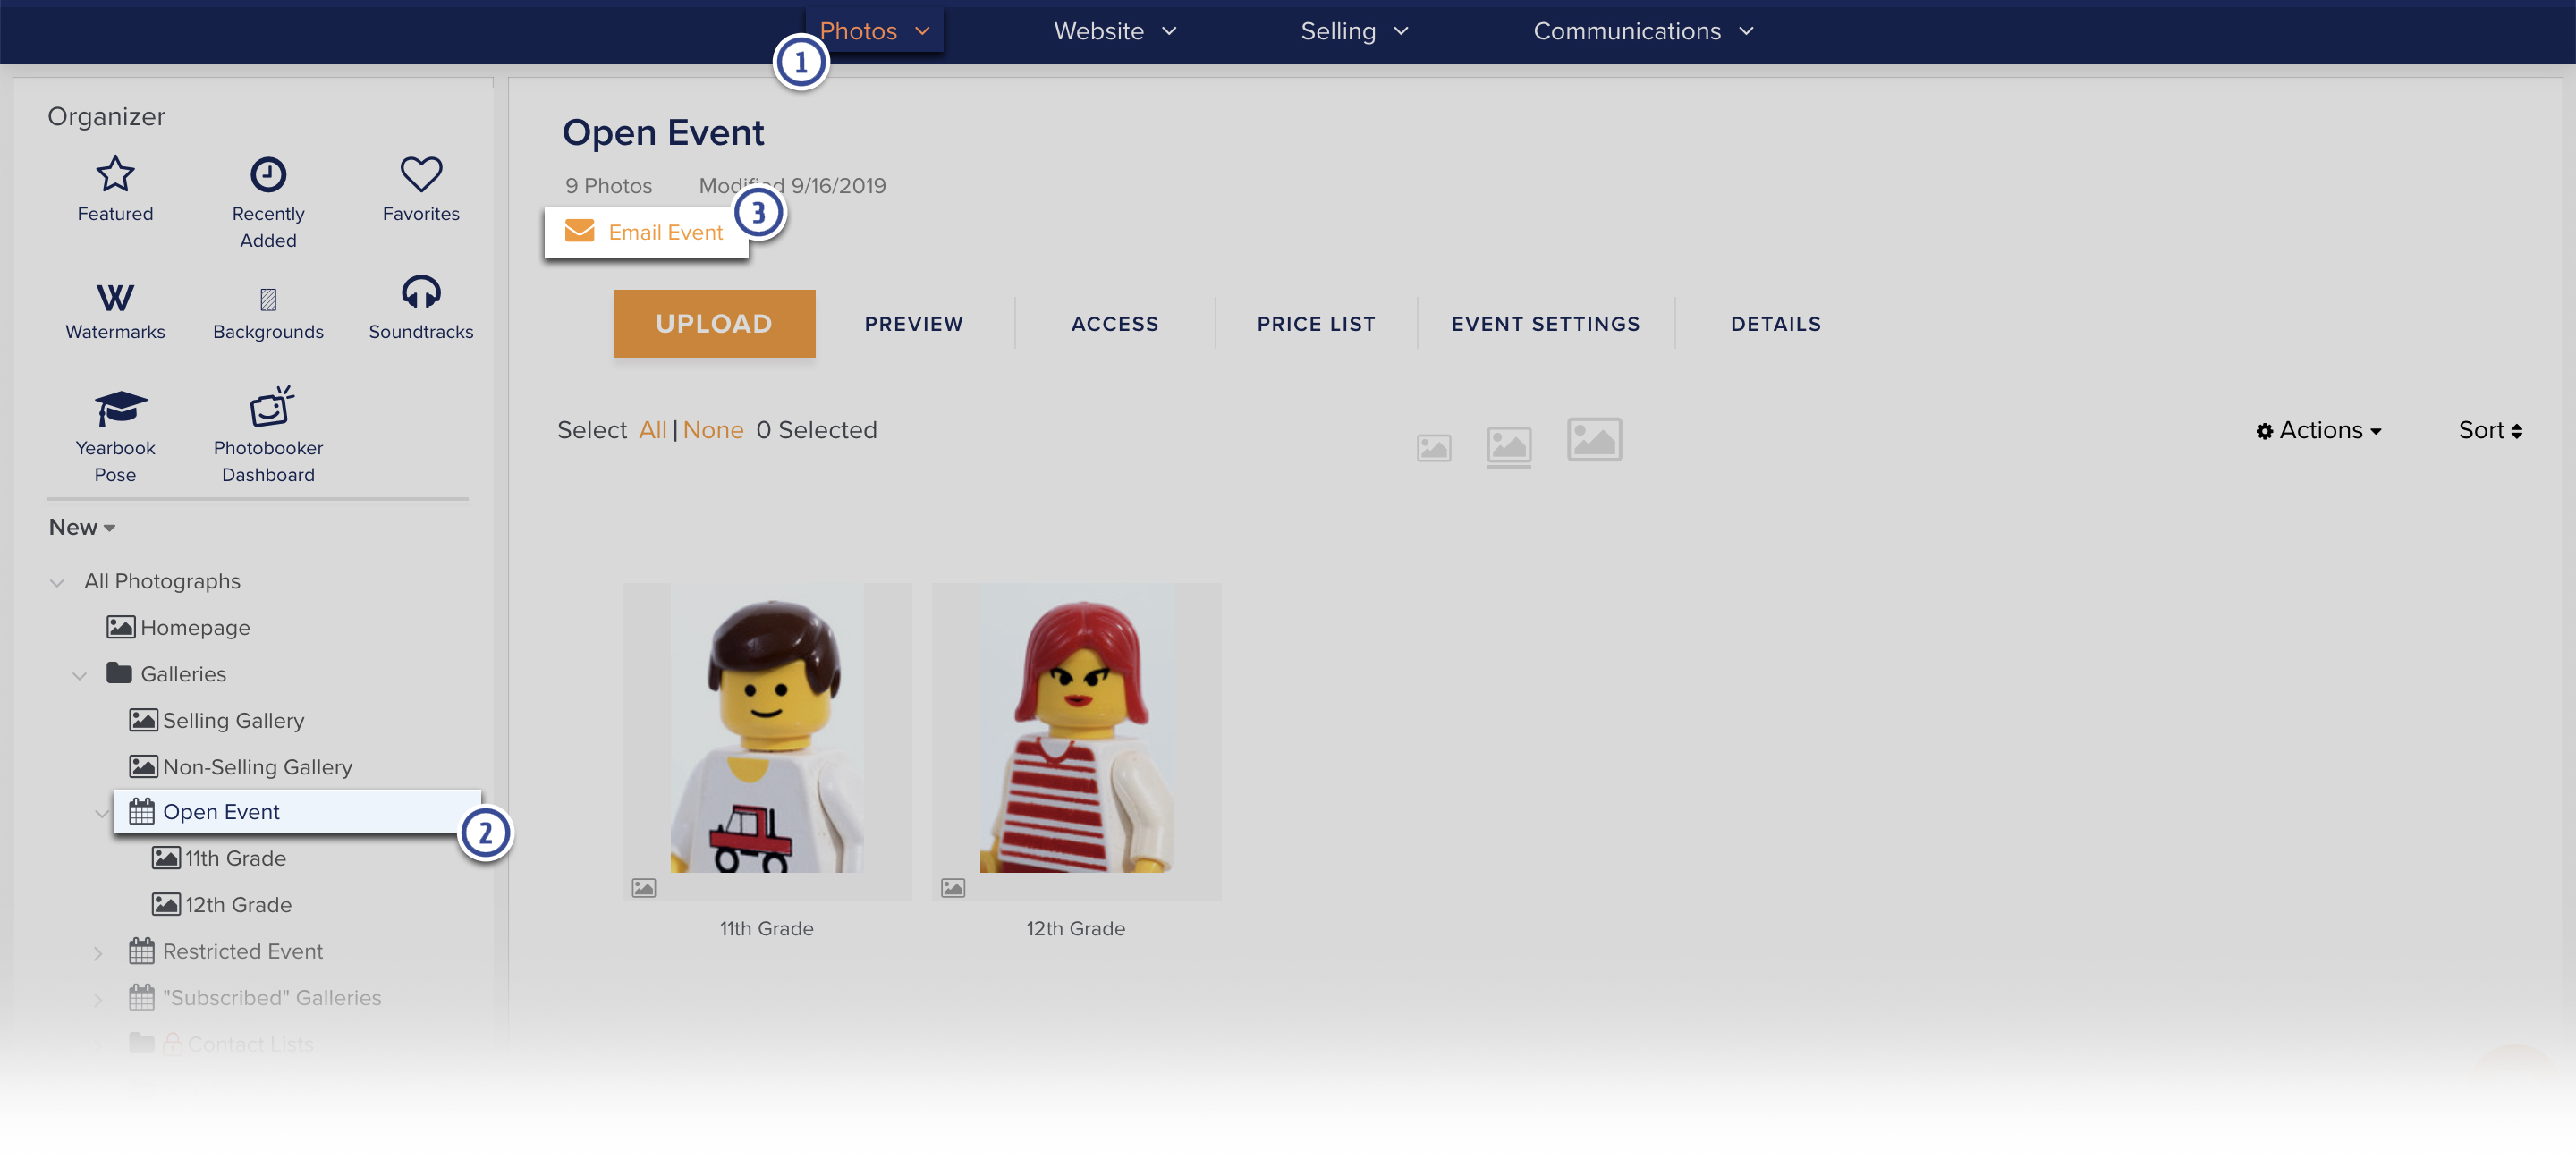
Send Yearbook Pose Invitation Emails to Your Clients in the New Photos Page
After enabling the Yearbook Pose feature, you'll need to email your clients to let them know that the images are available for viewing in your site and that they can now choose their yearbook photo. Also by sending your client the invitation to choose their yearbook pose photo, it adds their email address to a list of clients that are allowed to choose a yearbook pose photo.
Please note that it is important to send your client the yearbook post invitation email as they will not be able to select a yearbook pose otherwise.
If you have not already imported your clients' contact information into your Contact List, we recommend doing so as it will allow you to easily find their email addresses when sending emails from your Zenfolio account. Click HERE to learn how to import contacts into your Contacts List.
Sending the Email Using the Event Invite Feature
- Go to the Photos page in your account
- Find the Event in the Organizer and then click on it.
- Click Email Event
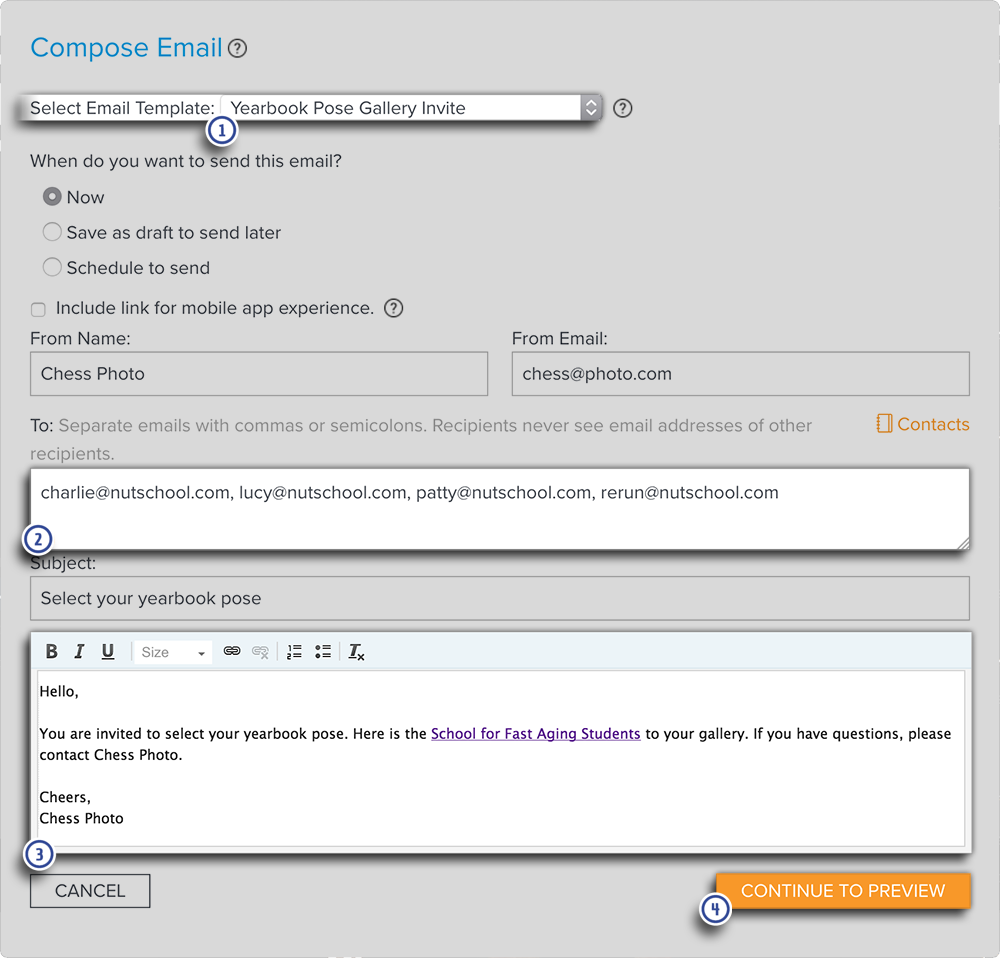
Composing the Event Invite Email
- In the Email Template drop down menu, select Yearbook Pose Event Invite. Choosing this template adds the client to the list of clients that can choose a yearbook post photo.
- Enter the clients' email addresses into the To field.
- Edit the email message as desired.
- Click Continue to Preview to view the email.

Review the email then click Send when it's ready.
You can edit the contents of the default Yearbook Pose Email Templates. Click HERE for more information.
Inviting Directly to a Gallery
Sending the Email Using the Gallery Invite Feature
- Go to the Photos page in your account
- Find the Gallery in the Organizer and then click on it.
- Click Email Gallery
Composing the Gallery Invite Email
- In the Email Template drop down menu, select Yearbook Pose Gallery Invite. Choosing this template adds the client to the list of clients that can choose a yearbook post photo.
- Enter the clients' email addresses into the To field.
- Edit the email message as desired. Make sure to include the password if the gallery has been locked with a password.
- Click Continue to Preview to view the email.
Review the email then click Send when it's ready.
You can edit the contents of the default Yearbook Pose Email Templates. Click HERE for more information.
Click HERE to see how a client will select their Yearbook Pose photo