The Pre-Order feature is available exclusively for those subscribed to the US/UK/AU/CA selling plans. Interested in some one-on-one guidance? Schedule a session to learn more and get Pre-Order setup on your site.
You can collect payment for Pre-Order Packages (also known as Pre-pay Packages or Pre-sale Packages) using your Zenfolio account.
You can do this by providing your clients with a page where they can pay for their desired Pre-Order packages. If you’d like, you can also offer add-ons (such as retouching) for sale in addition to the packages.
It’s good to note that by default, your site's Header logo will be displayed on the Pre-Order page, as well as on the order confirmation page. If you’d like, you can upload a different logo for specific use on those pages.
How it Works
- You create the pre-pay page with the Pre-Order packages that you would like to offer for sale.
- Send the Pre-Order page link to your clients.
- Your clients order their desired Pre-Order packages from the pre-pay page. The profits from the sale will then be added to your Zenfolio account balance.
- When it is time to fulfill the order, you place the order for the products requested, and then send the orders to the clients.
In order to use the Pre-Order feature, you’ll need to know how to first create a Pre-Order package. For those selling products in the US, using our integrated partner vendors, see this guide for more information about Automatic Vendor Pre-Order Fulfillment.
Creating a Pre-Order Package
- Log into your account, and then click Selling in the menu across the top.
- Click on Pre-Order. Alternatively, click HERE to go to that page.
- Click Create a New Pre-Order.
- Enter the Title for the Pre-Order page. This will be displayed to your clients.
- Choose the Currency you would like to apply to this Pre-Order.
- Upload a small (300 X 200 pixel) image to use to represent the Pre-Order package. This is optional.
- Enter the Title for the Pre-Order package that you would like to offer for sale.
- Enter a description for the Pre-Order package.
- Enter the Price that you would like to charge for the Pre-Order package. Make sure to factor in the cost of shipping the package.
- List the products that are to be included with each package. Click ⊕ Add a product to add more products.
- Click Add Packages to offer more Pre-Order packages for sale.
Optional: Add Customizable Packages to Pre-Orders
With customizable packages, you can offer packages for sale through the Pre-Orders page where clients can choose which products they would like included with their Pre-Order.
- Upload a small (300 X 200 pixel) image to use to represent the Pre-Order package. This is optional.
- Enter the name of the customizable package.
- Enter a description for the customizable package.
- Set the price that you would like to charge for the customizable package.
- List the products options that you would like to offer with this customizable package. Click ⊕ Add a Product to add more product options.
- Click Add Customizable Packages to add more Customizable Packages to the Pre-Order page.
Optional: Provide Add-ons options to the Pre-Order Packages.
Create any desired add-ons that you would like to offer for sale along with the packages. It’s not possible to create an add-on without first creating at least one Pre-Order package.
- Upload a small (300 X 200 pixel) image to use to represent the Add-on. This is optional.
- Enter the name of the Add-on.
- Enter a description for the Add-on.
- Set the price that you would like to charge for the Add-on.
- Click Add Product to add more Add-on options.
Click  when you're ready to proceed.
Collecting Customer Information
In the Customer Info section, you can create fields that your clients will need to fill out when they order their Pre-Order package. This feature will allow you to collect important information for the order, like the client's name, session name, student name, student number, school name, etc.
- Enter the title for the information that you would like to request from the client.
- Toggle the
drop down menu icon to provide a drop down menu that provides the clients with preset options to choose from.
- Enter the drop down options in the field provided. Separate each option with a comma.
- Enter any other requested info in the fields provided.
- Click X to the right of any unwanted customer question fields to remove them.
- Click Add Customer Info to add more fields to the page.
Click when you're ready to proceed. Note that you can return to this page anytime to edit the Pre-Order packages and add-ons.
Adjusting Additional Functionality of Pre-Orders
Image Selection
One of the mysteries of allowing client's to pre-order products before their images are ready to view is what images the client will want to use for the products they've ordered. To allow clients to select the images for their pre-ordered product, choose the YES option, in the Client Image Selection section.
Once you have uploaded the images related to a pre-order, you will need to invite the clients to select images for their pre-orders. See this guide here for more information about client image selection. Note: Vendor Fulfilled Pre-orders require client image selection.
Pre-Order Custom Message
If you'd like to add an additional message for the client's that will be viewing and place pre-orders, you can use this option to add a custom message at the top of the Pre-Order page – up to 500 character allowed.
Get the Sharing Link
If you're ready to provide the Pre-order to your clients, so that they can begin placing their pre-orders, or if you'd just like to take a look at what the page looks like, you can go ahead and copy the pre-order page link here.
When you Preview the Pre-Order page, you may notice that you prefer a different logo than what’s showing (your Header logo, by default). Click HERE to learn how to upload a custom logo for display specifically in Pre-order pages.
Setting Expiration Date
In many cases, a Pre-order page may need to be available only for a short amount of time. Once you've uploaded images to your Galleries, clients can just purchase products through the Gallery itself. If you'd like to set an expiration date for the pre-order page, you can do that here. After the expiration date is reached, you will still be able to access the page but your visitors will not be able to do so.
Pre-Order Auto Approval
For all orders, across the site, it is recommended that you manually approve your orders so that you have the opportunity to double check the client orders for any incorrect cropping, product selection, etc.
For Pre-orders, you can choose whether or not you want the orders to be automatically approved. For pre-orders that are being self-fulfilled, this is not so much a necessity as you will be manually fulfilling the orders after they're place. However, if you're going to allow for automatic vendor fulfillment, it is recommended that you disable auto approval so that you can make sure that client's have placed their orders correctly.
Selecting Shipping Options
Whether you're going to have clients pickup their orders, have a school hand out the orders, or have the orders delivered directly to the clients; you will want to choose what kind of shipping option will be used for the pre-orders placed through this page. The shipping information will also determine how Sale Tax is calculated, if you're collecting Sale Tax.
Note: If you're self-fulfilling pre-orders, you will need to factor the cost of shipping into the cost of your packages. There is not currently a way to set up shipping options/amounts for the client to choose from.
No Custom Shipping - For self-fulfilled pre-orders, if you're wanting to collect shipping information from your client, you will need to choose this option. For vendor fulfilled pre-orders, the lab's default shipping options and prices will be provided to the client.
Ship to Me - This option is not available to select when self-fulfilling products. For vendor fulfilled pre-order products, you can choose to have the products shipped to you, instead of the products being shipped to the client. When choosing this option, you will need to provide your shipping address and you can add a custom message to let clients know that the order will be shipped to you. The client will still provide their shipping address, but the order will be delivered to you.
No Shipping - This option cannot be selected if there's at least one vendor fulfilled product int he pre-order offerings. For self-fulfilled pre-orders, if you do not need to collect any shipping information from the client's you can choose this option. Even though no shipping information will be collected from the client, you will still need to provide your shipping address so that Sales Tax can be calculated properly, if you're collecting Sales Tax.
Be sure to click on the DONE button once you've completed setting up your Pre-Order page.
How To Collect Sales Tax With Pre-orders.
Just like selling vendor fulfilled products, or self-fulfilled products, through your Galleries, you can collect Sales Tax on Pre-orders.
To set this up, go into the Sales Tax page of your Zenfolio account, HERE.
- In your Zenfolio account, hover your mouse pointer over your username in the top right corner.
- Click on Account from the dropdown menu.
- On the far left side of the Account Information page, click on Selling.
- Choose the Sales Tax option on the left side.
- Here, if you have not already chosen to collect tax, check the box to collect tax.
- Then choose the location from which you want to collect tax.
See this guide for more information about collecting sales tax.
The collection of Sales Tax is determined by the type of product being sold through Pre-order. If you're selling Self-Fulfilled products in your Pre-orders, then you'll want to check the option to collect sales tax for Self-Fulfilled orders. If you're selling Vendor fulfilled products in your Pre-orders, you'll want to check the option to collect sales tax for Vendor products.
The Sales tax amount will then be calculated according the the locations chosen to collect sales tax.
While we are able to help show you how to collect Sales Tax, we are not able to provide assistance on other tax related questions. For details and more information regarding which locations you should collect sales tax, if you need to collect sales tax, and how to report the collected sales tax; it is best to contact a tax professional.
Ordering from the Pre-order Packages Page
Once your clients receive the URL to the Pre-order packages page, they will be able to place their orders on that page by clicking the 
Once they have made their selections, they should click CHECK OUT to start the checkout process.
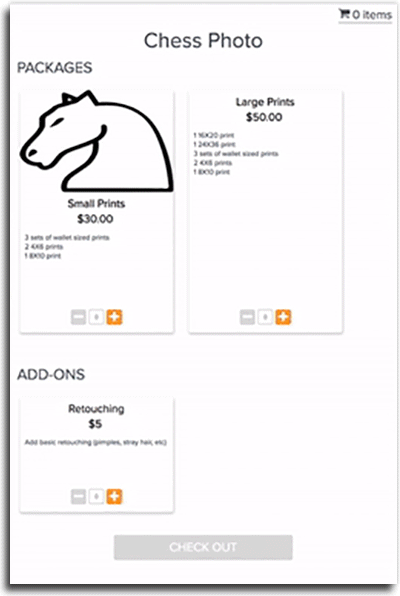
Please note that it’s not possible to purchase an add-on without purchasing at least one pre-order package.
The checkout process is an easy, one-page process. To check out, the client will only need to:
- Review the pre-order packages and add-ons that are being ordered.
- Submit the Customer Info requested by the photographer.
- Enter their payment info and their billing address.
What do I need to do after the orders are placed?
After your clients have placed their pre-orders, you'll need to fulfill the orders; pre-orders are not fulfilled automatically like Partner Vendor Fulfilled product orders. This means that you'll need to fulfill the pre-orders through the lab of your choice, much like you would a self-fulfilled order. Keep this in mind when you are setting up your pre-order packages.
When fulfilling the pre-orders, you can use any lab you’d like (Zenfolio partner labs, or not). With that in mind, here are the most common methods to use for fulfilling pre-orders.
-
Use a Zenfolio partner lab (like Mpix, MpixPro powered by Miller's Lab, or Miller's) to fulfill each order and have the orders shipped directly to each client.
- For this option, you'll need to place a separate order for each client's pre-order through your Zenfolio account's Photos page.
- On the Shipping page, you can enter the client's shipping address so that the order can be shipped directly to the client.
- Do make sure to enter your own email address on that page as the receipt with the base lab prices will be sent to that email address. No receipts (with pricing) are included with the actual orders when they are shipped.
-
Use a Zenfolio partner lab to fulfill the pre-orders by placing one large order for all of the items pre-ordered by your clients.
- As with above, you can place the order within your account so that you are only charged for the base lab cost of each product.
- When ordered this way, all of the items from all of the orders will be shipped to your studio.
- You can then distribute the orders to your clients by allowing them to pick up their order from your studio or you can ship the orders to each client.
-
Place the order, or orders, though any other lab of your choice. As with the above options, you can choose to place separate orders for each client, or place one large order to be sent to your studio.
Where are the profits from the pre-order sales?
After the order is placed, your profits (minus the service fee) are deposited into your Zenfolio account. You can request a payout for those funds at anytime.
Pre-Order Tracking
You can find the records for the pre-orders made by your clients in your Sales Reports.
There, you will find a Pre-Order tab, where details from all pre-orders placed are displayed.
Click Export to export all of the data displayed into a CSV file.
Click HERE to go directly to the Pre-Orders tab in your Sales Reports.